
How do I manually configure Exchange Online Connectors and Transport Rules for the Sigsync Email Signature Service?
Sigsync offers both automatic and manual configuration options for Exchange Online connectors. Click here to view the steps for automatic configuration. To manually configure the Inbound and Outbound connectors, as well as the required Transport Rules, follow the steps below:
Manual Configuration Steps for Exchange Online Connectors and Transport Rules:
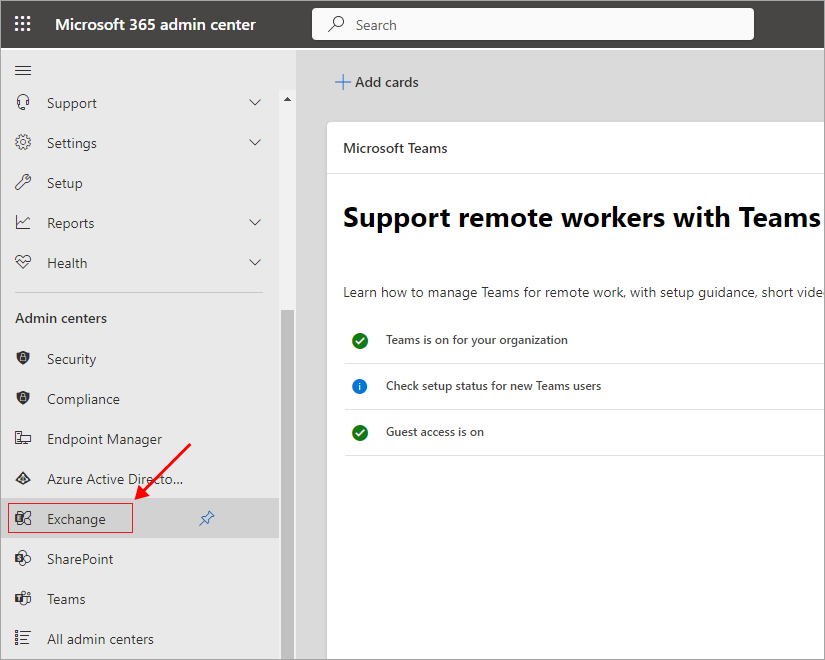
- Log in to your Office 365 Tenant admin center
- Click 'Show all' and navigate to 'Exchange' from the left pane
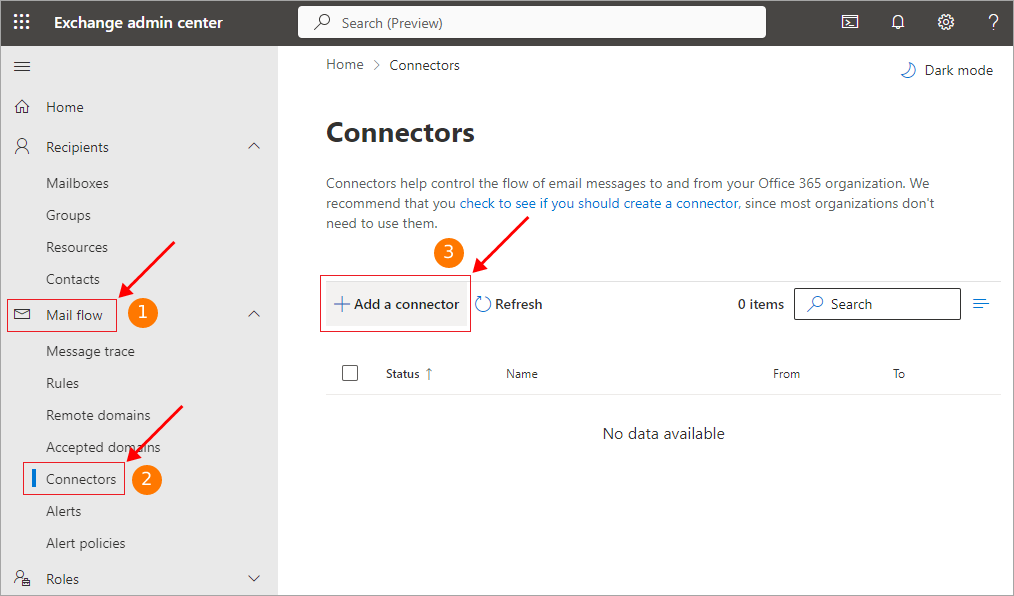
- Navigate to 'Mail flow' > 'Connectors' from the left side pane and click the '+ Add a connectors' button on the right side pane
Note: All value needs to be exact as given below to have no issues while verifying and functionality.
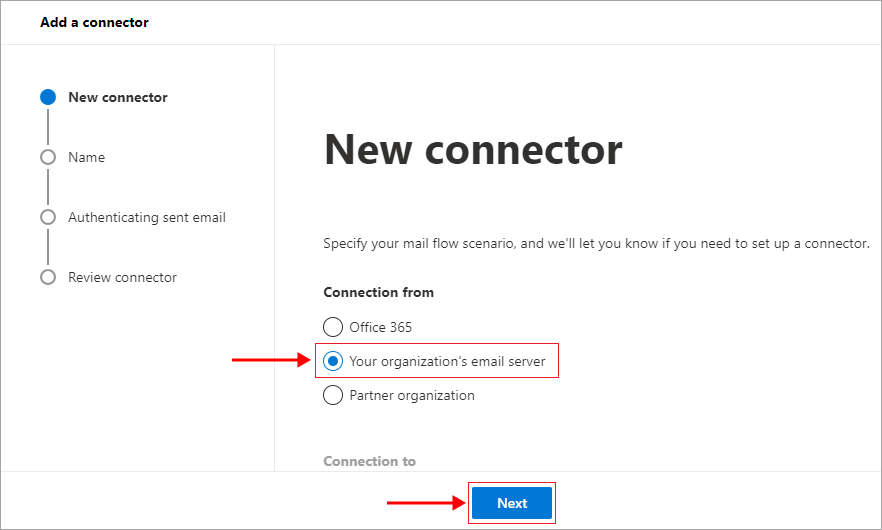
- In the 'Connection from' section, select 'Your organization's email server' option. The option in the 'Connection to' section gets automatically selected. Click the 'Next' button to proceed.
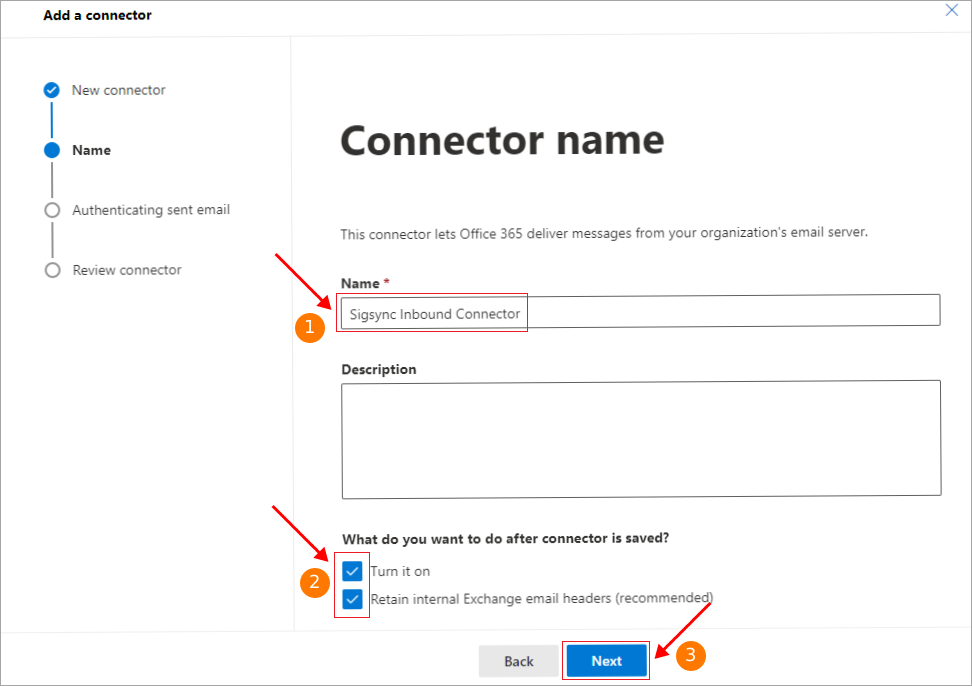
- Enter 'Sigsync Inbound Connector' in the 'Name' field, and make sure to keep the 'Turn it on' and 'Retain internal Exchange email headers' options checked. Then, click 'Next'.
- In the 'Authenticating sent email', enter '*.sigsync.com' in the first field for verifying that the subject name is matching with the sender's server certificate. Click 'Next' > 'Create Connector' buttons to create the inbound connectors.

- In the 'Connectors' window, again click the 'Add a connector' to create Sigsync Outbound Connectors.
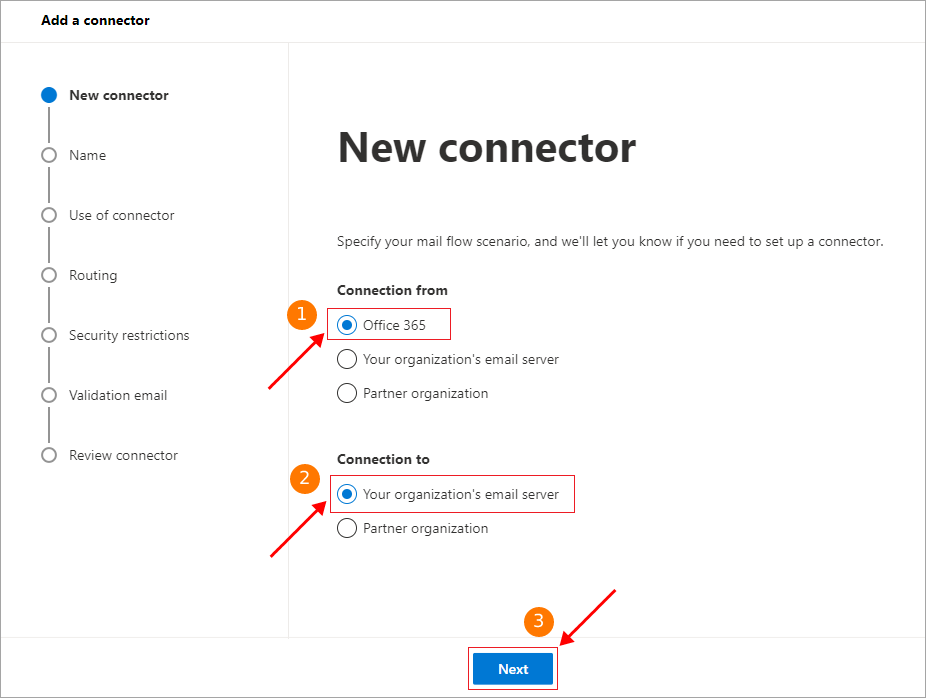
- In the 'Connection from' section, select 'Office 365' and in the 'Connection to' select 'Your organization's email server'. Click 'Next' to proceed.
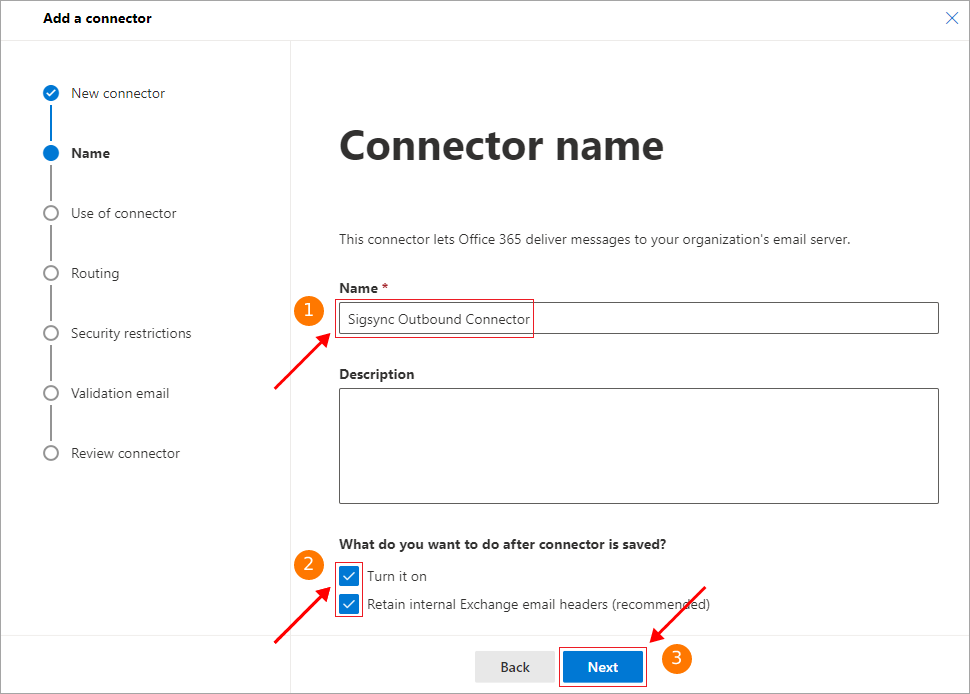
- Enter the name as 'Sigsync Outbound Connector' in the 'Name' field and keep 'Turn it on' and 'Retain internal Exchange email headers' options checked as it is. Click 'Next'.
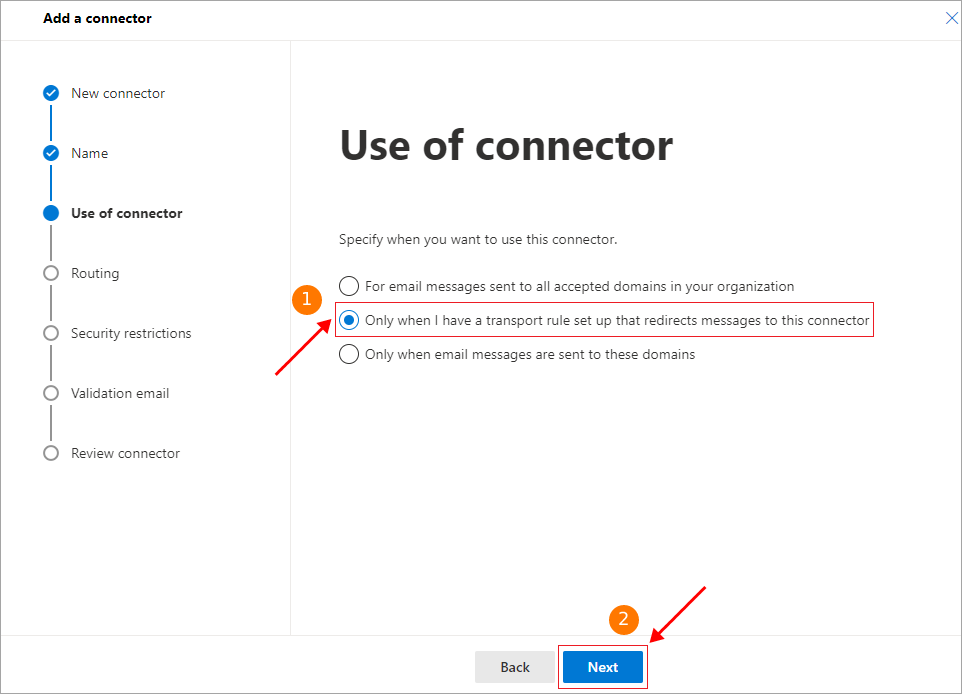
- Select the option 'Only when I have a transport rule set up that redirects messages to this connector' and click 'Next'.
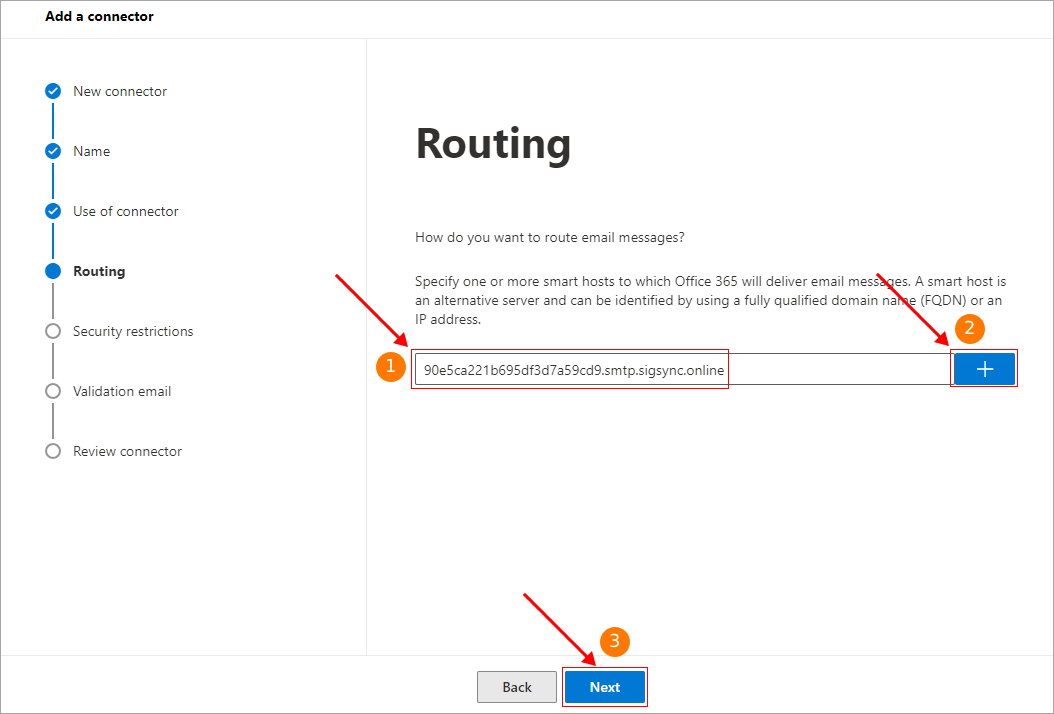
- Routing:
To route your email through the Sigsync Azure Server, use the unique subdomain created by Sigsync for your tenant during the registration of your Office 365 tenant. This subdomain is essential for the service to function correctly.
To copy the subdomain name, go to Mail Flow > Accepted Domains, locate the subdomain in the format: <2a71928ta099177ea8a53021>.smtp.sigsync.online, and copy the subdomain name.
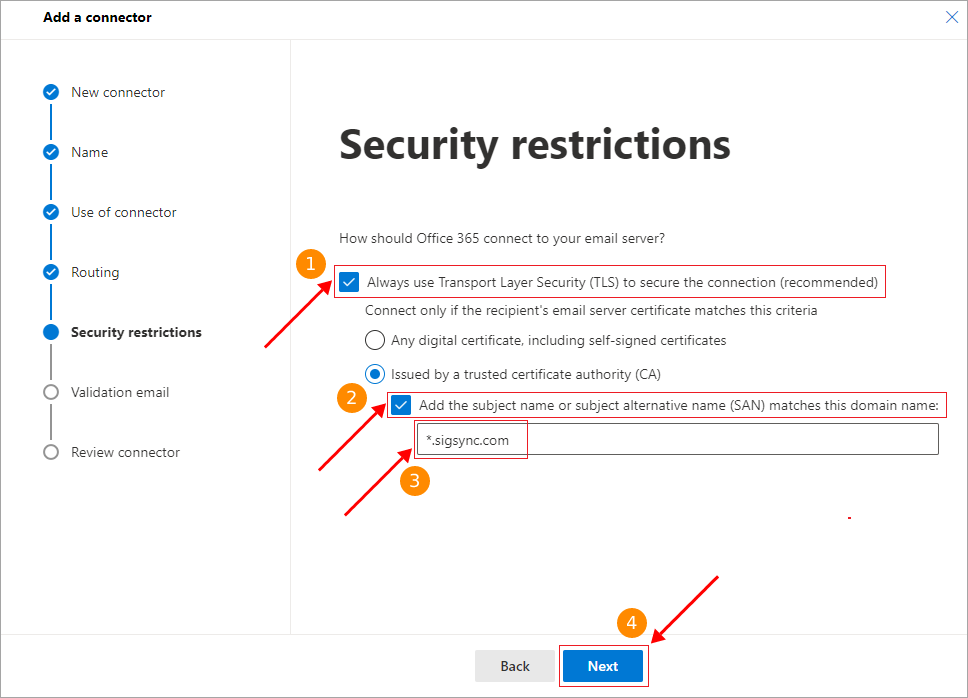
- Now, mark the checkbox 'Always use Transport Layer Security (TLS)'. Select 'Issued by a trusted certificate authority' option. Mark the checkbox and add subject name as '*.sigsync.com' and click 'Next'.
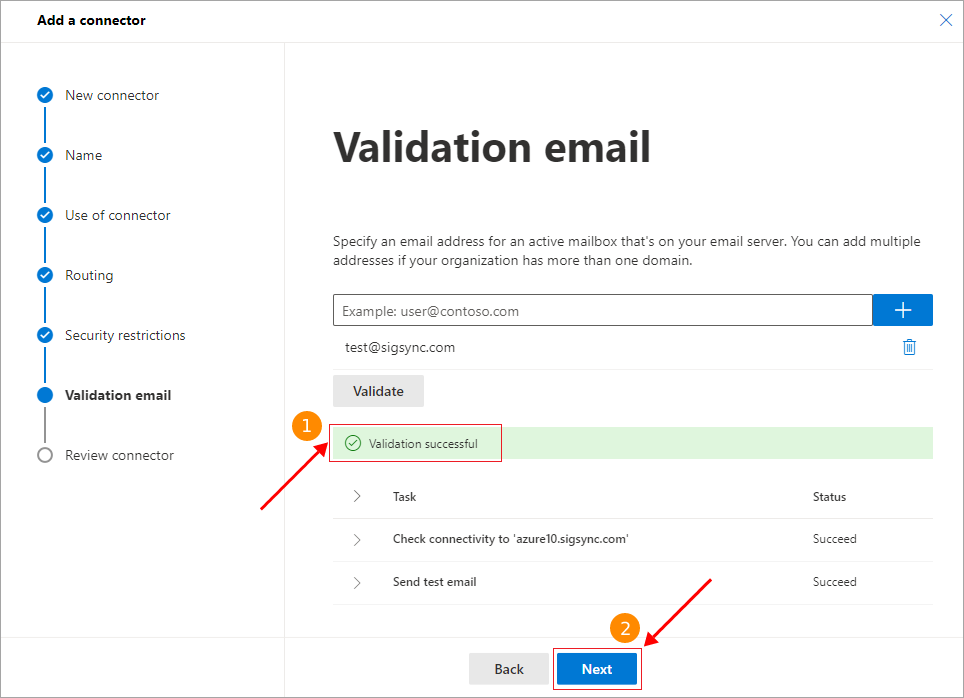
- Enter email address as 'test@sigsync.com' and click the '+' button. Click the 'Validate' button to validate the Outbound connectors . Wait for it to complete.

- After the successful validation, click the 'Next' button.
- In the Review connector step, click the 'Create connector' button to finish the configuration. When the connector is created, click 'Done'.
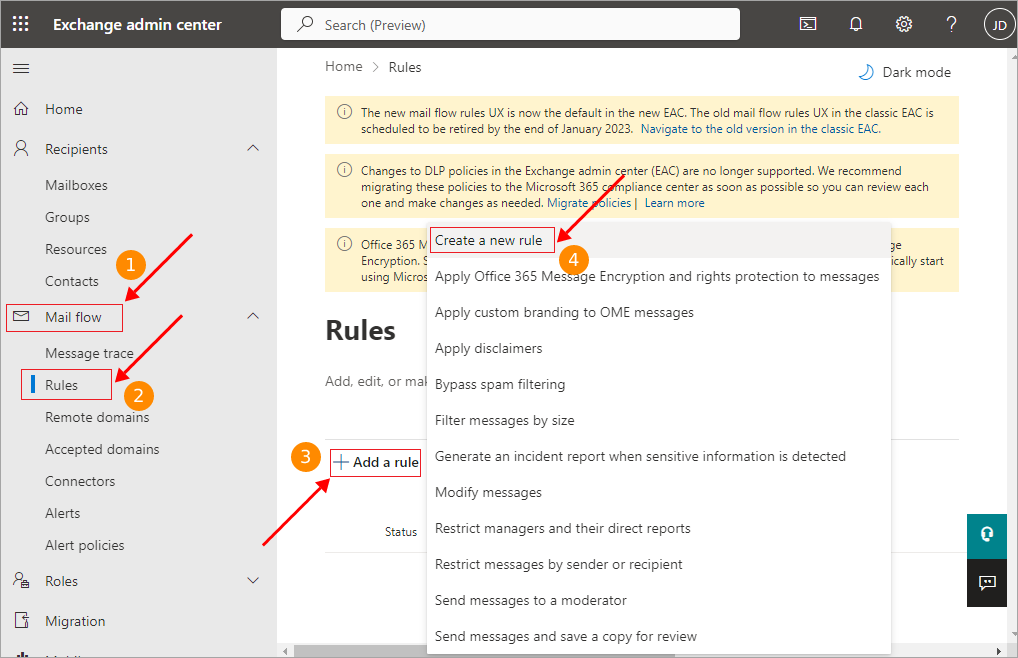
- In the Exchange admin center, navigate to 'Mail flow' > 'rules' from the left pane
- Click the '+ Add a rule' button from the right side pane and select 'Create a new rule' option from the drop down list.
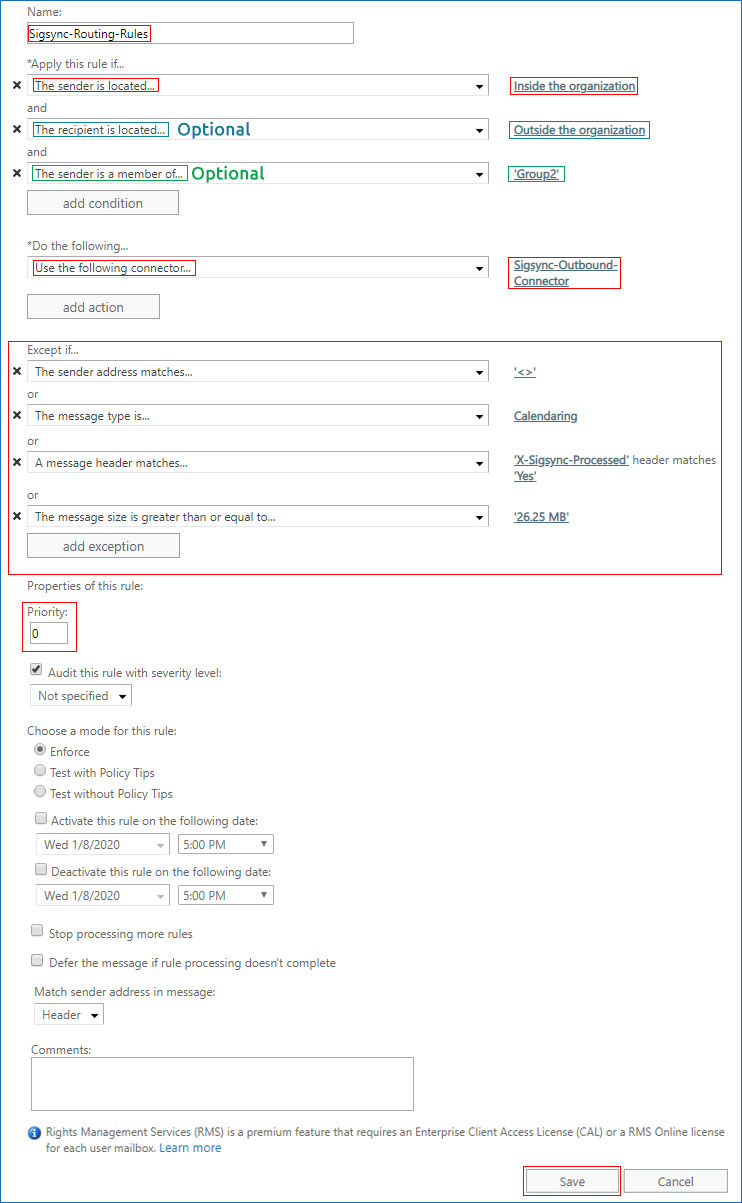
- Name the rule as 'Sigsync Routing Rules'. In the 'Apply this rule if' section, set the condition as 'The sender' > 'is external/internal' and then select the recipient location as 'Inside the organization'. Click 'Save'.
- Add Signature to External users only (Optional) : This step is optional and can be used if you want to add signatures only to external users. In the 'Apply this rule if' section, click the '+' button and set the condition as 'The recipient' > 'is external/internal'. Then, select the recipient location as 'Outside the organization'. Finally, click 'Save'.
- Add Signature to a specific Group of users (Optional): This is an optional step. That is, use this option if you wish to add signatures only to the specific Group of users.
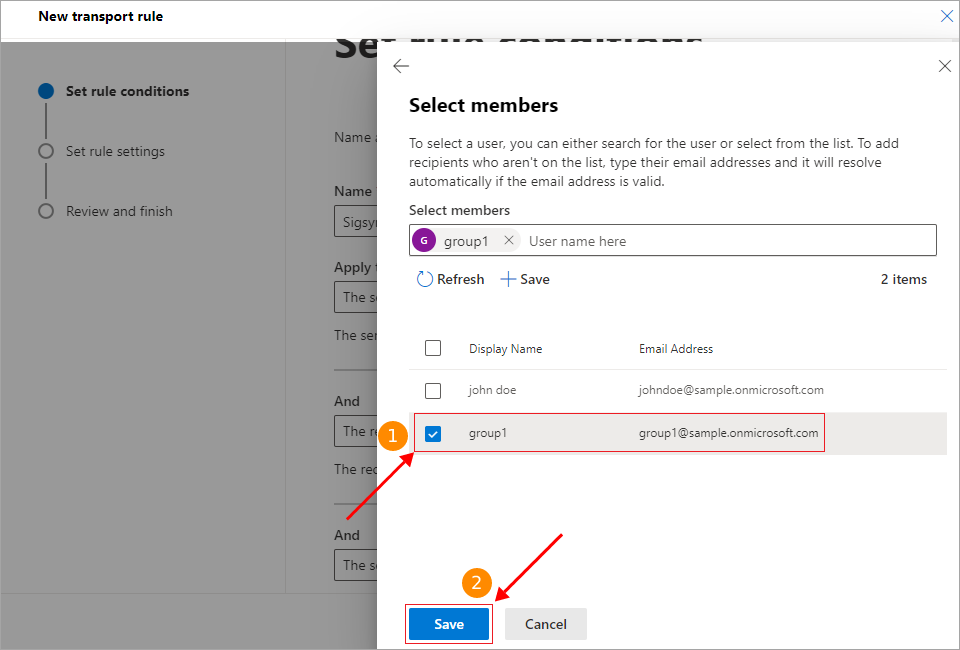
Create a Distribution Group containing users you wish to add signatures to. In the 'Apply this rule if' section, click the '+' button and set the condition as 'The sender' > 'is a member of this group'. Then, select the required distribution group from the list and click 'Save'.
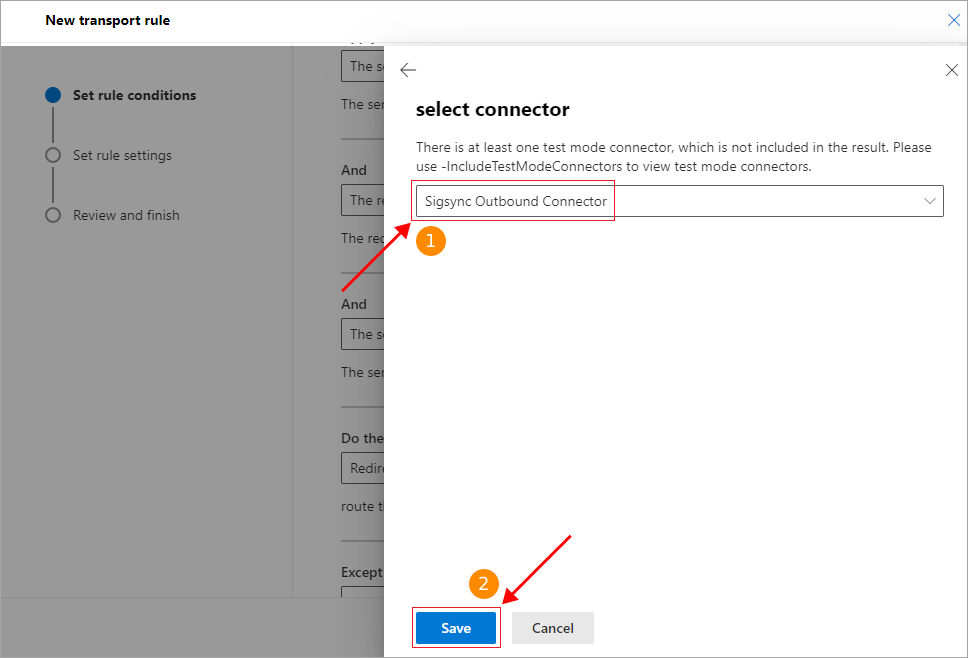
- In the 'Do the following' section, select 'Redirect the message to' > 'the following connector' and then, select 'Sigsync Outbound Connector' from the list. Click 'Save'.
- In the 'Except if' section, Click the '+' button in the 'Except if' section and add the exception as 'The message properties' > 'include the message type'. Select 'Calendaring' from the drop down list and click 'Save'.
- Click the '+' button in the 'Except if' section and select 'The message' > 'size is greater than or equal to' and specify the size as '51200' if you have default maximum size. If you have changed the maximum mail size, then you have to calculate (Maximum message size * 0.75) and add that value in KB. For example, if you have 100MB as max size. then '76800' as a value which is equal to 75 MB as mails will take some encoding space and grow in size before sending. Click 'save' to proceed.
- Click the '+' button in the 'Except if' section and select 'The message headers…' > 'includes any of these words'. Click 'Enter text' and add the header name as 'Return-Path' and save. Click 'Enter words' and enter the phrase as '<>' and click the 'Add' button and save the condition.
- Click the '+' button in the 'Except if' section and select 'The message headers...' > 'matches these text patterns'. Click 'Enter text' and enter the header name as 'X-Sigsync-Processed'. Save the header name. Click 'Enter words' and enter the phrase as 'Yes'. Click the 'Add' button and save.
- Select 'The sender' > 'address matches any of these text patterns' and enter the phrase as '<>' without the quotes and click the 'Add' button. Click 'Save'.

- Click 'Next' to move forward. Keep the default settings for all options unchanged. Compare your rule setup. If they match, click 'Finish' to create the new rule, and then hit 'Done' to close the rule creation wizard.
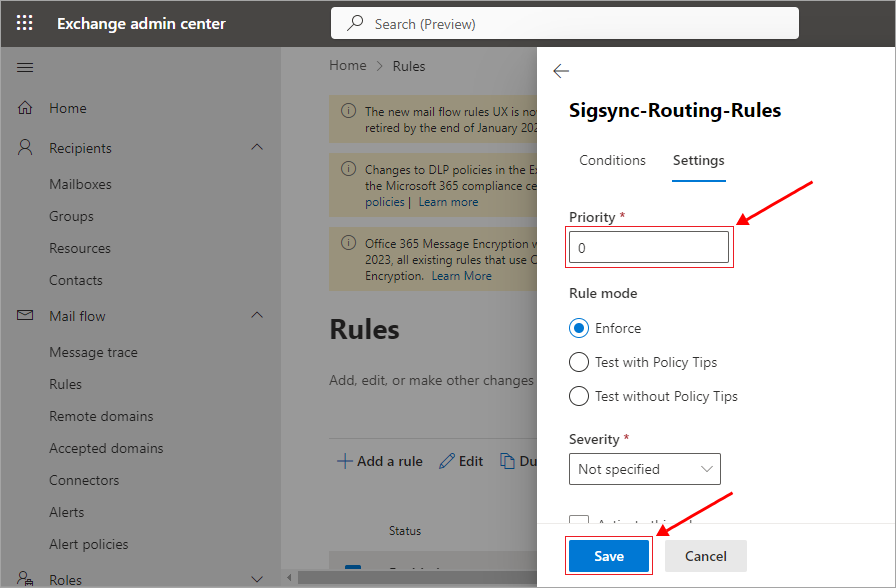
- On the Rules page, click the 'Move up' button to place the Sigsync Exchange transport rule at the very top of the list. Also select the rule and set the rule's priority to '0' under 'Settings'. Save the rule settings.
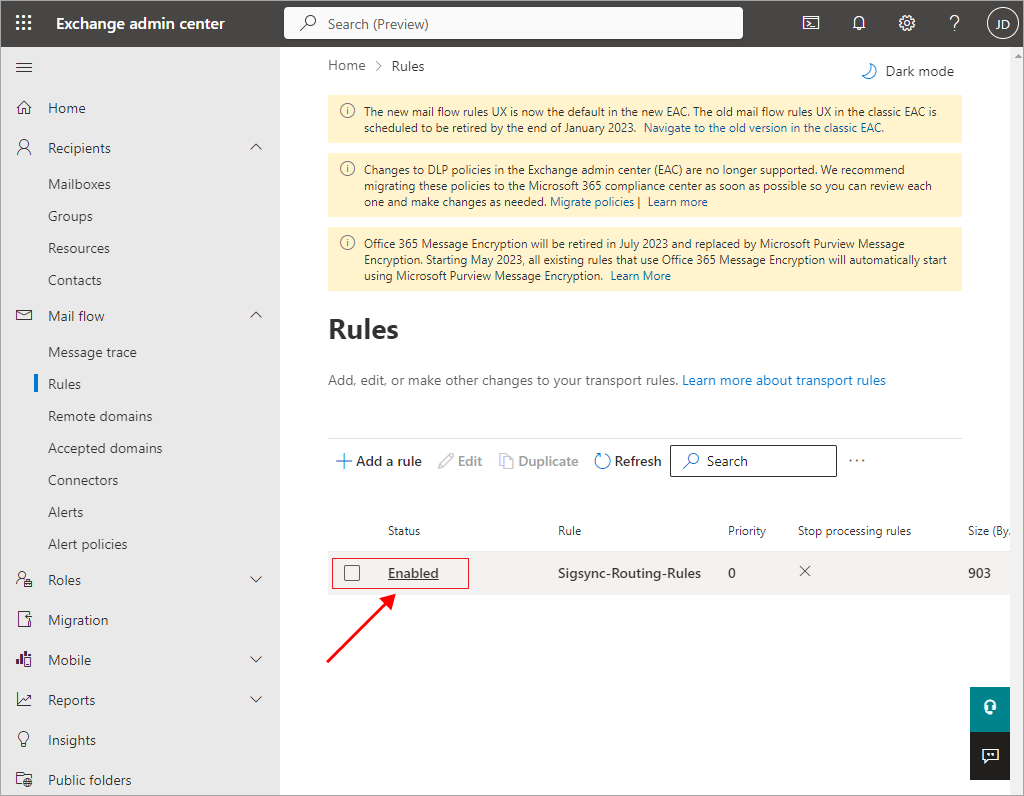
- Ensure the rule 'Status' is 'Enabled', otherwise, select the rule and switch the toggle to enable it.
- Click on the Windows Start button.
- Search for 'Windows PowerShell' (PowerShell should already be installed).
- Start PowerShell with administrator privileges (right-click -> run as administrator).
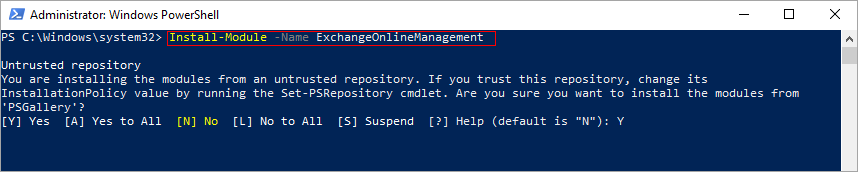
Step 1: If the Exchange Online PowerShell module is not installed, run the following command:
Command:
Install-Module -Name ExchangeOnlineManagement
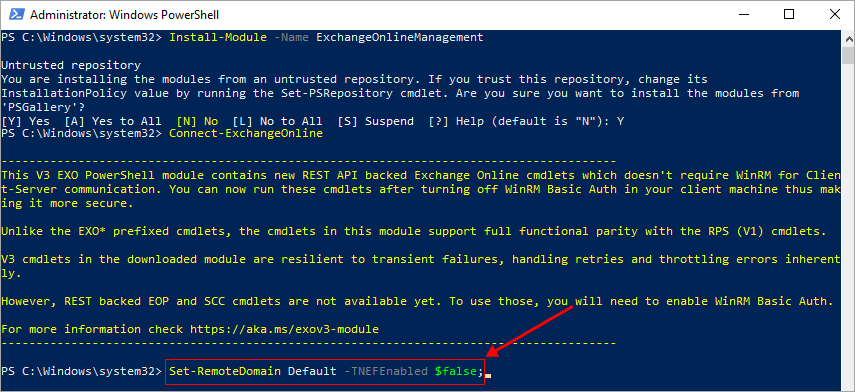
Step 2: Connect to your Office 365 account using the Global Admin account when the login is prompted. Run the following command:
Command:
Connect-ExchangeOnline

Step 3: Disable the TNEF (Transport Neutral Encapsulation Format) for the Default remote domain by running the following command:
Command:
Set-RemoteDomain Default -TNEFEnabled $false;
Experience Smarter Email Signatures with a
Free Sigsync Demo
Sigsync email signature service provides effortless, centralized signature management for Office 365 and Exchange.
Our team can assist you in quickly setting up company-wide signatures. Request a free on-demand demo to see
how Sigsync can simplify your email signature management process.

