How to disable default email signatures in Outlook for Windows using Microsoft Intune?
Problem:
You want to prevent users from manually creating email signatures in Outlook for Windows on their computer using Microsoft Intune.
Resolution:
There are two options to disable the built-in email signature feature in Outlook for Windows using Intune.
- Configuration profiles feature
- PowerShell scripts
Steps to disable email signatures using the Configuration profiles feature
- Log in to the Microsoft Endpoint Manager admin center.
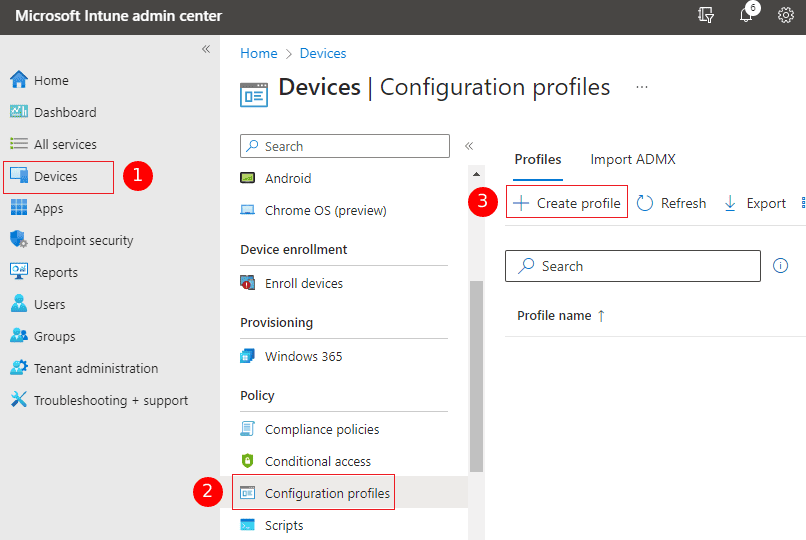
- Navigate to ‘Devices’ > ‘Configuration profiles’ and click the ‘Create profile’ button
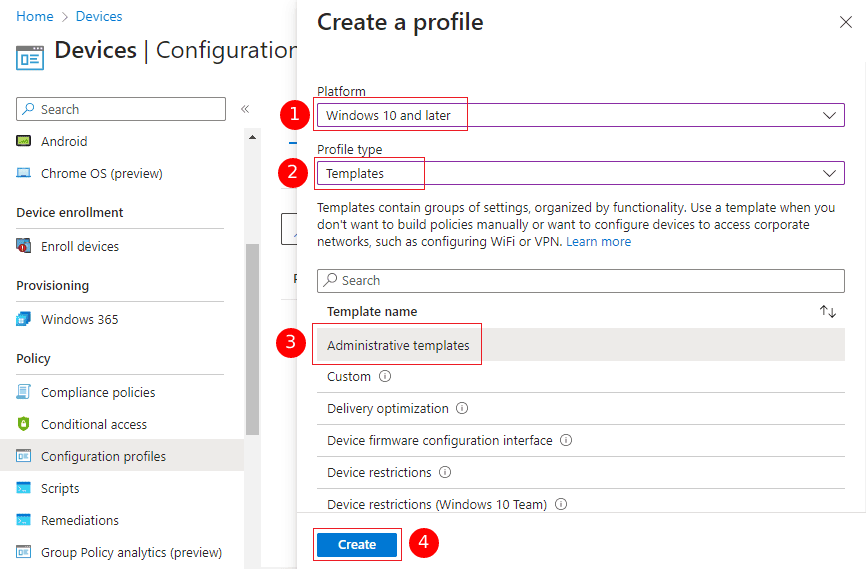
- Select ‘Windows 10 and later’ under ‘Platform’ and ‘Templates’ under ‘Profile type’ dropdown lists. Then , choose ‘ Administrative Templates’ under Template name, and click the ‘Create’ button for the new configuration profile creation.
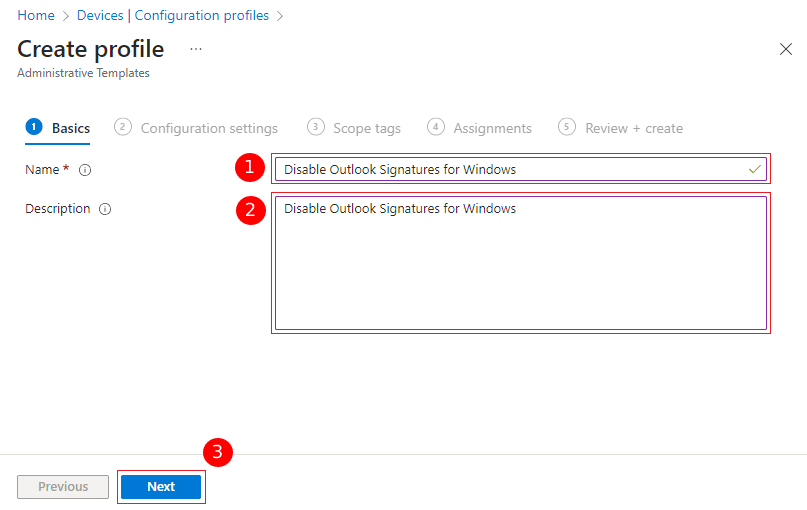
- Next, proceed with configuring the profile settings. In the ‘Basics’ step, ensure to provide a profile name (required) and description. Click the ‘Next’ button to continue.
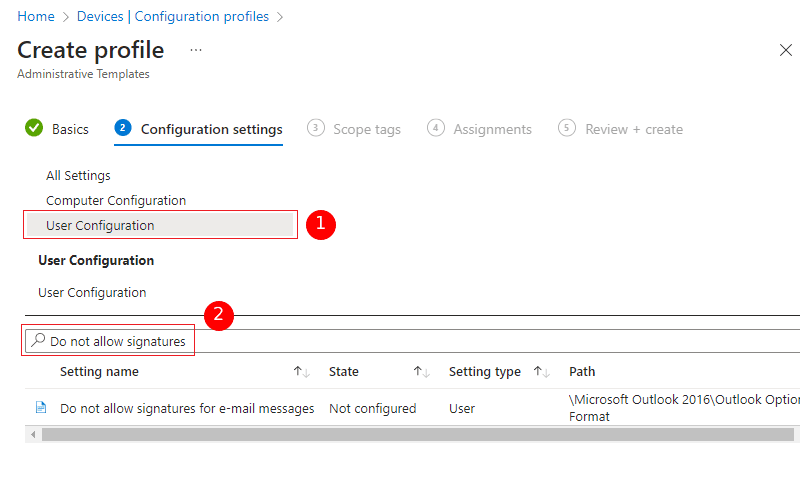
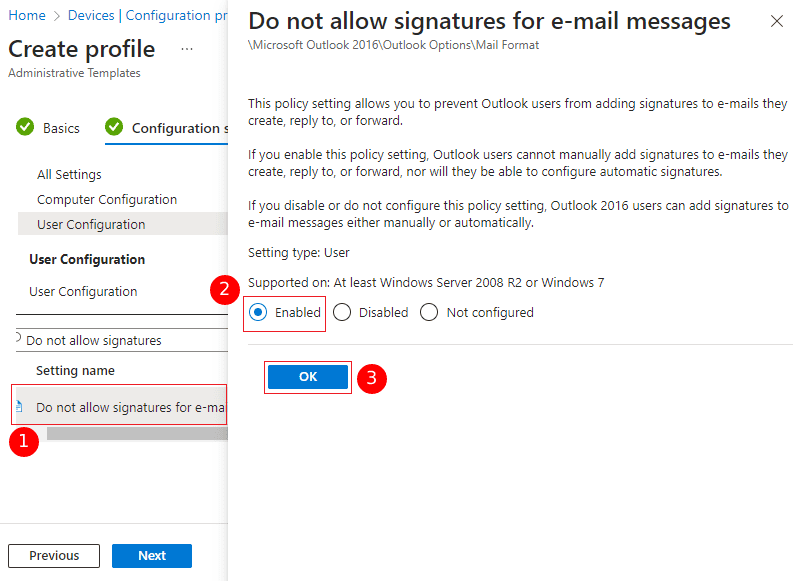
- From the menu on the left-hand side, select ’User Configuration’ and enter ‘Do not allow signatures’ in the search box to locate the desired setting
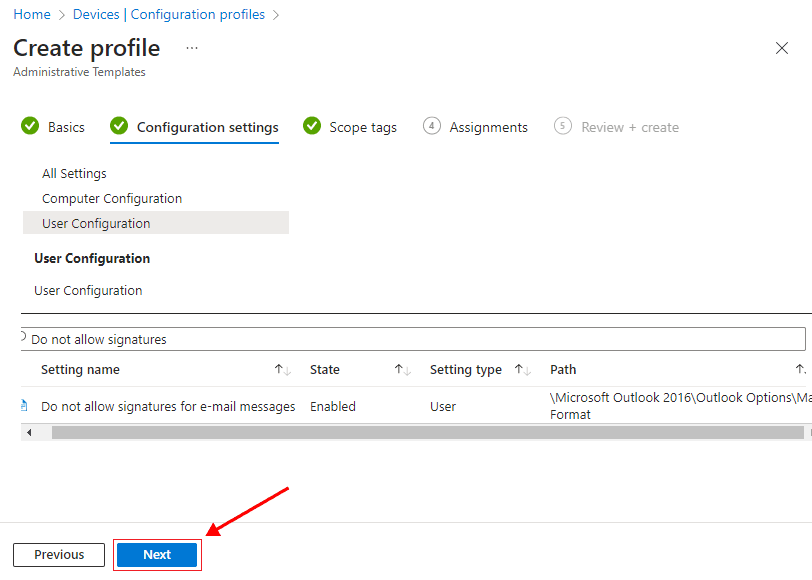
- To access the setting, click the name ‘Do not allow signatures for email messages’ and open its pane. In order to disable signatures in Outlook for Windows, choose the ‘Enabled’ option, and then click ‘OK’ and proceed by clicking ‘Next.’
- In the next step, you have the option to configure Scope tags if you utilize this feature. To proceed, click the ‘Next.’ button
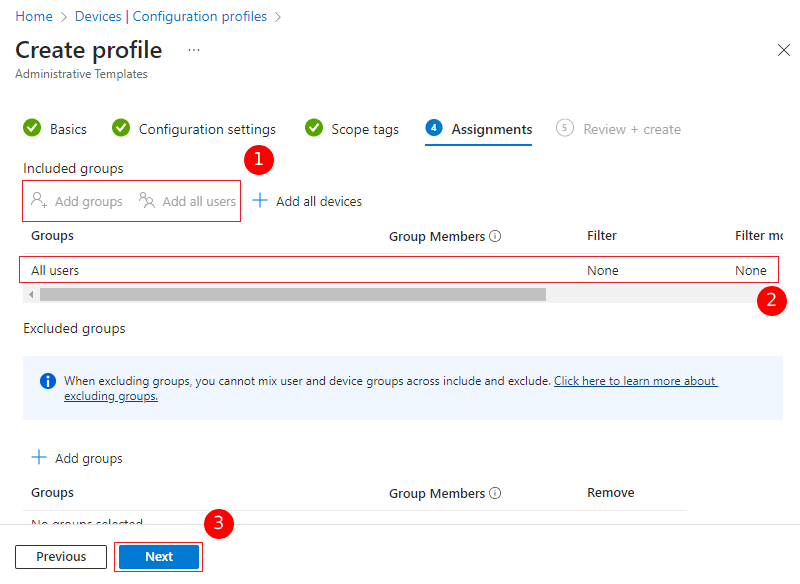
- In the ‘Assignments’ step, you can determine the scope of users for whom the signatures will be disabled. To disable signatures for all users in your organization, click on ‘Add all users.’ Alternatively, you can click on ‘Add groups’ to disable signatures for specific user groups in Azure Active Directory.
Note: If you have certain Azure Active Directory (AAD) groups whose users should be allowed to use the default signature experience in Outlook for Windows, you can exclude them from this policy. To achieve this, click the ‘Add groups’ under the ‘Excluded groups’ section.
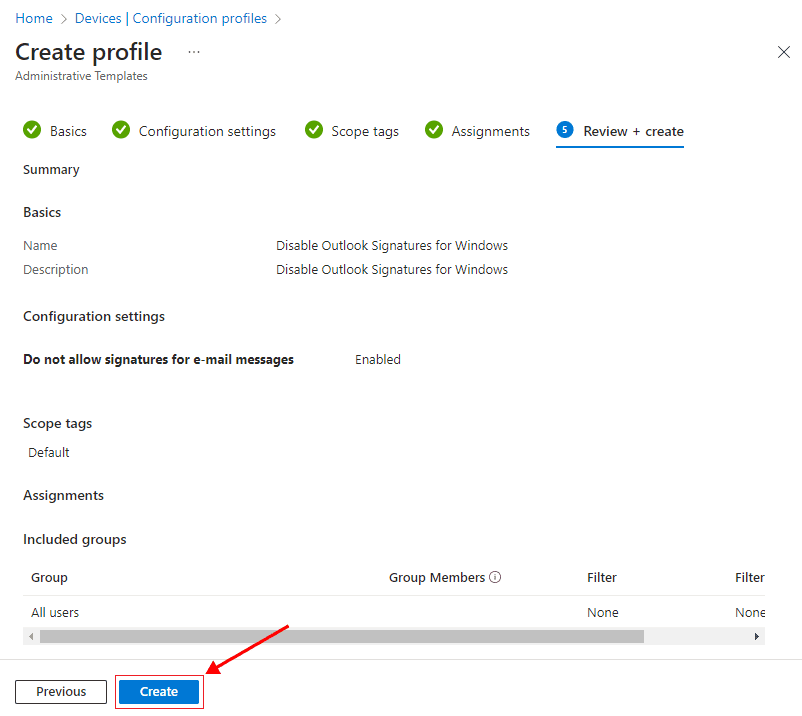
- In the final step, ‘Review + Create’, you can carefully review all the settings to confirm their accuracy. If you are satisfied with the configuration, simply click the ‘Create’ button to save and apply your policy. As a result, the native signature experience in Outlook for Windows will be disabled on the computers of either all users or the specific users you have selected.
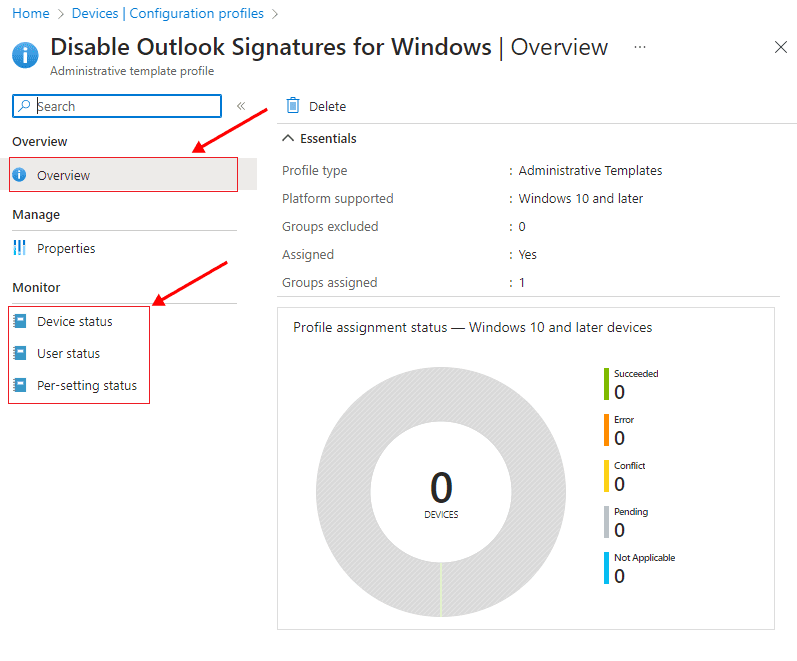
Note: You can monitor the progress of profile assignment by selecting the configuration profile name from the profiles' list, located under ‘Devices’ and then ‘Configuration profiles.’
On the Overview page, you can easily track the assignment status of the configuration profile. It provides an overview of the successful and unsuccessful assignments to devices and users. If you need more detailed information about specific devices, users, or particular settings, you can click on the respective options: ‘Device status,’ ‘User status,’ or ‘Per-setting status.’
Disable email signatures in Outlook using PowerShell scripts
If you opt for using a PowerShell script through Microsoft Intune to disable the default email signature experience in Outlook for Windows, follow the step-by-step procedure below.
- If you opt for using a PowerShell script through Microsoft Intune to disable the default email signature experience in Outlook for Windows, follow the step-by-step procedure below.
New-ItemProperty -path
"HKCU:\SOFTWARE\Microsoft\Office\16.0\Common\MailSettings" -Name
"DisableSignatures" -Value '1' -PropertyType 'DWORD' -Force - Save the file in the .ps1 format using ‘Save As’option (Ctrl+Shift+S)
Example: disable-signatures.ps1
Configure Intune to run the script for given users
- Step 1: Log in to the Microsoft Endpoint Manager admin center.
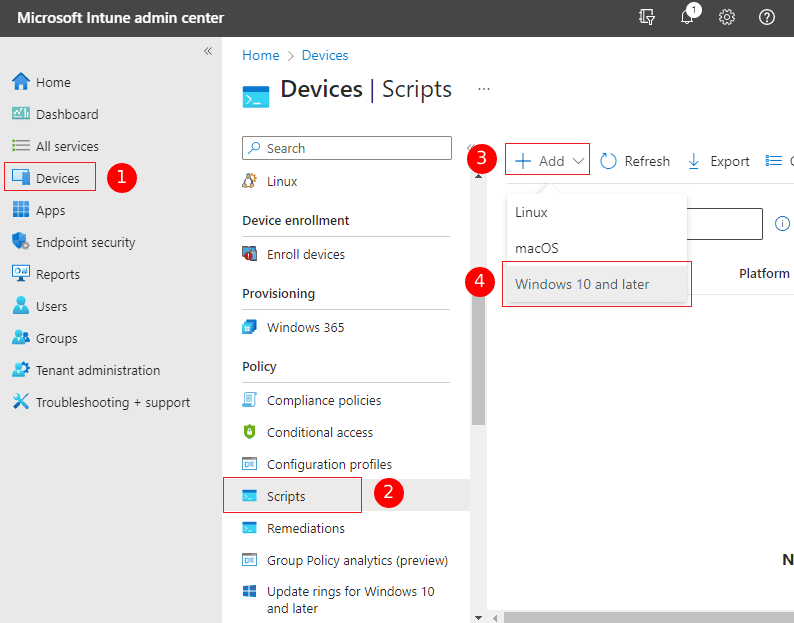
- Step 2: Navigate to ‘Devices’ > ‘Scripts’. Click the 'Add' button, and then select the 'Windows 10 and later' option
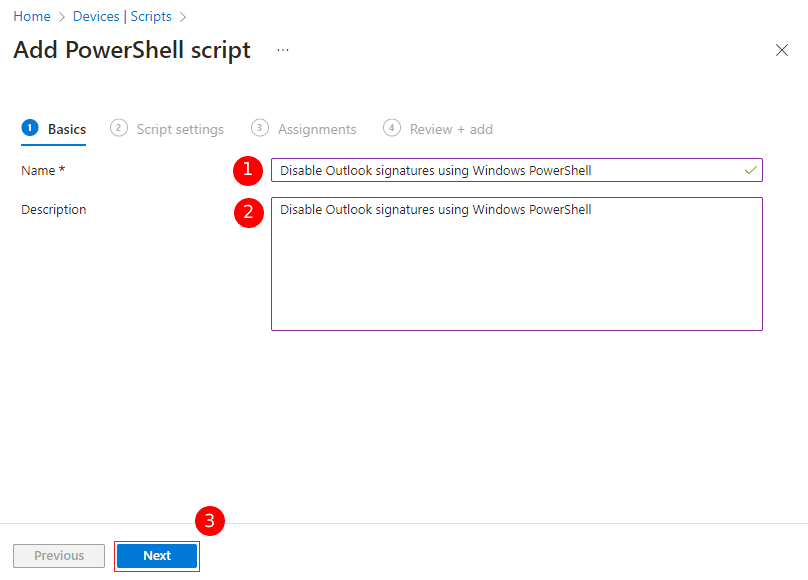
- Step 3: ive your script a name, optionally provide a description, and click the ‘Next’ button.
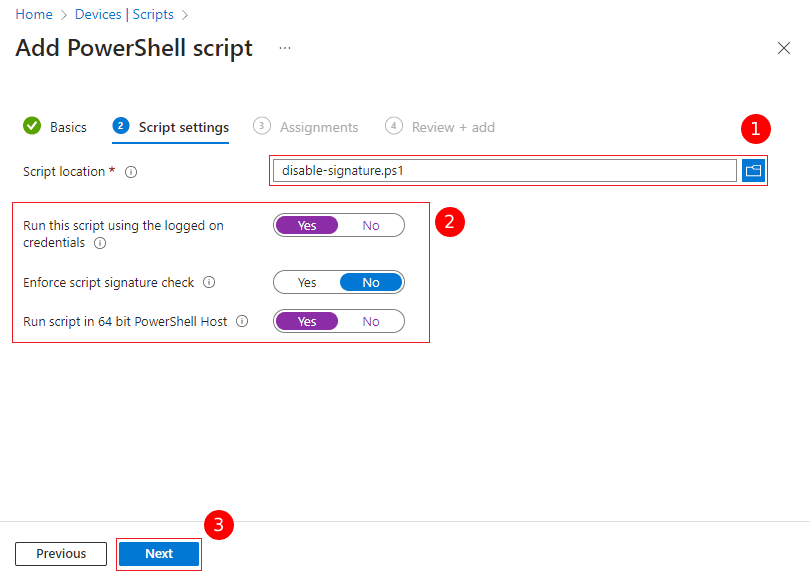
- Step 4: In the ‘Script settings’ step, you will need to load the file that you prepared earlier. Configure the settings as outlined below to proceed:
- Run this script using the logged on credentials: Yes (This allows to run the script for each individual user who logs into a computer, effectively disabling signatures for their specific account)
- Enforce script signature check: No
- Run script in 64 bit PowerShell Host: Yes (For 32-bit operating system,, select the ‘No’ option. )
Verify that your configuration matches the settings displayed in the image below. If you are satisfied with your settings, click the ‘Next’ button to proceed.
- Step 5: If you utilize the Scope tags feature, you have the option to configure scope tags for this script policy. However, if you do not use this feature, you can simply click the ‘Next’ button to proceed to the next step .
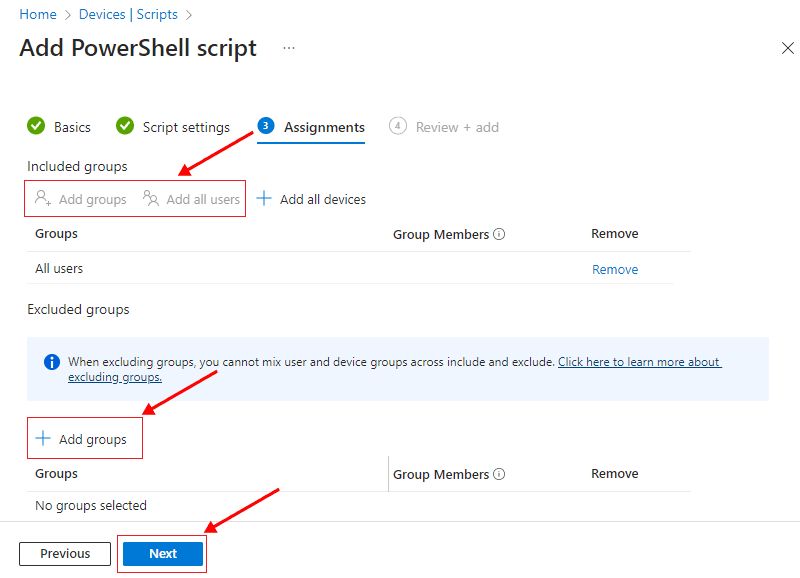
- Step 6: In the ‘Assignments’ step, you can choose the users or Azure AD user groups within your organization for whom the script will be executed. You can also exclude specific user groups if needed.Note:
Ensure that you define assignments based on users rather than devices. This is important because the script modifies an entry in the Current User registry key. If multiple users use the same computer, the script needs to be executed for each user who logs in to ensure the desired modifications are applied.
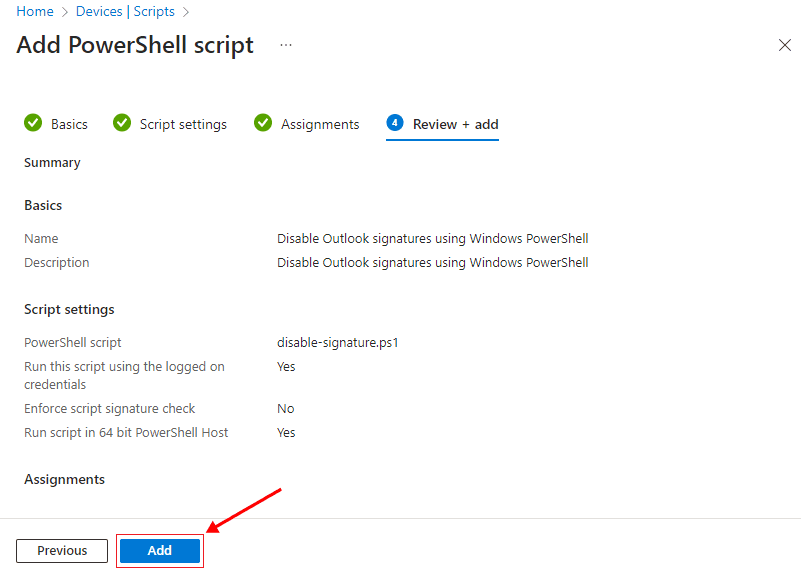
- Step 7: In the final step, ‘Review + Add’, you can thoroughly review all the settings for your script policy. If you are satisfied with the configuration, simply click the ‘Add’ button to include the script in the scripts list.Note:
To monitor the progress of script executions, navigate to the scripts list under ‘Devices’ and select ‘Scripts’. You can track the status of each script by clicking on its name in the list.
On the ‘Overview’ page, you can easily review the status of script executions. It provides an overview of the successful and unsuccessful execution of the script on devices and users. For more detailed information, such as specific device names or user names, click the corresponding option. If you need details related to devices, click the ‘Device status’ option. Similarly, if you require information about users, click the ‘User status’ option
Streamline Email Signature Management with a Free On-demand Demo from Sigsync
Sigsync email signature service provides effortless, centralized signature management for Office 365 and Exchange. Our team can assist you in quickly setting up company-wide signatures. Request a free on-demand demo to see how Sigsync can simplify your email signature management process.

