
Good Practices for designing an email signature
A well-designed email signature serves as your digital business card—professional, consistent, and aligned with your brand. It builds trust, boosts engagement, and reinforces brand recognition. Sigsync Office 365 Email Signature Service helps you create and manage centralized signatures that meet professional standards. To get the best results, follow these good practices while designing your email signature:

Guidelines to design professional email signature
Learn how to design Professional email signatures that enhance branding and maintain a polished look in every email
Guidelines
Guidelines
- Use Table (Rows and Columns) format for a consistent signature design
- Dynamic fields to directly pull Active Directory details
- Set Visibility properties for the signature fields
- Use high resolution images
- Set Alt text for the images
- Use images with PNG or JPG formats
- Allow signatures to be compatible with dark modes
- Sync AD changes for new updates in Active Directory
- Disable default signatures from Outlook
Use Table (Rows and Columns) format for a consistent signature design
 Tables for consistent signature design
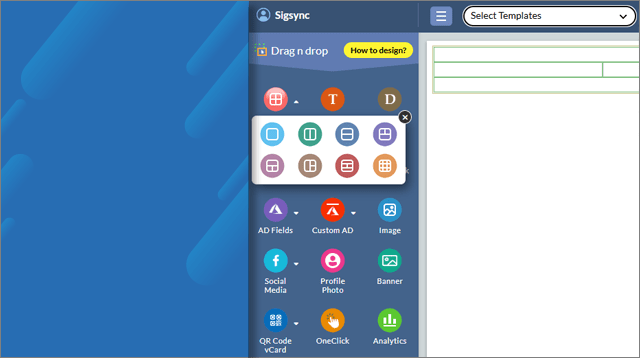
It is recommended to use tables to keep the signature layout consistent and to avoid signature elements fields shifting around in different mail clients and screen resolutions. Sigsync provides different table components as per the design requirement. To insert a table, just drag and drop a required shape of the table component into the design area from the left side of the editor.

You can set the 'Table' properties on the right side of the editor

Insert table
To insert a table with multiple rows and columns, click on the Signature Editor section and choose 'Insert Table' from the toolbar

Enter the number of columns and rows as per the design requirement and click 'Apply' button

Insert a Row / Column
To insert a new row or column, select a table cell, click the table icon in the toolbar, and choose either 'Insert Row' or 'Insert Column' from the dropdown menu.

Delete a Row / Column
To delete a row or column, select a table cell, click the table icon in the toolbar, and choose either 'Delete Row' or 'Delete Column' from the dropdown menu.

Merge Rows
To merge rows, hold the Ctrl key and select the cells in the rows you want to merge, then click the table icon in the toolbar and choose 'Merge Cells' from the dropdown menu.

Merge columns
To merge columns, hold the Ctrl key and select the cells in the columns you want to merge, then click the table icon in the toolbar and choose 'Merge Cells' from the dropdown menu.

Splits Cells
To split cells, select the cell you want to divide, then choose 'Split Cells' from the Table Properties dropdown menu.

Select whether you want to split the cell into rows or columns, enter the number of divisions, and click ‘Apply’ to confirm the changes.

The cell you selected will now be split into two separate cells

Dynamic fields to directly pull Active Directory details
 Dynamic fields to directly pull Active Directory details
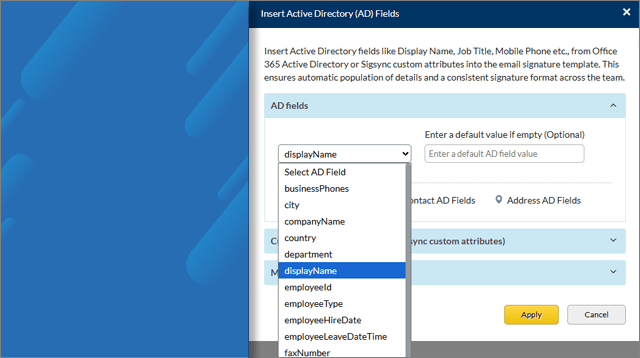
Sigsync supports Azure Active Directory fields (Example: ${displayName}, ${jobTitle}, ${companyName} ) to include in Signature. These fields automatically pull details from your active directory. With this, you can manage all the users signatures in a single template.
You can use individual as well as group of Active Directory Fields (Personal, Address, Contacts)in your signature.
To insert a single Active Directory field, select the table cell, click the 'Insert Active Directory' icon in the toolbar, and choose 'Insert AD Fields' from the dropdown menu.

Select the required Active Directory fields from the list and click the 'Apply' button

To insert a group of Active Directory fields, simply drag and drop the required component in the template design area.
For instance: Let's insert the 'Personal AD Fields' component. Select the table cell, click the 'Insert Active Directory' icon in the toolbar, and choose 'Personal AD Fields' from the dropdown menu.

You can keep the default fields or add new fields. Click the 'Apply' button

Set Visibility properties for the signature fields
 Set Visibility properties for the signature fields
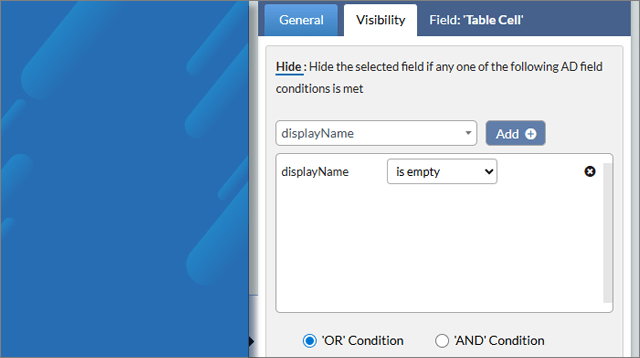
To prevent empty fields from appearing in your signature when the corresponding Active Directory value is not available, Sigsync provides the 'Visibility' property in the Signature Editor.
For an instance:
Suppose if 'Fax Number' is not filled in your active directory, an empty field will appear in the email signature. To remove the empty space, just set the 'Hide' property for the label/icon around the 'Fax Number' field.
In the below screenshot, after the label 'f:' there is an empty space in the preview pane

To remove the empty space, select the label, go to the Visibility Properties panel, choose the 'Fax Number' field, and click the 'Add' button.

The empty field with the label gets removed on the preview pane.

Use high resolution images
If your email signature looks blurry when viewed on a mobile phone, tablet, PC ,the simplest option is to use a high resolution image in your email signature and scale it down to the desired size using the height and width attributes.
Important Note: When using large-scale images in your email signature, there is a possibility that your email client, such as Outlook, Outlook Web Access (OWA), or Gmail may display them as attachments. This occurs because email clients handle images in signatures differently. When the actual image used in the signature is large, the email client may be unable to display it directly within the email body. Consequently, the image is treated as an attachment rather than being shown as part of the email content. This issue is particularly noticeable in replies and forwarded emails. The recommended solution is to resize the original images according to the specified height and width in your signature templates for each image.
To insert a profile photo from Active Directory, select the table cell, click the 'Insert Image' icon in the toolbar, and choose 'Profile Photo' from the dropdown menu.

Click the 'Apply' button

You can set the image width to the required size

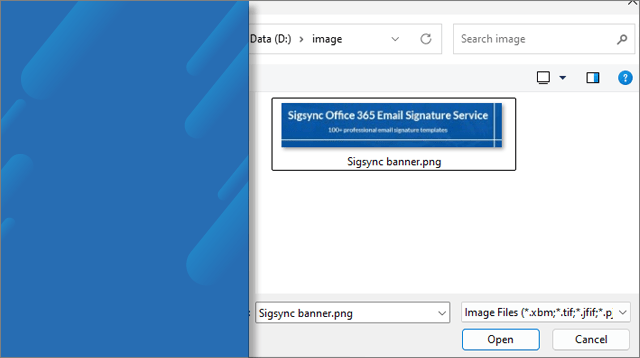
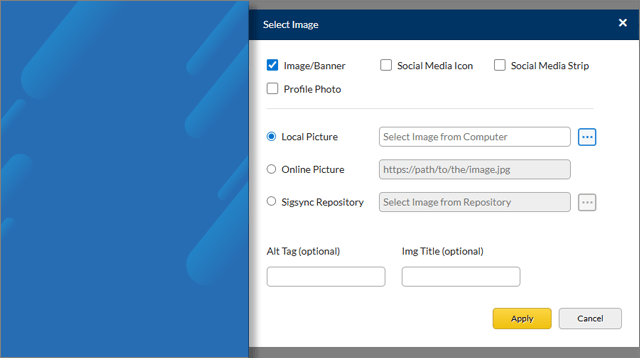
To insert a banner image or static profile photo into the signature template, select the table cell and choose 'Insert Image' from the dropdown menu

Upload the image either from your local drive or by using an online URL, then click the 'Apply' button.

Set the image width to the required size

Set Alt text for the images
Alt text describes what the image is supposed to be if the images are not appearing for the recipients. It will make your signature more accessible to the visually impaired and will serve as a backup if your image cannot be shown for some reason.
For instance: Add Alt Tag and Image Title for the Banner Image
Insert the 'Banner' image component into the design area

Upload the image either from your local drive or by using an online URL.

Enter the appropriate Alt Tag and Image Title and click the 'Apply' button

Use images with PNG or JPG formats
 Use images with PNG or JPG formats
It's recommended to utilize standard image formats like PNG or JPG (JPEG), which are supported by the vast majority of email clients. Before including images in your signature, ensure that they are scaled down.
For instance: Insert a banner image
Insert the 'Banner' image component into the design area
Choose the image either from your local drive or by using an online URL. Here, we’ll select it from the local drive.
Select the banner image

Enter the appropriate Alt Tag and Image Title and click the 'Apply' button
Set the image width to the required size
Allow signatures to be compatible with dark modes
Consider how your signature will seem against a dark background when selecting font colors, icons, images etc. Use images or icons with translucent backgrounds if feasible.
Sigsync provides pre-designed dark mode signature templates from its 'Signature Gallery'.
Select 'Manage Signature' > 'Signature Gallery' tab from the Sigsync dashboard

Choose the 'Dark Mode Signatures' from the category panel and pick any template suitable for you.

You can keep or modify the template as per the requirement

After the modification, 'Save' the template.
Sync AD changes for new updates in Active Directory
If you've added new users or changed any details in your Office 365 Active Directory, sync the changes with Sigsync. This ensures that the new updates for your email signatures are available. This syncing process ensures secure login by redirecting you to the 'Microsoft Sign in page'.
To sync the Active Directory changes select the 'Manage Signatures' and 'Settings' tabs from the Sigsync dashboard.

Click the ‘Sync AD Changes’ button and proceed with the authentication in Microsoft sign in page.

Disable default signatures from Outlook
If you have set a default signature in Outlook, just disable the default signature to avoid your recipients getting both default signature and Sigsync signature.
Follow the below steps to disable Outlook default signatures for individual users in OWA ( Outlook Web Application)
- Login to Exchange Admin center.
- Choose 'permissions' from the left panel and click the 'Outlook Web App policies' tab

- Double-click the policy that is assigned to the user to stop adding the OWA signature.

- Navigate to features and click on the More options link to get more features.

- Uncheck the Email signature feature as shown below.

Click here to disable outlook default signatures for all the users at once
Experience Smarter Email Signatures with a
Free Sigsync Demo
Sigsync email signature service provides effortless, centralized signature management for Office 365 and Exchange.
Our team can assist you in quickly setting up company-wide signatures. Request a free on-demand demo to see
how Sigsync can simplify your email signature management process.

