Available placeholders in Sigsync Signature Generator
Sigsync Email Signature generator consists of various features. Placeholders are the options available for you at the right pane of the signature generator. The placeholders in Sigsync are sections, social media links, personal/address/contact fields, etc. Email signature can be created effortlessly using all the features available in the signature generator. Add the AD placeholders to the signature and Sigsync service will dynamically add each sender's details.
How to add placeholders in email signature
To add placeholders to the email signature, drag and drop the required placeholder to the signature layout where you want it to be added. If it’s an AD placeholder, you can select required fields or if it’s a social media icons select required icons etc. After the addition of a placeholder to the email signature. To edit any of the placeholders, you need to double click on it and perform the required action.
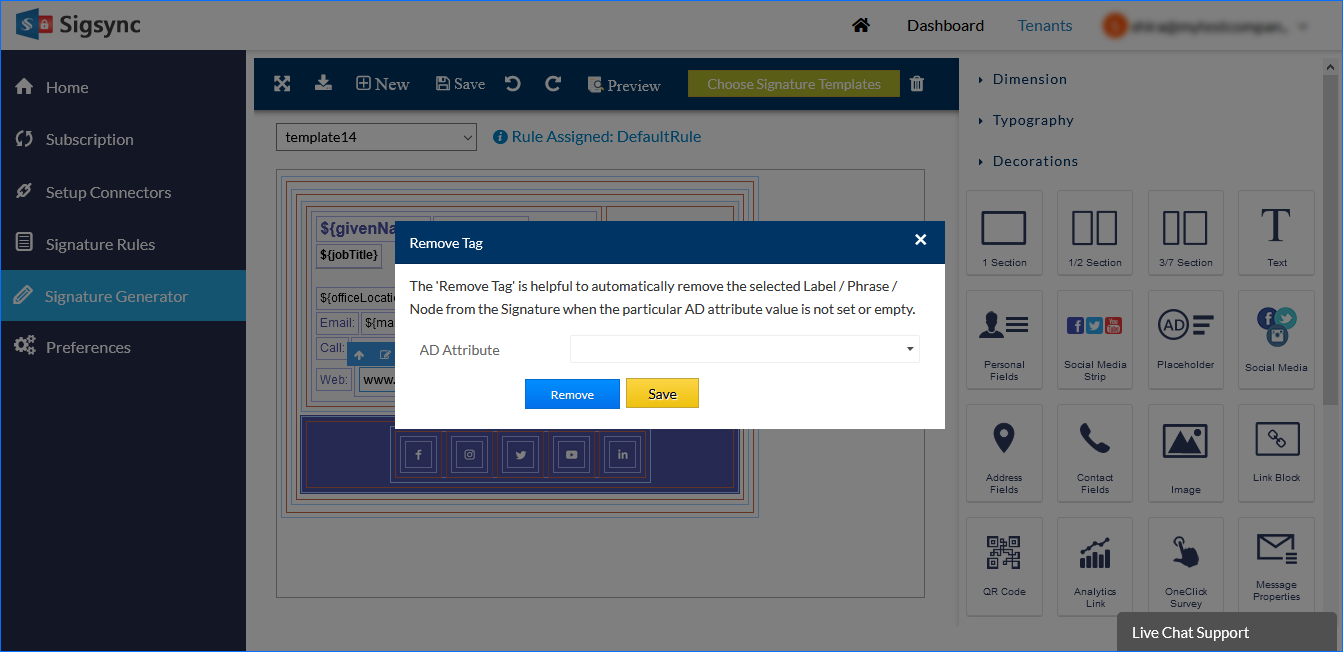
How to avoid empty space when sender's AD field value is blank?
If you have the AD placeholders with the empty values you can remove it using 'Remove Tag' provided in signature generator. For an instance, if you have an address field without any value you can add a 'Remove Tag' to all the related elements of the address field and remove that particular field while signature for that user only.
This will avoid empty space for that particular sender and other user's will not be affected.
Available Placeholders in Signature Generator
All the placeholders available in Sigsync are explained in this section. You can use any placeholder by dragging and dropping into the required position to create the desired signature layout easily. These can be resized or moved after dropping inside the signature layout. All placeholders can be added into existing templates as well as new blank template.
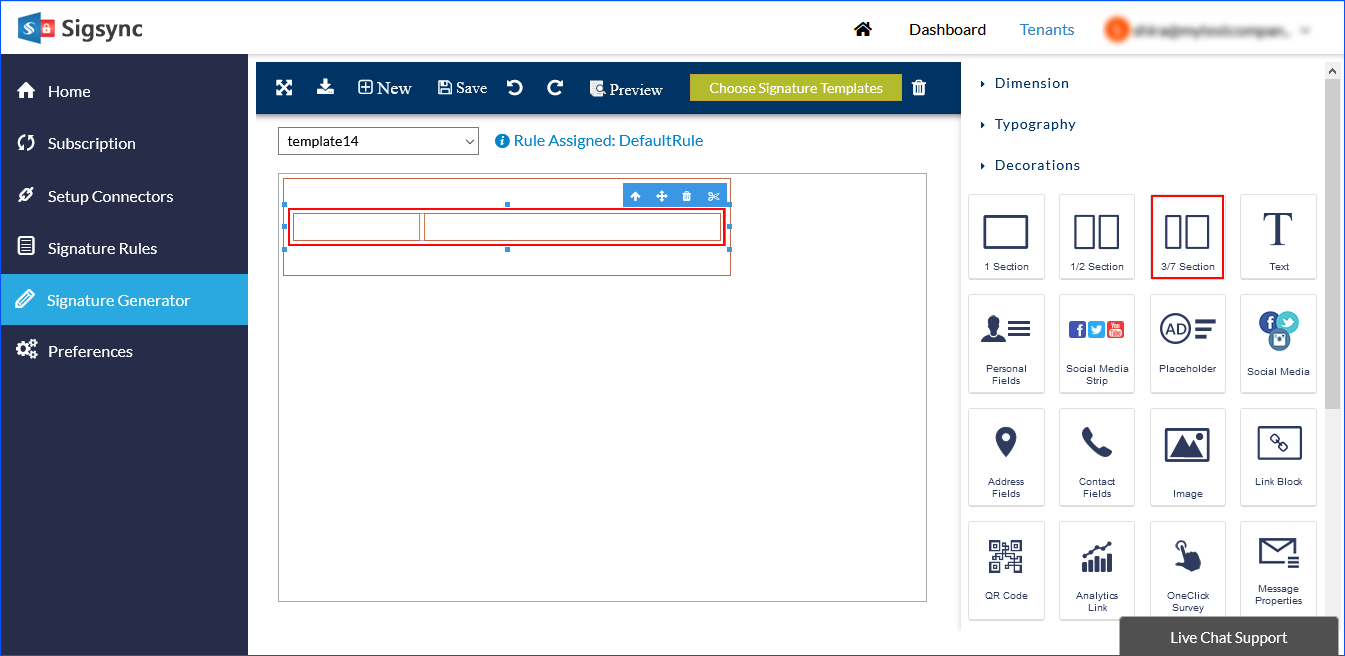
Sections
Sigsync Email signature generator is not only limited for readymade templates but also provides different creative options to create template from scratch. To differentiate the sections between one another, you have three different options available which you can add and then edit those sections by adding different fields like Name, Contact details, banner, disclaimers etc.
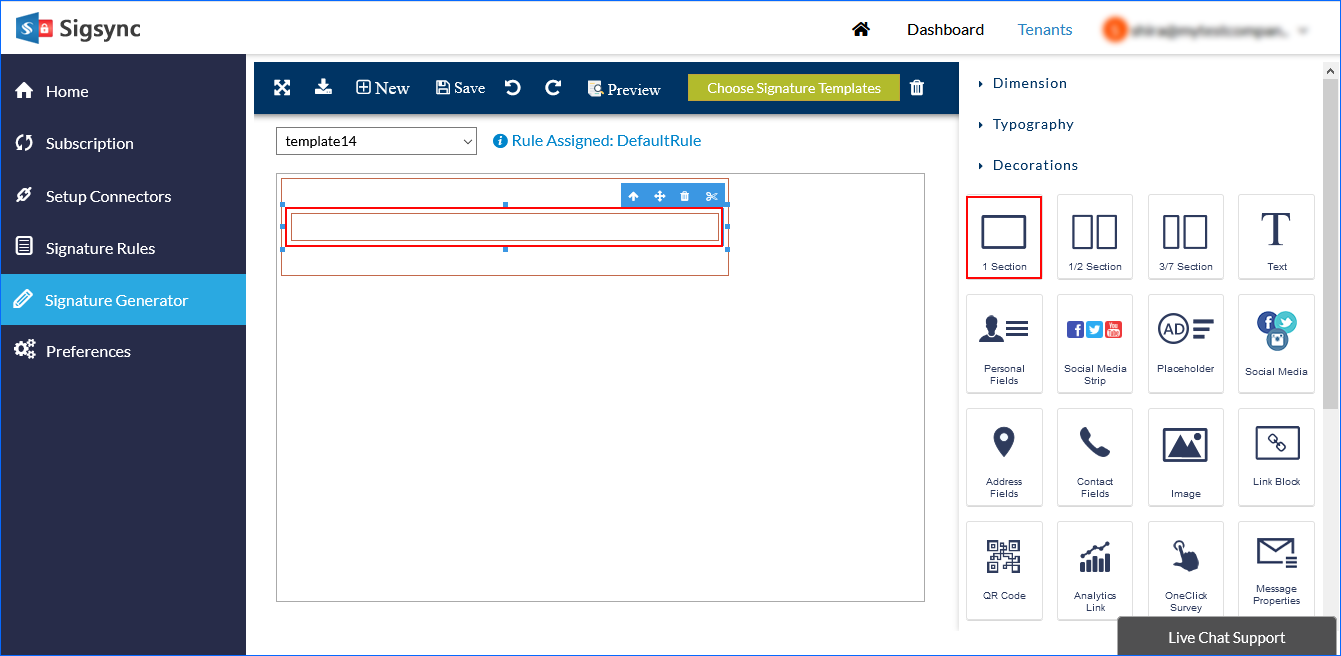
1 Section: Inserts only one section to the signature layout where you can add other required placeholders inside the inserted section to create block layout.
Note: If you are starting on a blank template, initially add one section and then start creating the signature.
Drag and drop the 1 section to the signature layout. This section can be used as a basic layout for the whole signature or it can be used for adding other placeholders in a row such as social media icons, AD fields etc.
½ Section: Inserts two sections with equal width where you can add placeholders as required.
Drag and drop the ½ Section to the signature layout. This section can be used as a basic layout for the whole signature or it can be used for adding other placeholders in two different sections such as social media icons, AD fields etc.

3/7 section: Inserts two sections which contain 30% width for the first section and 70% width for the second section. In these sections, you can add different place holders in the intended section to create a unique email signature.
Drag and drop the 3/7 Section to the signature layout. This section can be used as a basic layout for the whole signature or it can be used for adding other placeholders in two different sections such as social media icons, AD fields etc.
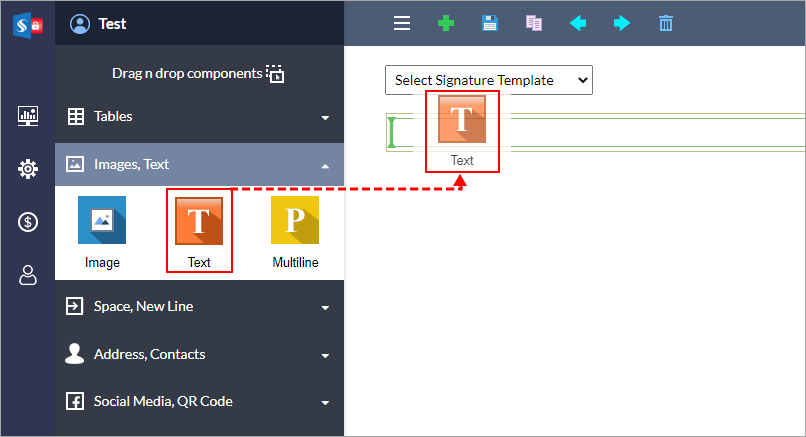
Text (T)
Inserts the text field to the signature layout and enter required text in the signature. This can be helpful for adding text field like website links, email address etc.
To add the custom text or link a text use the Text placeholder. Drag and drop the Text placeholder to the signature layout and add the required text.
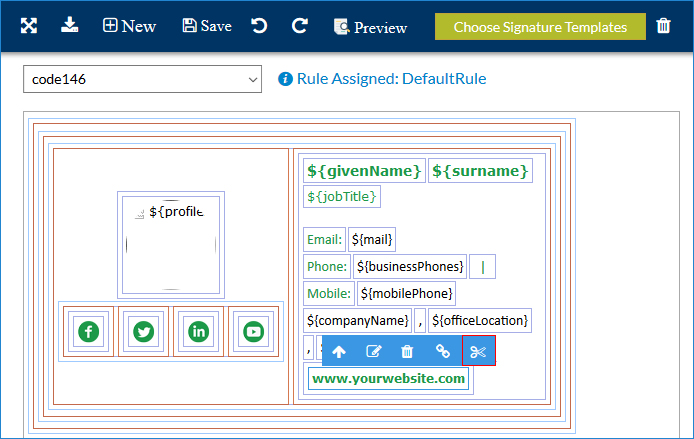
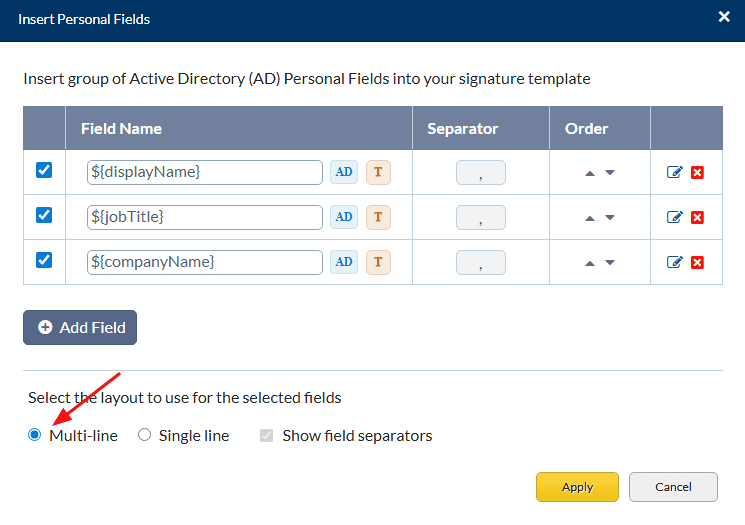
Personal Fields
Personal Fields used to insert the AD field values dynamically to email signature. The AD field values will be fetched from sender’s AD field. Personal fields section is useful for adding multiple personal fields in one single click and personal fields can be re-arranged according to the requirement.
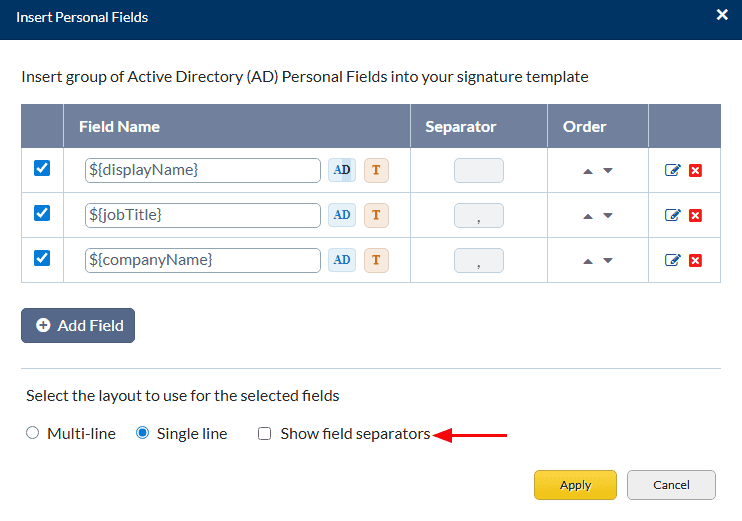
- Drag and drop the Personal Field to the signature layout, you will be displayed with the below screen.
- Select the label, field from the drop down menu and Separator. Then, Click the 'Add Field' button.
- Use ' ' to edit the existing personal fields and you can use ' ' to delete the fields if it’s not required.
- Personal fields can be re-arranged according to the requirement using ▲▼ these buttons.
- Added fields can be placed in two ways such as Multi-line or Single line. Multi line can be used to show fields in separate lines. Wherein a single line option makes all the fields to appear in one line and you can choose a separator for example, 'comma (,) '. You can also choose to not use separator.

Layout
Selected personal fields can be displayed in Multi-line or single-line as required.
- Multi-line: All the selected 'Personal Fields' will be displayed in multiple lines.
- Single-line: All the selected 'Personal Fields' will be displayed in single line and here you can select separator to differentiate between the fields.
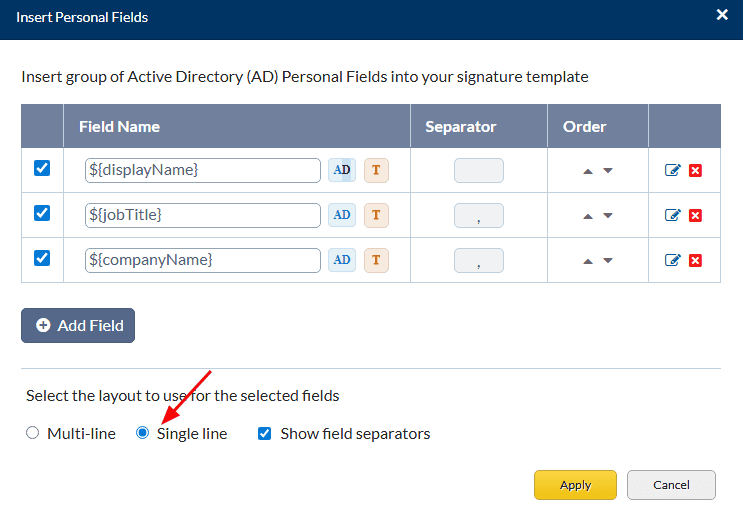
- You can uncheck the 'Show field separators' if you don’t want it to be displayed in the email.
Social Media Strip:
Social Media strip is a placeholder that provides all the social media options, required in one place making it very easy to add social links for your signature. To add the multiple social media links, you can use social media strip and you can also re-arrange the social media links according to your requirement.
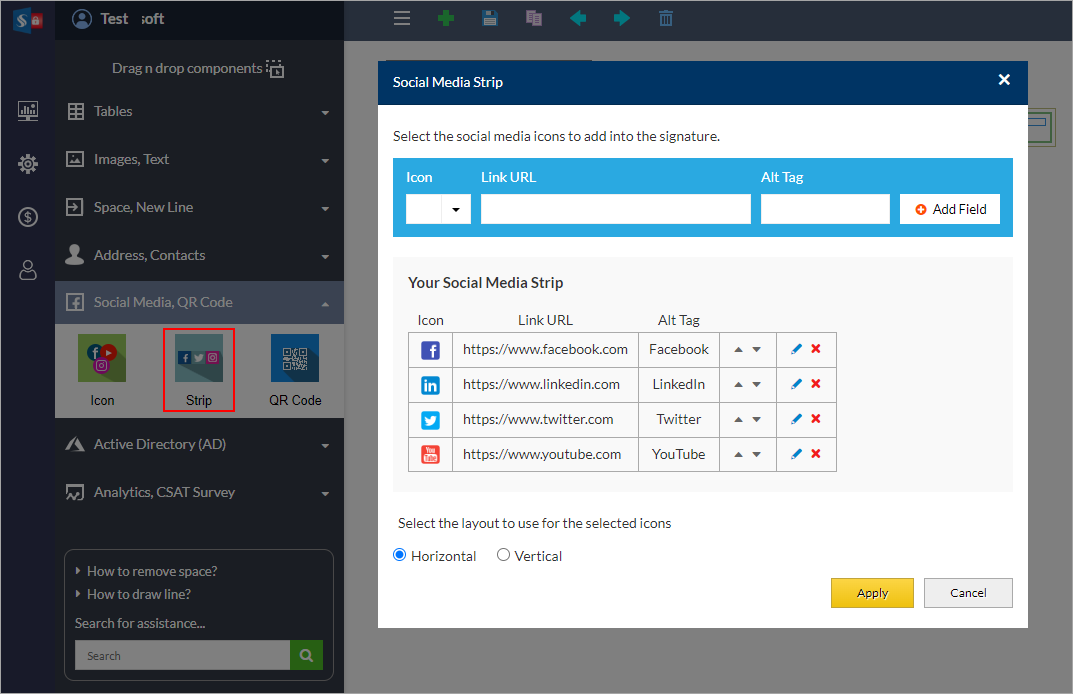
- Drag and drop the Social media strip placeholder to the signature layout, you will be displayed with the below screen.
- Select the respective social media Icon from the drop down menu, add the Link URL with Alt Tag and then, click on the Add field to add the social media link. Follow these steps to add multiple social media links at once.
- You can re-arrange the added social media links according to the requirement using ▲▼ these buttons. For the social media icons alignment, it has two options such as Horizontal and Vertical alignment.
Layout
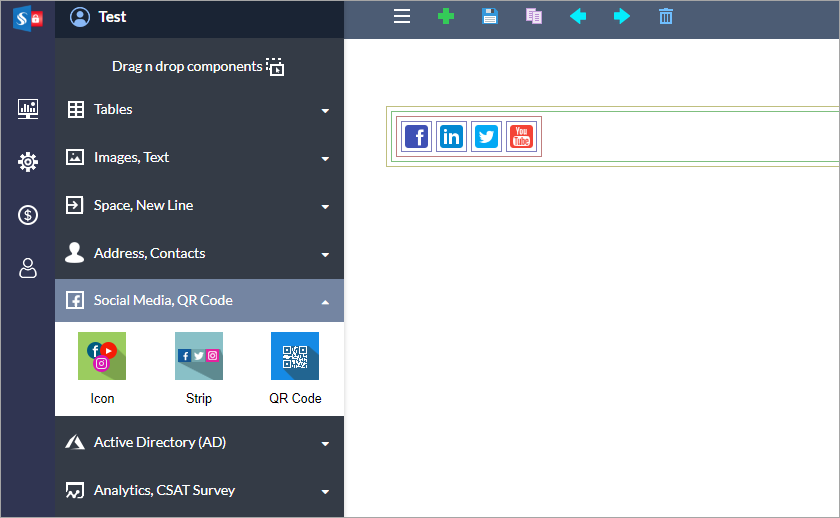
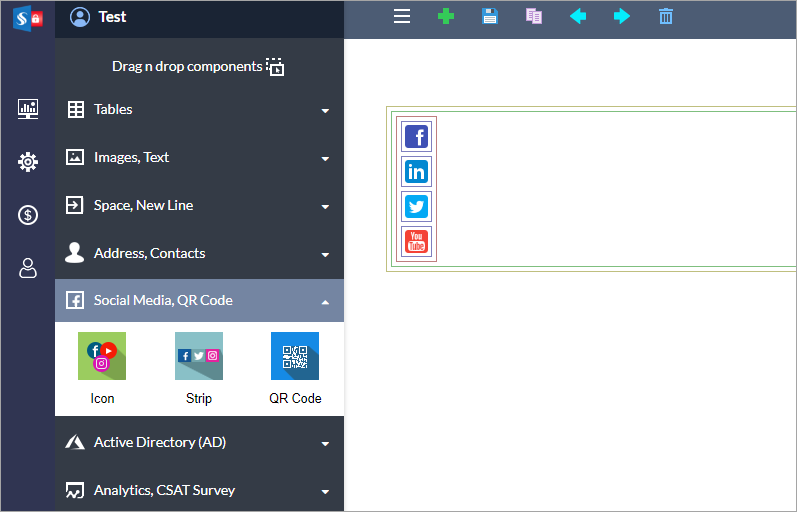
Selected social media icons can be aligned in two ways such as 'Horizontal' and 'Vertical' alignment.
- Horizontal: Select the 'Horizontal' option to align all the selected social media icons horizontally.
- Vertical: Select the 'Vertical' option to align all the selected social media icons vertically.
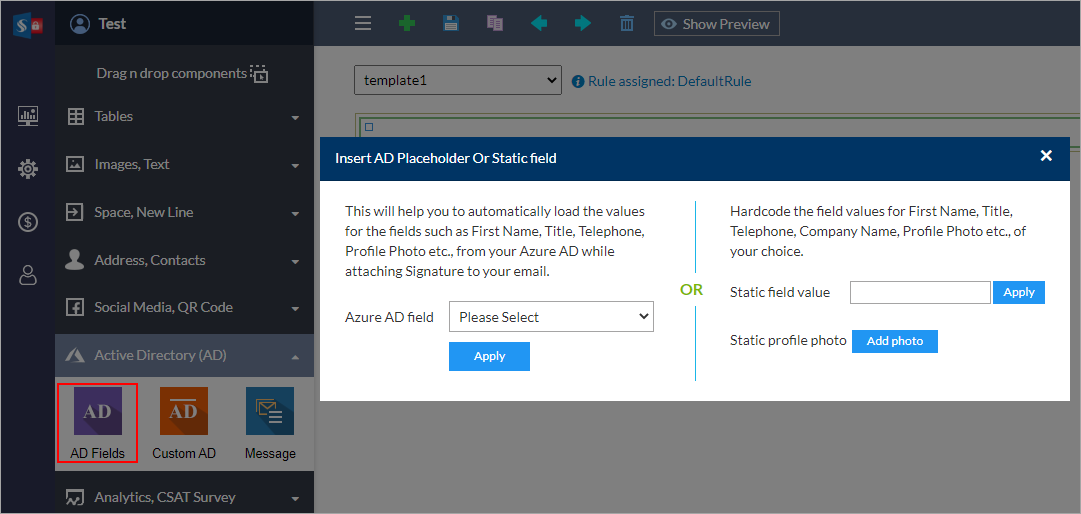
AD Placeholder:
AD Placeholder can be used to add the AD field values dynamically to the email signature for each and every user according to the field placed or you can also set static value instead of dynamic Azure AD field value to the email signature. You can add a single AD field at a time.
To insert the Azure AD field select the required field from the drop down menu OR you can hardcode the field values, it also has the option to upload the static profile photo. For example, static company logo can be added instead of profile photo.
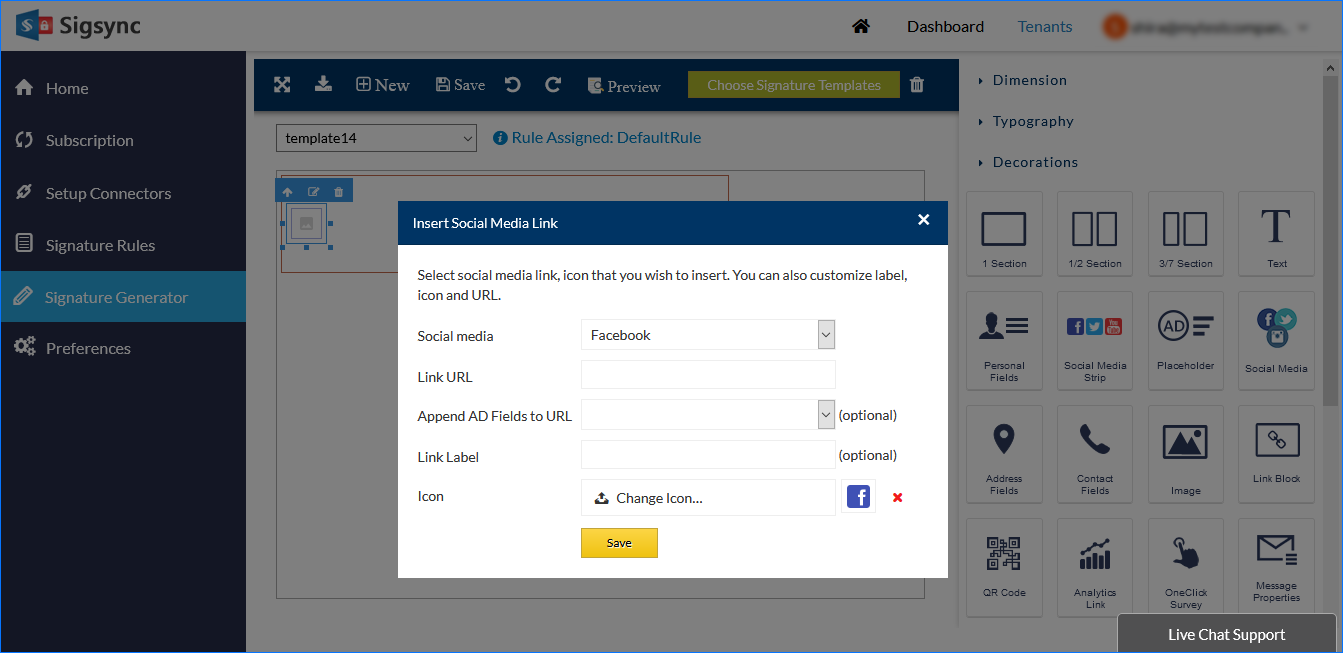
Social Media Link:
Social Media link can be used to add a single social media link at a time. Drag and drop the social link section to the signature layout, you will be displayed with the below screen.
- Select the social media network from the drop down menu
- Add the suitable link for the selected social media network
- Social media URL can also be appended with user’s AD placeholders with Append AD Fields to URL, it helps to directly mention the user’s social media profile page. This is optional
- You can provide the label for the social media link using Link Label.
- Social media URL can also be appended with user’s AD placeholders with Append AD Fields to URL, it helps to directly mention the user’s social media profile page and also the Link Label can be mentioned both these fields are optional.
- Using Icon you can browse and add different icon according to your requirement and then click the 'Save' button to apply the changes.
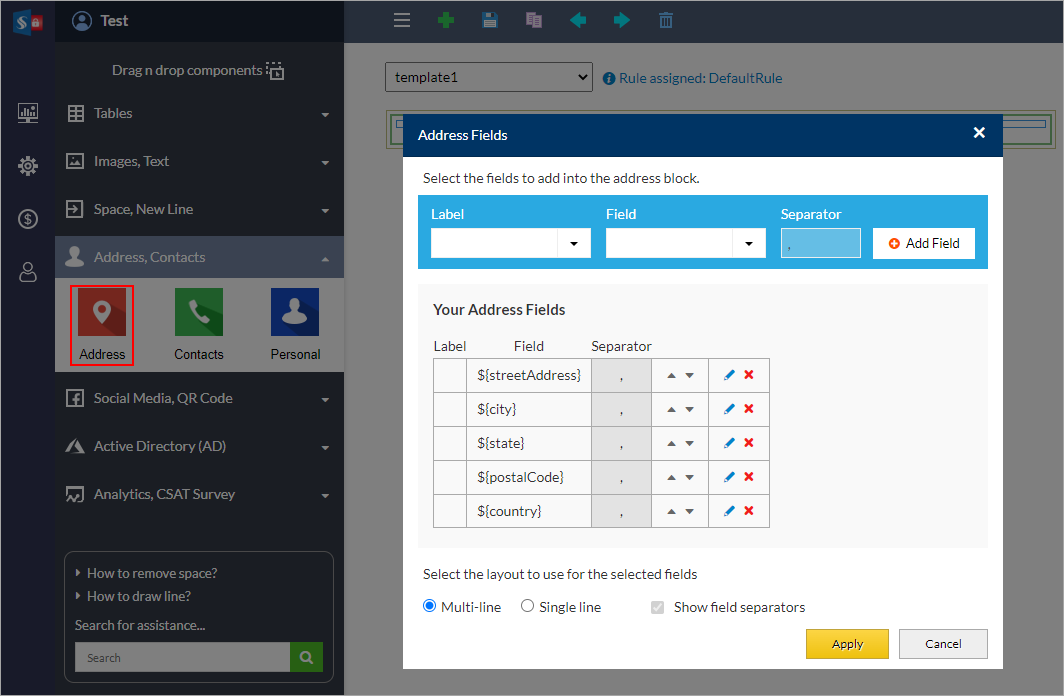
Address Fields
Address Fields used to insert the AD field values dynamically to email signature for each and every user according to the added field. The AD field values will be fetched from sender’s AD field. The Address Fields section helps to add unique address of each user dynamically and it can be re-arranged as required.
- Drag and drop the Address Field to the signature layout, you will be displayed with below screen.
- Select the label, field from the drop down menu and Separator. Then, Click the 'Add Field' button.
- Use ' ' to edit the existing address fields and you can use ' ' to delete the icon if it’s not required.
- Address fields can be re-arranged as required using ▲▼ these buttons.
- Added fields can be placed in two ways such as Multi-line or Single line. Multi line can be used to show fields in separate lines. Wherein a single line option makes all the fields to appear in one line and you can choose a separator for example, 'comma (,) '. You can also choose to not use separator
Layout
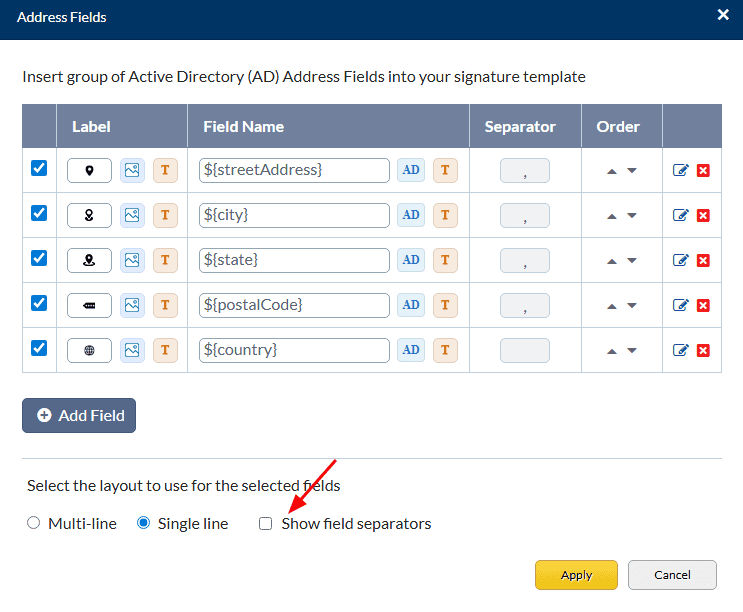
Selected address fields can be displayed in Multi-line or single-line as required.
- Multi-line: All the selected 'Address Fields' will be displayed in multiple lines.
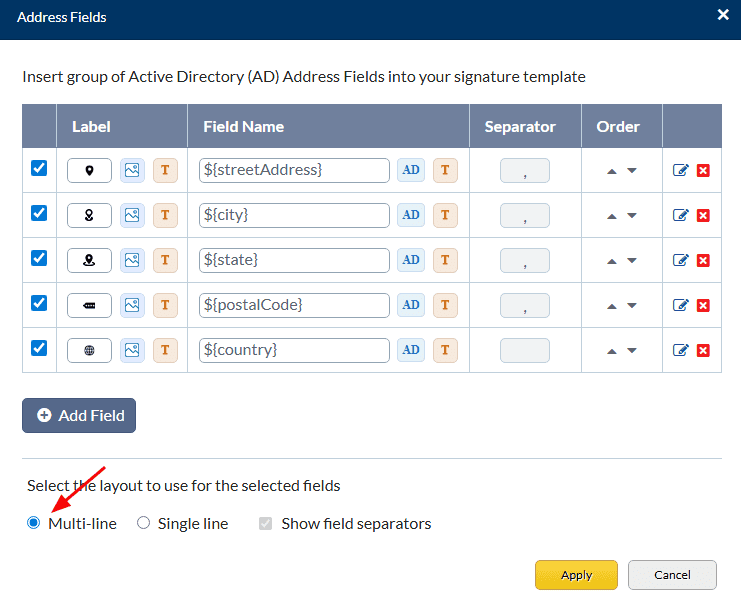
- Single-line: All the selected 'Address Fields' will be displayed in single line and here you can select separator to differentiate between the fields.
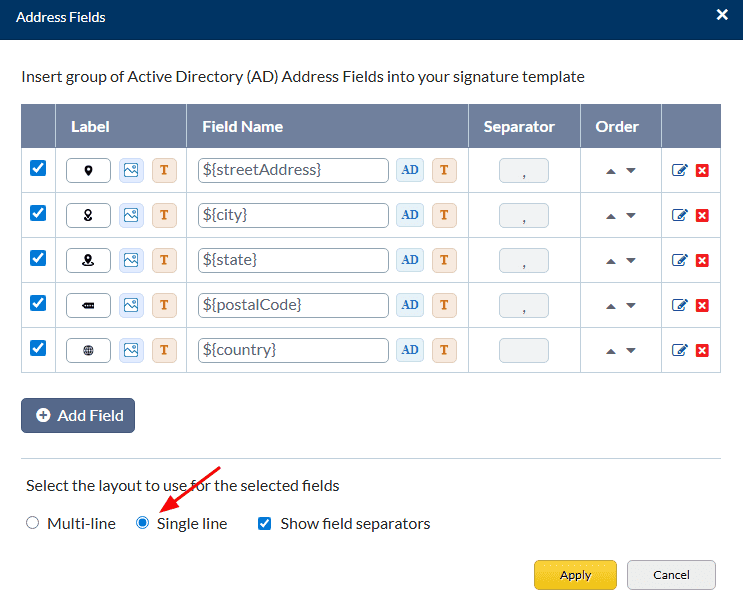
- You can uncheck the Show field separators, if you don’t want it to be displayed in the email
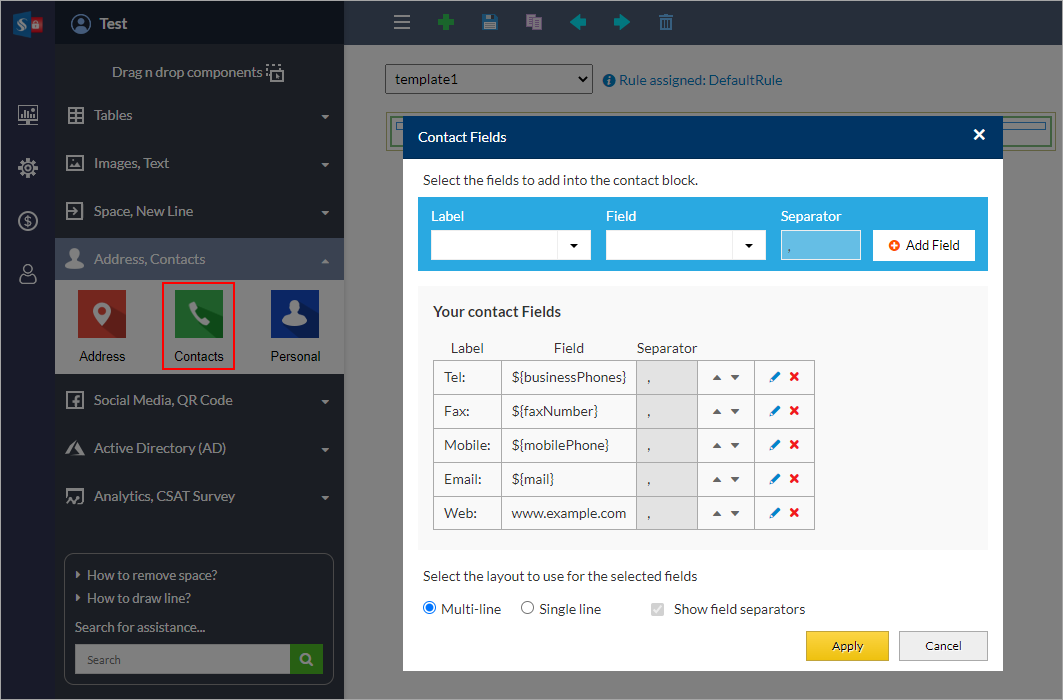
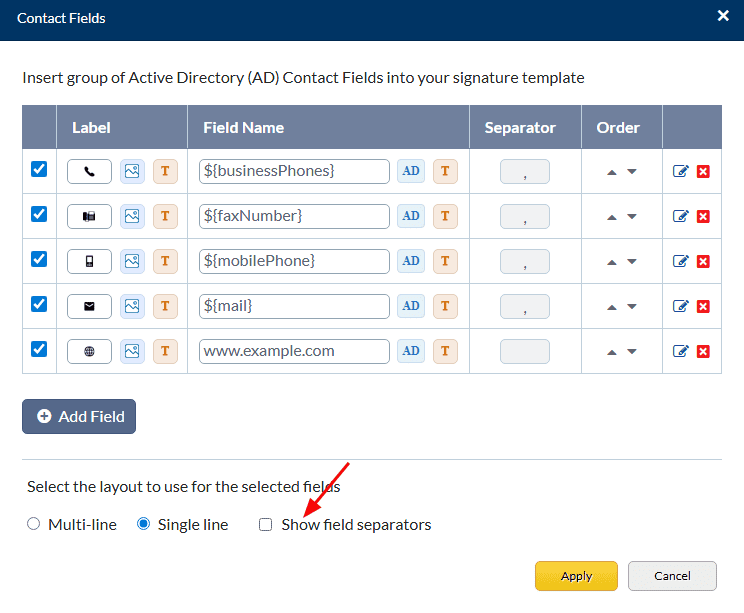
Contact Fields
Contact Fields used to insert the AD field values dynamically to email signature for each and every user according to the added field. The AD field values will be fetched from sender’s AD field. Contact Fields section helps to add unique contacts of each and user dynamically and it can be re-arranged as required.
- Drag and drop the Contact Field to the signature layout, you will be displayed with below screen.
- Select the Label, Field from the drop down menu and Separator. Then Click the 'Add Field' button.
- Use ' ' to edit the existing contact fields and you can use ' ' to delete the icon if it’s not required.
- Contact fields can be re-arranged as required using ▲▼ these buttons.
- Added fields can be placed in two ways such as Multi-line or Single line. Multi line can be used to show fields in separate lines. Wherein a single line option makes all the fields to appear in one line and you can choose a separator for example, 'comma (,)'. You can also choose to not use separator
Layout
Selected contact fields can be displayed in Multi-line or single-line as required.
- Multi-line: All the selected 'Contact Fields' will be displayed in multiple lines.
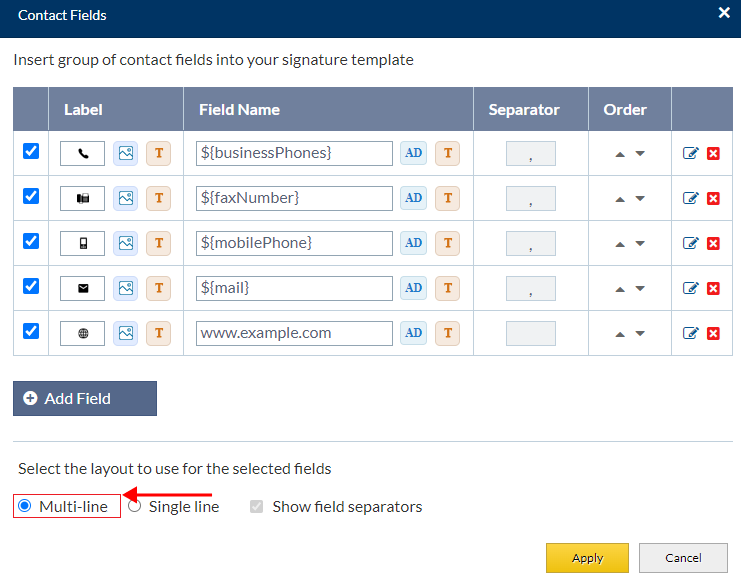
- Single-line: All the selected 'Contact Fields' will be displayed in single line and here you can select separator to differentiate between the fields.
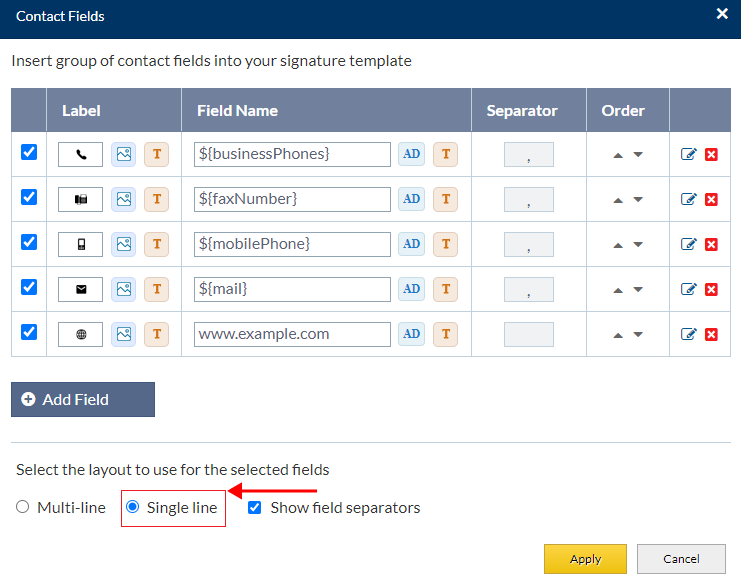
- You can uncheck the Show field separators if you don’t want it to be displayed in the email.
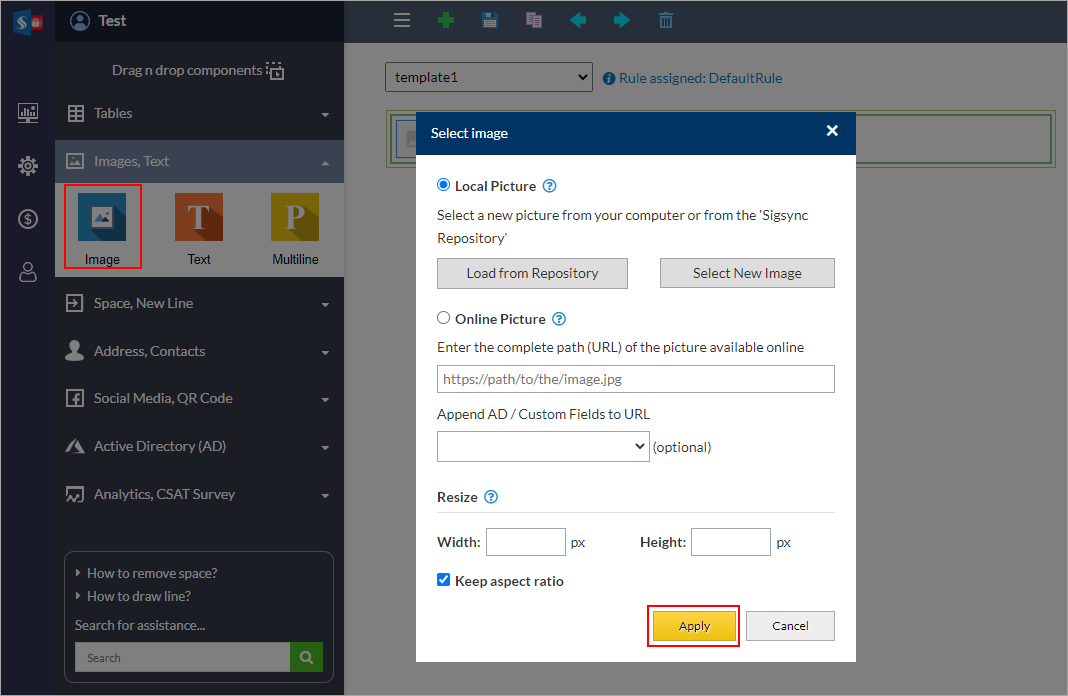
Image
A placeholder to add an image to the email signature.
- Drag and drop the image to the signature layout.
- Image can be selected from your computer/Sigsync repository or you can also have the online image by entering the complete URL.
- Select Local Picture option. Click the Load from Repository button to load image from Sigsync repository or click the Select New Image button to load image from your computer.
- Select Online Picture Option to have the online image. Enter the complete URL of the online picture.
- Loaded image can be resized according to your requirement. Enter the appropriate Width and height in pixels.
- Click the ‘Save’ button to apply the changes.
Link Block
Link block is used as a link provider for other fields such as, adding the link to an image. Href or Analytics link can be added as well.
- Drag and drop the Link block to the signature layout and add the link. You can add the link in two ways such as Href Link and Analytics Link.
- For Href, fill all the fields required and click the 'Save link' button.
- Inserts the link field where you can add URL to refer your webpage. Drag and drop the link to the signature layout.
- You have to add Title which will appear if image is not supported in receiver’s application, Href is URL link you want to add.
- Target can be either 'This window' which opens link in same page or 'New window' which opens it in new tab or new window based on browser settings.
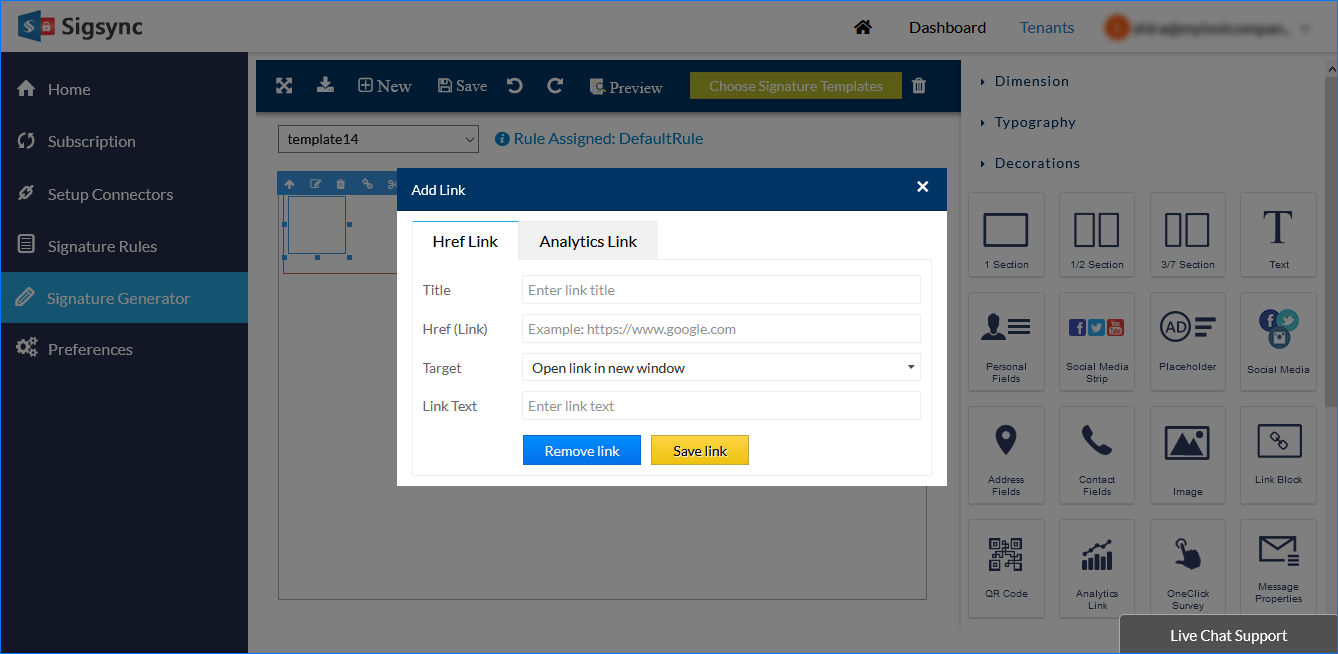
- For Analytics Link parameters, refer Analytics section.
- You can also add the image placeholder inside this placeholder to make the image clickable.
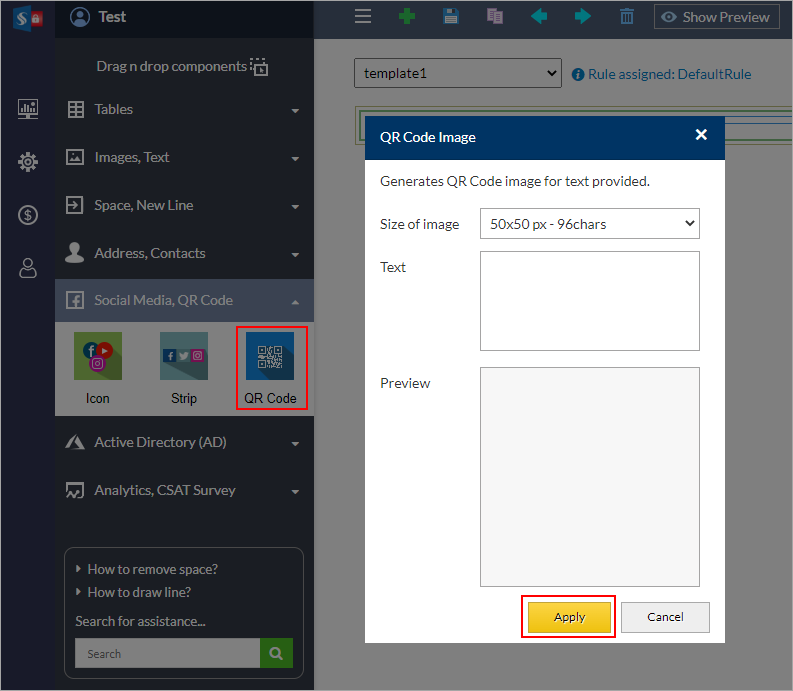
QR Code
Add any text in the text field to generate a QR code image automatically. Its image size can be varied according to the set size.
- Drag and drop the QR code placeholder to the signature layout.
- Select the size of the QR code image from the drop down menu.
- Enter the required text in the text field. If you require a higher text limit pick a higher image size.
- Preview will be displayed according to the text added.
- Click 'Save' button to add QR image to signature.
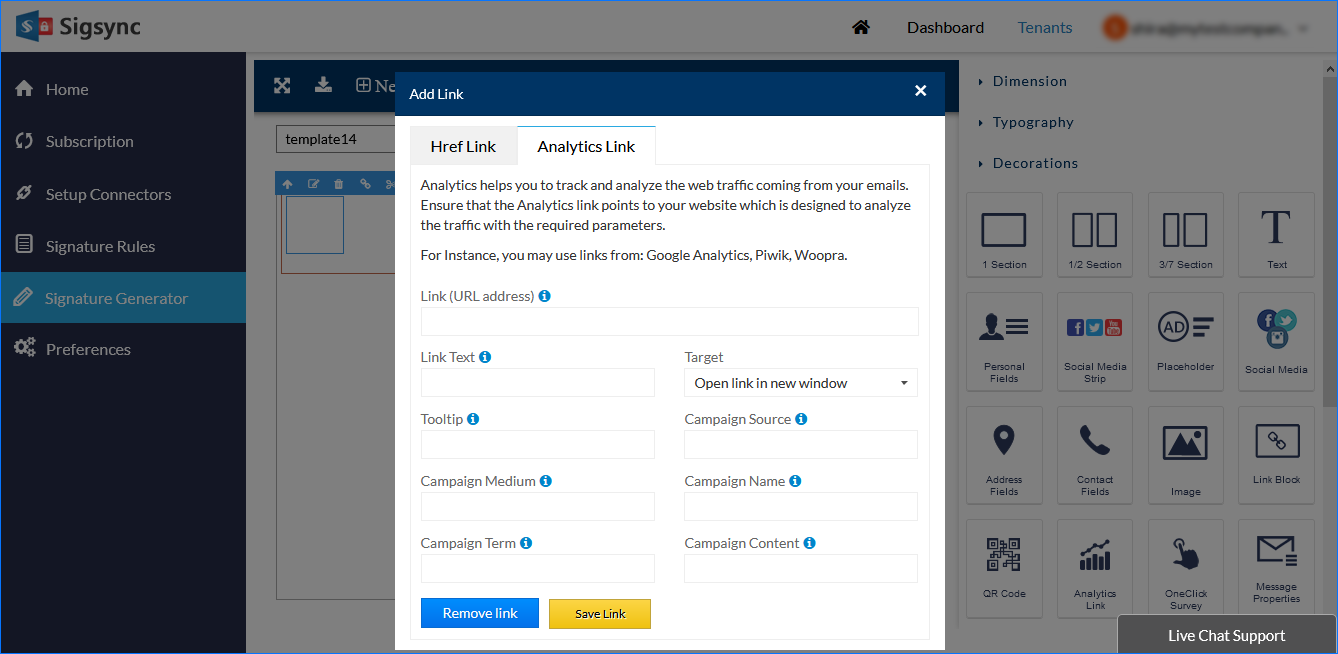
Analytics Link
Sigsync Email signature service provides an option to add analytic links of third parties into email signature which can help to track the activity, conversion rate and user behavior on a website and it includes user’s actions, users count and page they visit etc.
- Drag and drop the Analytic link tool to the signature layout.
- Upon performing drag and drop action you will be displayed with a form where you need to fill all the fields.
Parameters of Sigsync Analytics link:
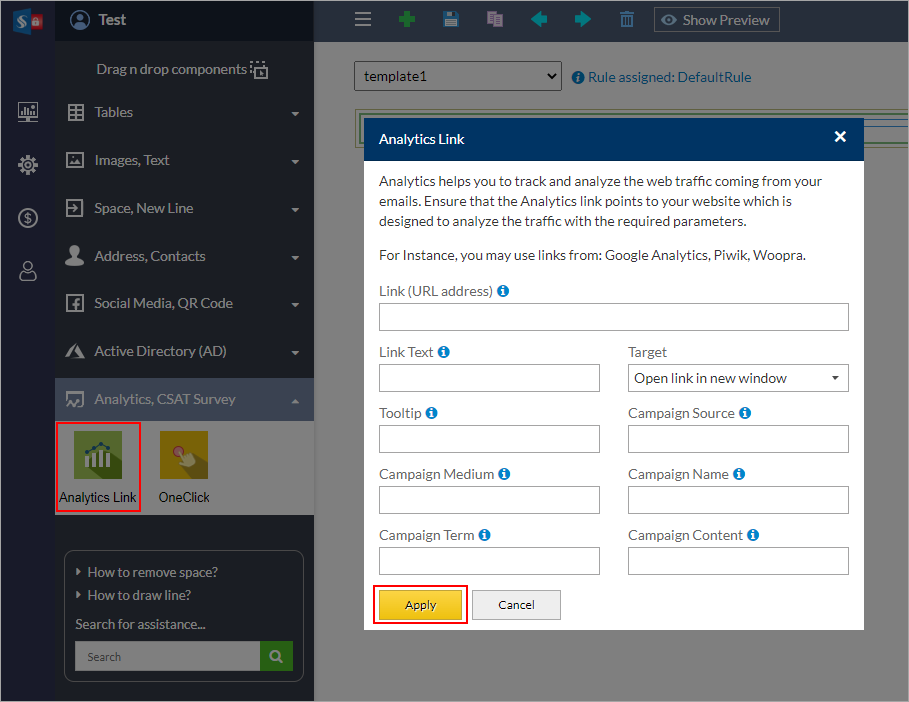
- Link (URL address): It’s your website link which needs to be added to track the traffic coming from the emails.
- Link text: It’s a link text which is clickable.
- Tooltip: The entered text will be displayed as a tooltip text when the mouse hovers over it.
- Campaign source: It’s a source of the traffic such as Google, newsletter etc.
- Campaign medium: It’s a medium of the campaign which contains the general source of traffic.
- Campaign Term: It’s a keyword which is used to differentiate between the various ads.
- Campaign content: It can contain the product name, product code or a slogan such as summer_sale.
- Click the 'Save' button to apply changes.
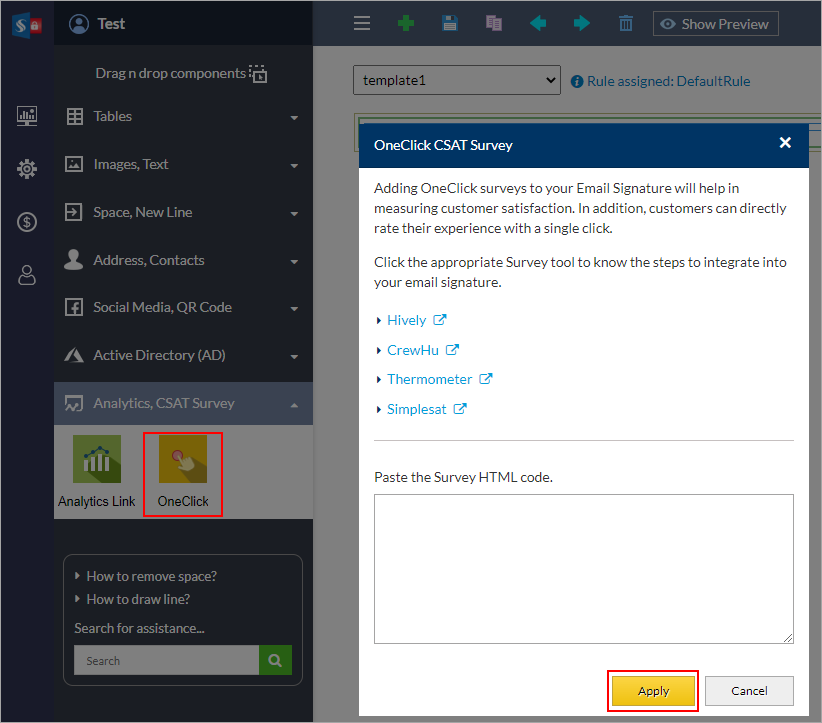
OneClick Survey
OneClick surveys are used to collect customer satisfaction feedback from your clients via email. Integrate Sigsync Email signature service with one of the OneClick surveys provided by third-party.
- Drag and drop the OneClick survey placeholder to the signature layout.
- Upon performing drag and drop action you will be displayed with the form below where you need to fill with the HTML code snippet provided by third-party One-click survey providers.
- Insert the HTML code snippet from any third party applications.
- Click the 'Save' button to apply the changes.
Message Properties
A placeholder to add message properties to the email signature. To add the Message properties to the email signature, use Message Properties component which has options such as,
- Message ID: It's a unique identifier for digital message used in email message.
- Message date: It's the date of the email message, when it was composed.
- Message subject: It's the subject line used in an email message.
- Message current date time: It's the current date time of the received email message
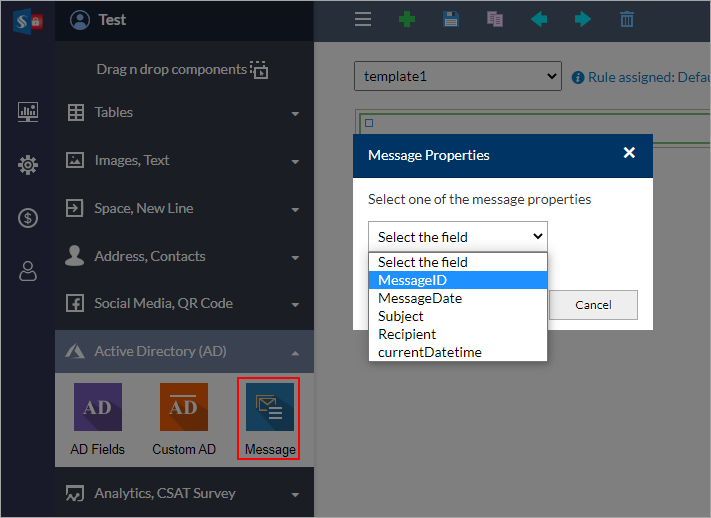
- Drag and drop the 'Message Properties' component to the signature layout.
- Then, select the required message properties from the dropdown menu which needs to be added in your email signature.
- Click the 'Save' button to apply changes.
Blank Space
Blank Space can be used to have a space between two fields / components.
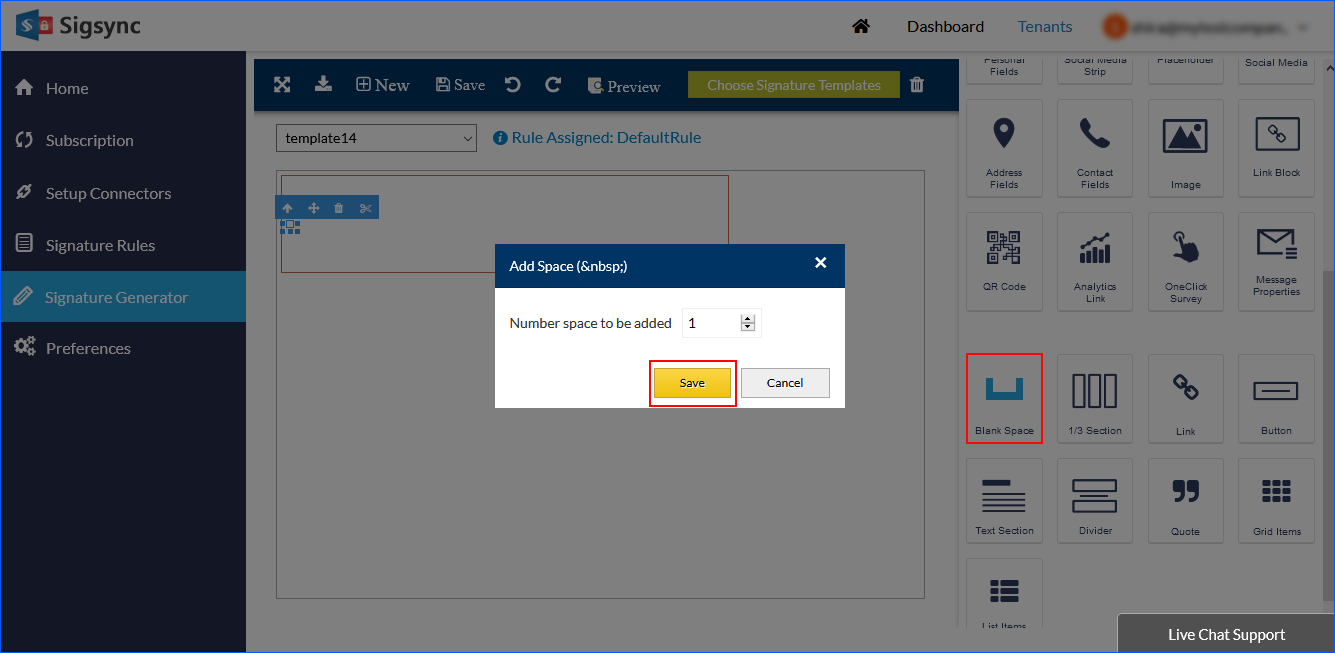
- Drag and drop the 'Blank Space' placeholder to the signature layout.
- Upon performing drag and drop, you will be displayed with the popup where you need to add the number of spaces required in the Number of Space to be added field.
- Click the 'Save' button to apply changes.
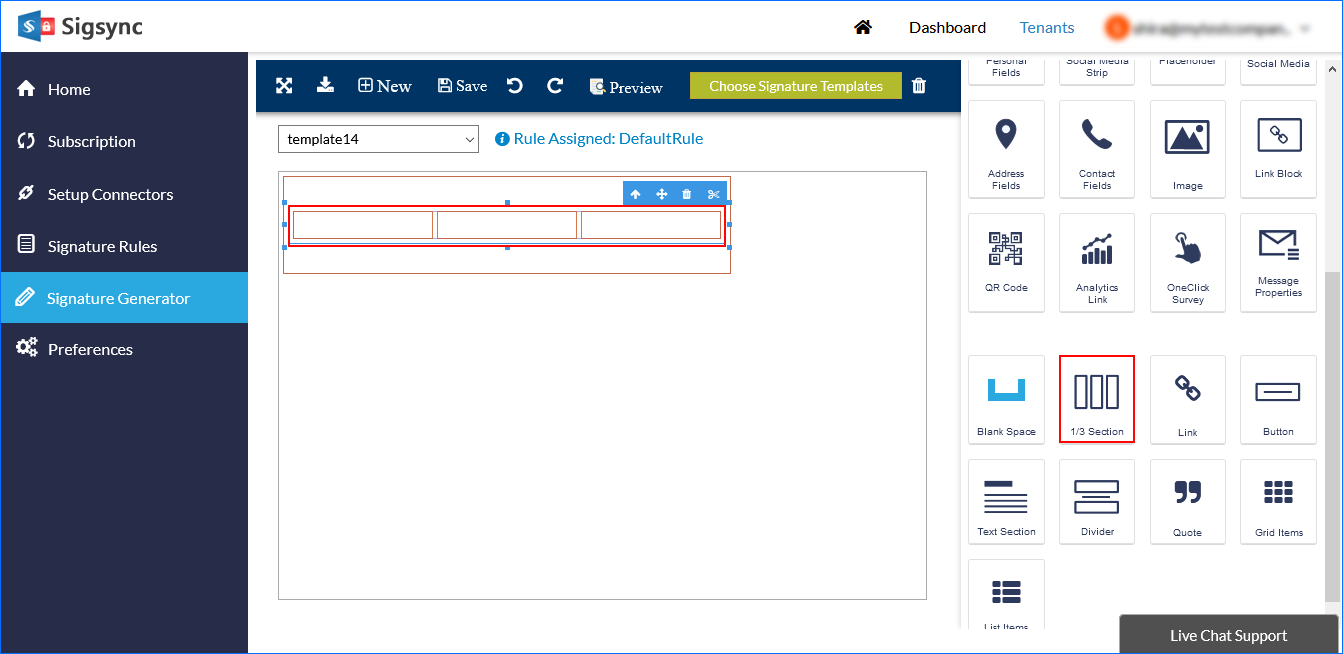
1/3 section: Inserts three sections where each section contains 33% width. In these sections, you can add different placeholders in the intended section to create a unique email signature.
Drag and drop the 1/3 Section to the signature layout. This section can be used as a basic layout for the whole signature or it can be used for adding other placeholders in three different sections such as social media icons, AD fields etc.
Link:
- Inserts the link field where you can add URL to refer your webpage. Drag and drop the link to the signature layout.
- You have to add Title which will appear if image is not supported in receiver’s application, Href is URL link you want to add.
- Target can be either 'This window' which opens link in same page or 'New window' which opens it in new tab or new window based on browser settings.

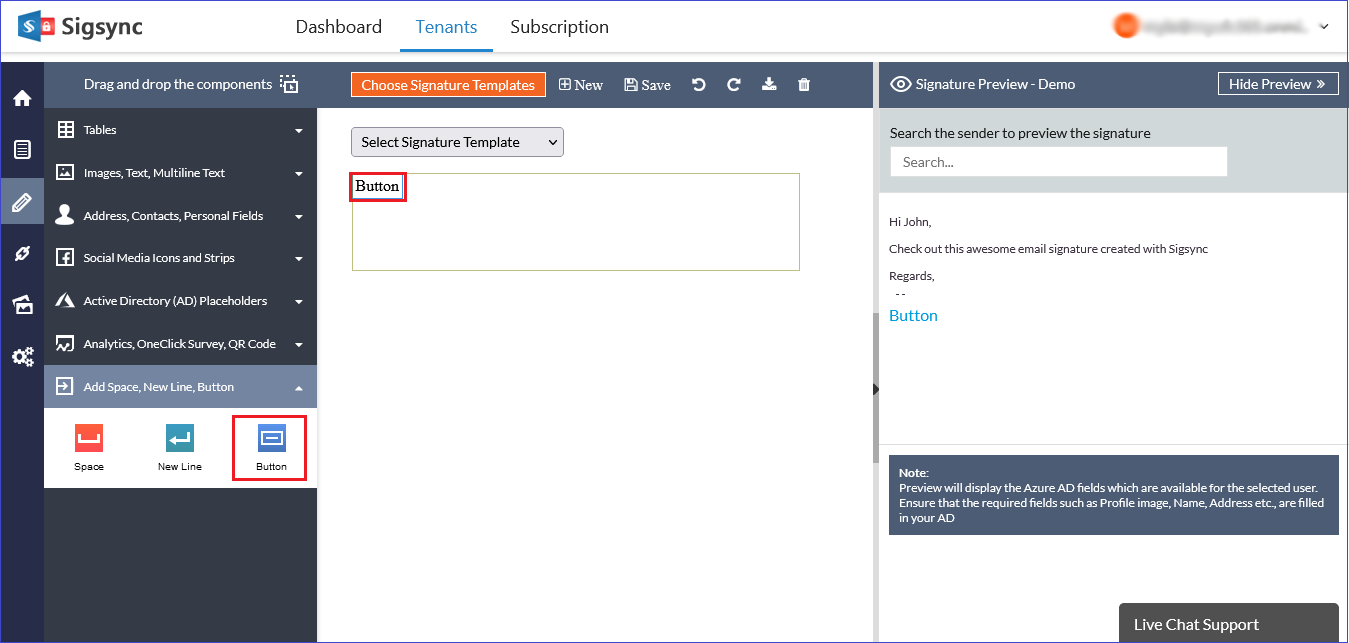
Button: Inserts a button. Drag and drop the button to the signature layout. Enter the button name and you can also link the button using the link icon.
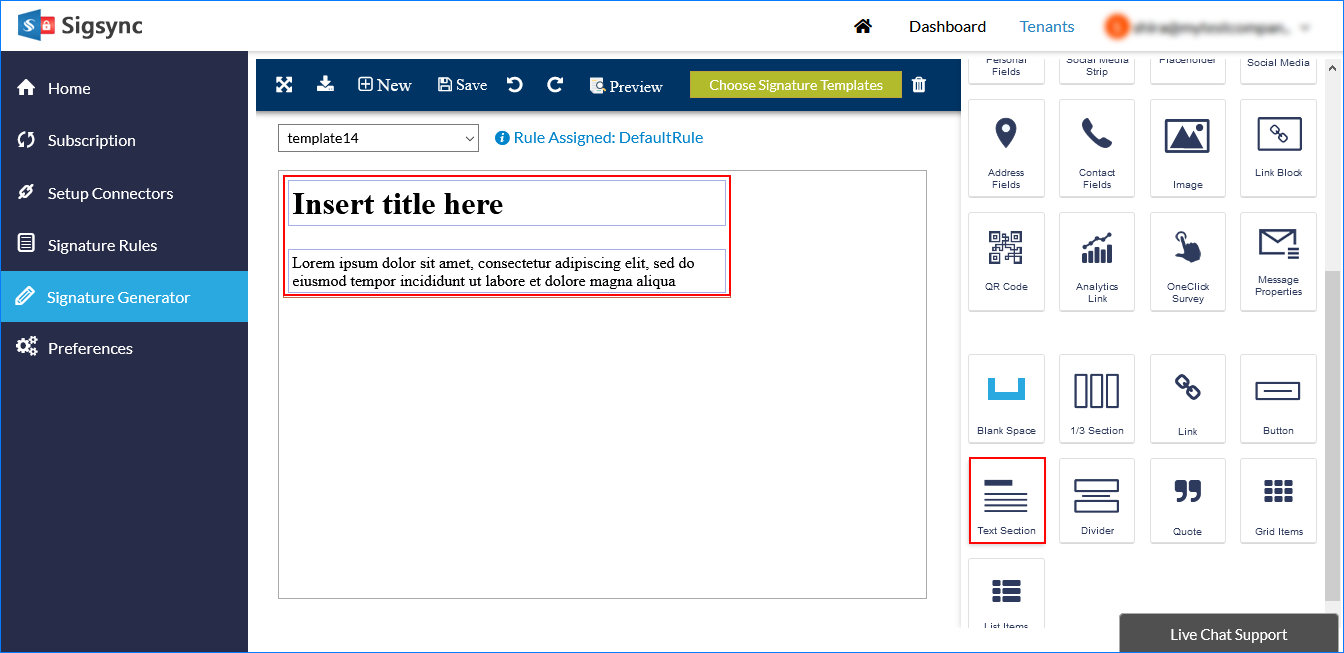
Text section: Inserts a text field where you can add any text. For example, disclaimers can be added here. Drag and drop the text section to the signature layout and add the required text in the text section.
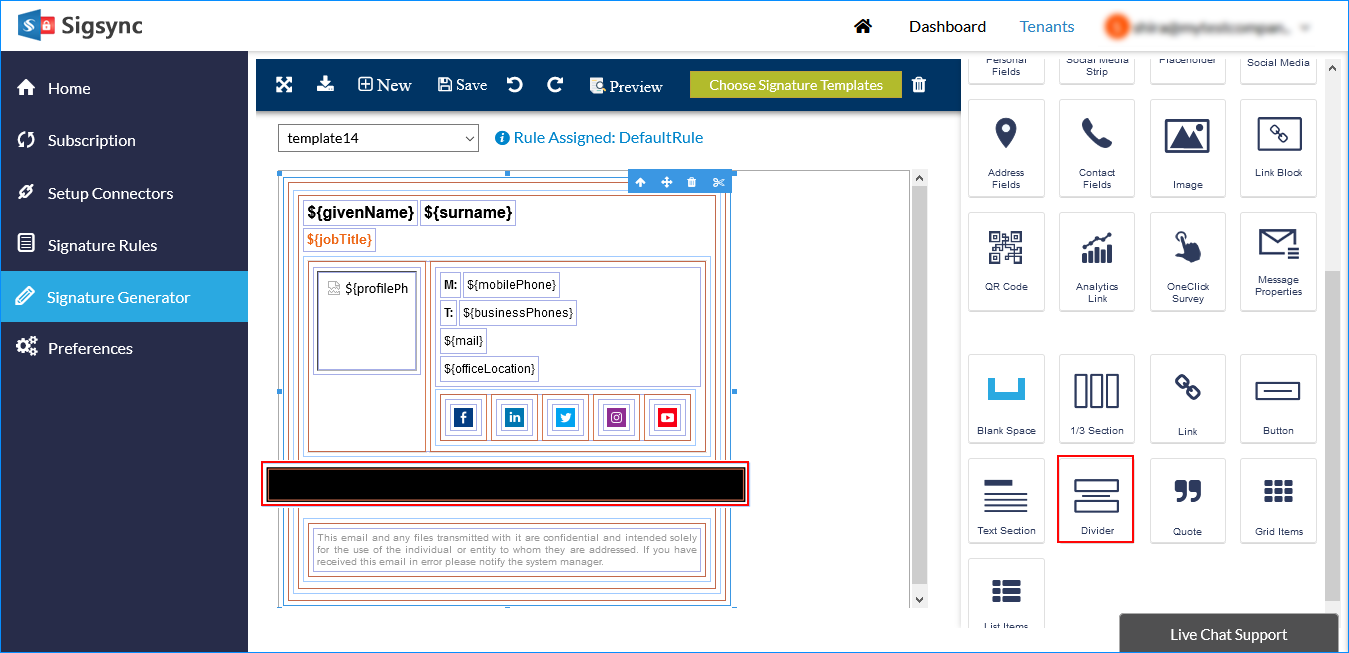
Divider: Inserts a divider. This is useful for dividing sections and giving visibility. Drag and drop the divider to the signature layout to differentiate between the two sections.
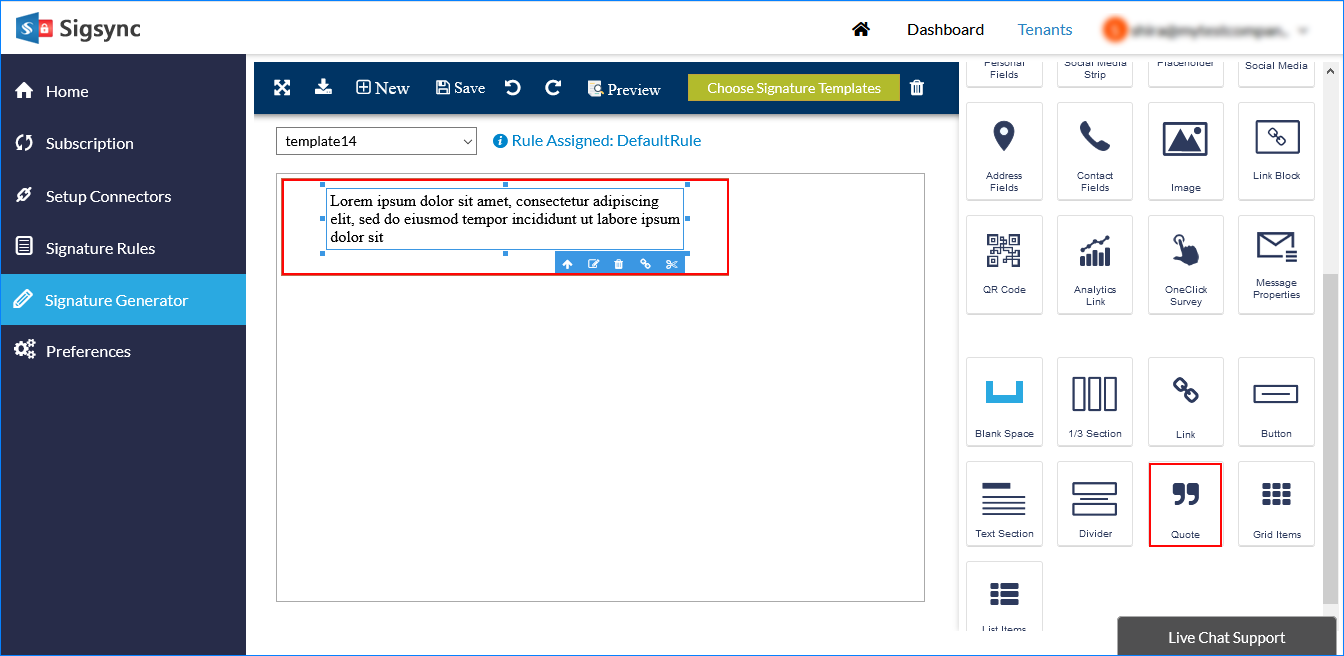
Quote: Inserts famous quotes or company motto using this field. Drag and drop the quote section to the signature layout and enter the required quote in the section.
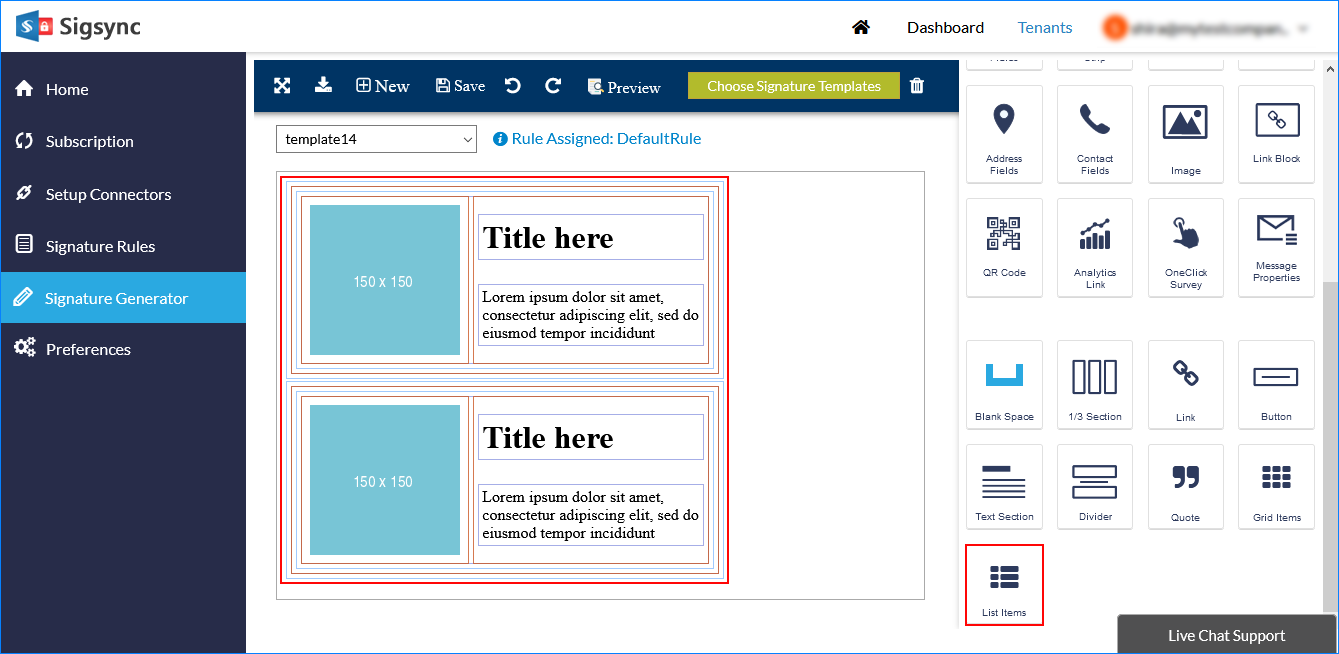
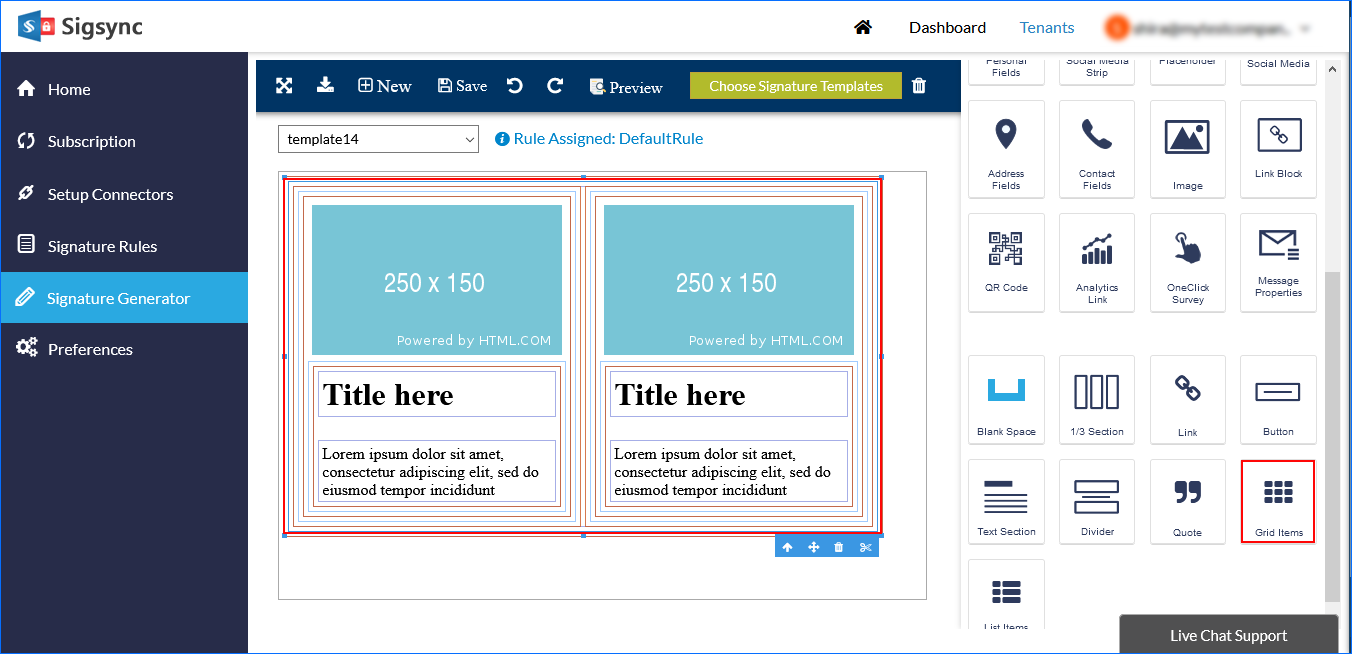
Grid items: Inserts the grid with multiple sections which can be used to add other placeholders. Drag and drop the grid items to the signature layout which helps to add multiple placeholders.
List items: Inserts a list of sections which can be used to add other placeholders. Drag and drop the list items to the signature layout which helps to add multiple placeholders.