
-
- Reseller
-
Products
Tailored Product Demo for Your Exact Needs
Explore how our solution delivers efficiency, control, and scalability.
Request a Demo
-
Solutions
Tailored Product Demo for Your Exact Needs
Explore how our solution delivers efficiency, control, and scalability.
Request a Demo
- Dashboard
- Features
- Pricing
Integrate Brevo Campaign Tool with Sigsync
Sigsync Office 365 Email Signature Software lets you integrate with Brevo, an email marketing and campaign platform used to design, send, and manage marketing emails, so your approved signature is applied across Brevo campaign templates automatically, instead of updating each one by hand.
Why Integrate the Brevo Email Campaign Tool?
Here's what this integration is actually useful for:
- Rolling out a new signature across every campaign template at once, instead of opening each Brevo template individually and pasting it in
- Keeping marketing and support campaigns on-brand, so a promotional email and a support follow-up both carry the same approved signature, logo, and contact details
- Updating details that change often, like a phone number, job title, or seasonal banner, in one place in Sigsync, then pushing that update to every synced Brevo template in a few clicks
- Applying different signatures to different template groups, for example, one signature for newsletter templates and another for transactional or support campaigns, without manually tracking which template has which version
- Avoiding outdated signatures slipping into live campaigns, since templates stay in sync with the approved version in Sigsync rather than drifting out of date over time
Steps to Integrate Brevo Campaign Tool with Sigsync
Setting this up has three parts:
- Generate API Key in Brevo — create a Brevo API key to authorize the connection.
- Connect your Brevo account in Sigsync — use that key to connect Brevo from your Sigsync dashboard.
- Select & sync templates — choose a signature and the Brevo templates it should apply to, then sync.
Generate API Key in Brevo
You'll need an API key from your Brevo account before connecting to Sigsync. Here's how to create one.
- Create an account or log in to your existing Brevo account.
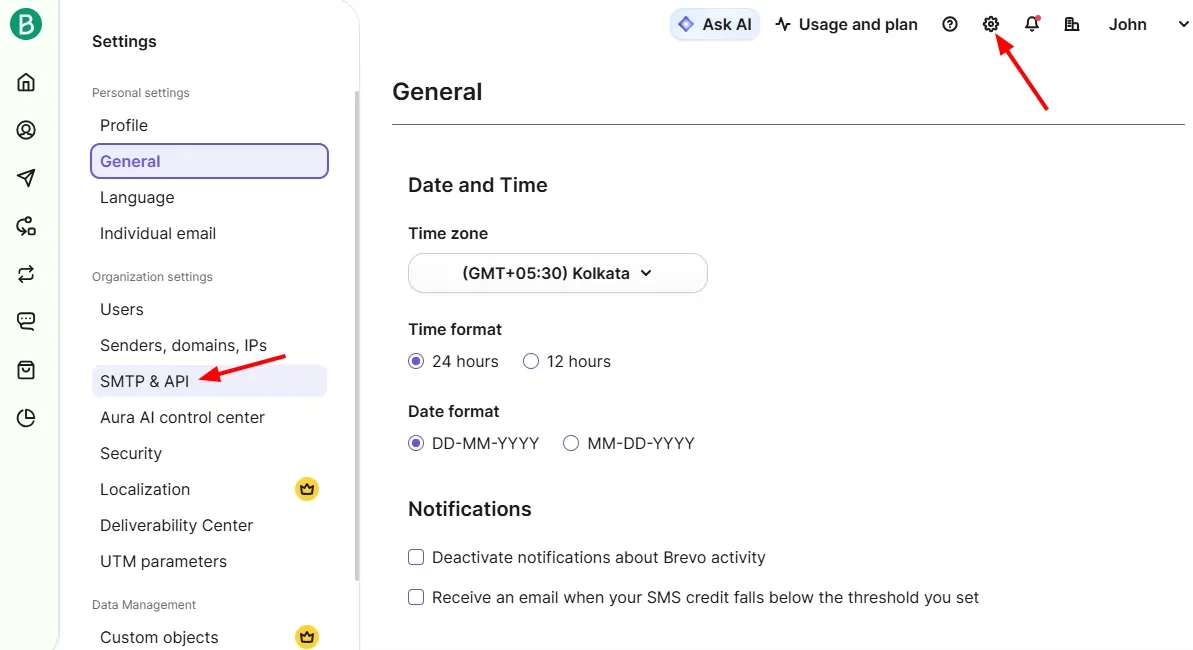
- Click the Settings (⚙️) icon in the top right corner, then select SMTP & API under Organization settings.
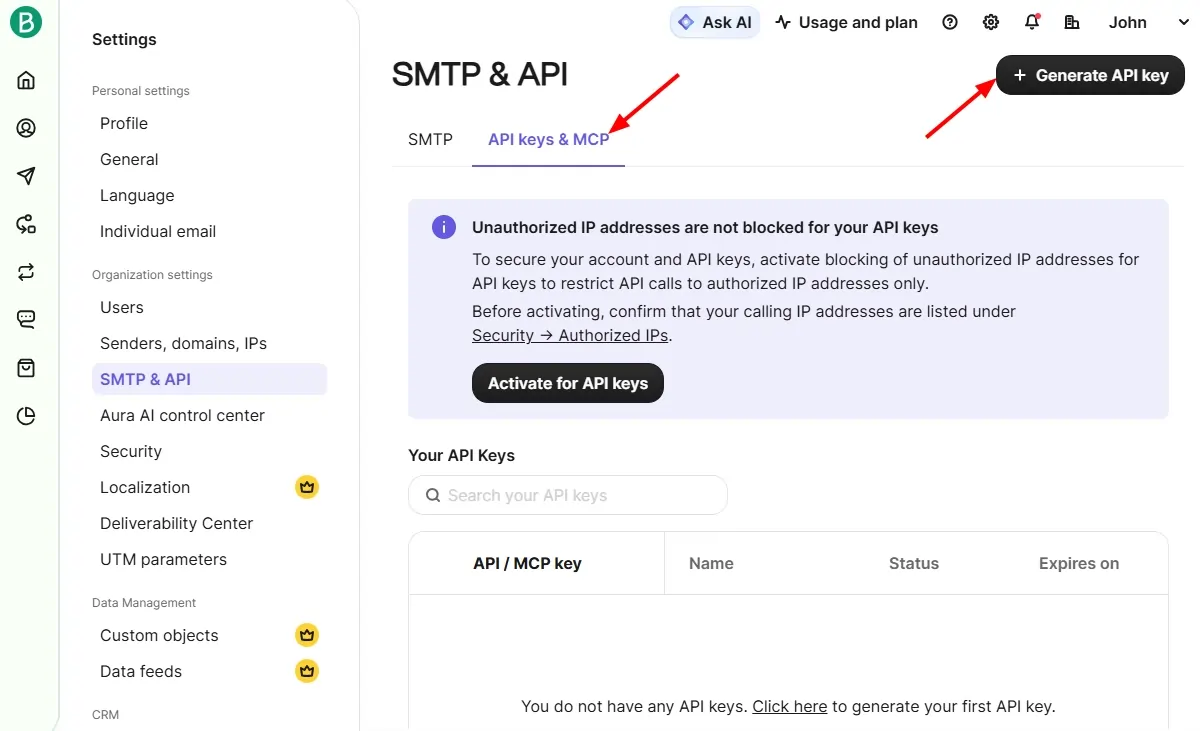
- Select API Keys & MCP, then click Generate API key.
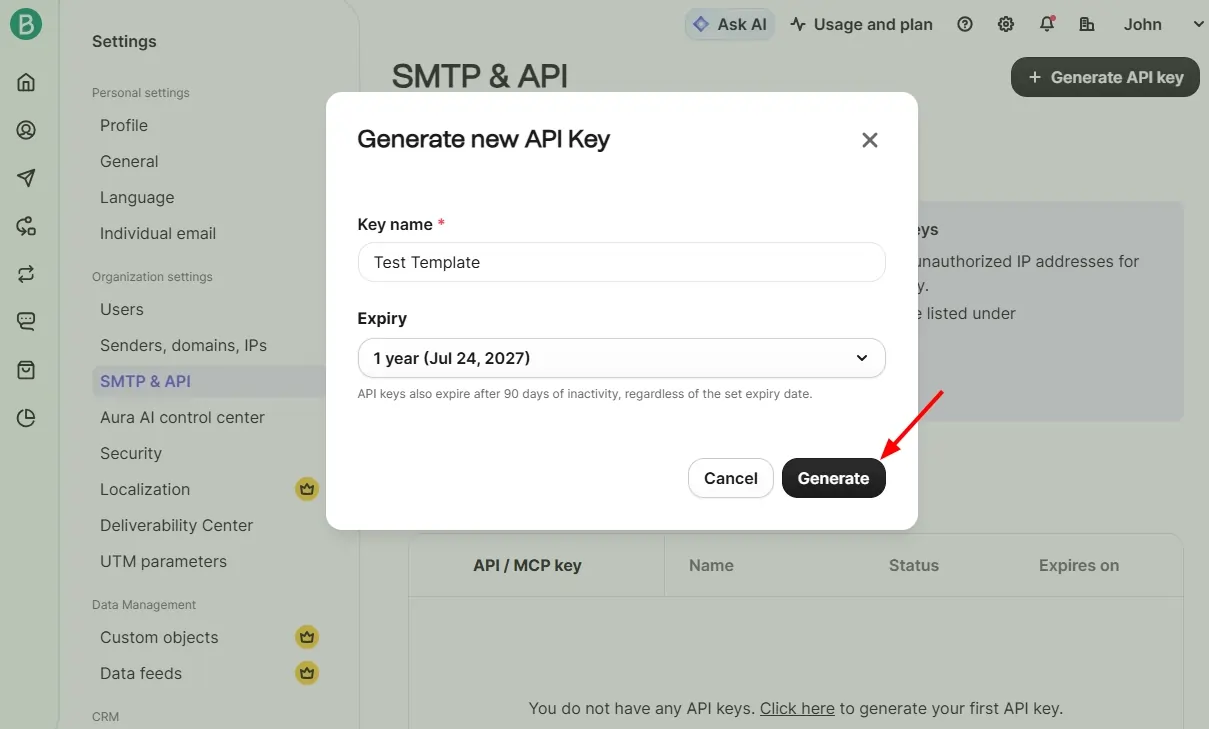
- Enter a name for the key, choose an expiry period, and click Generate.
- Copy the generated key.
Your API key is now ready to use in Sigsync.
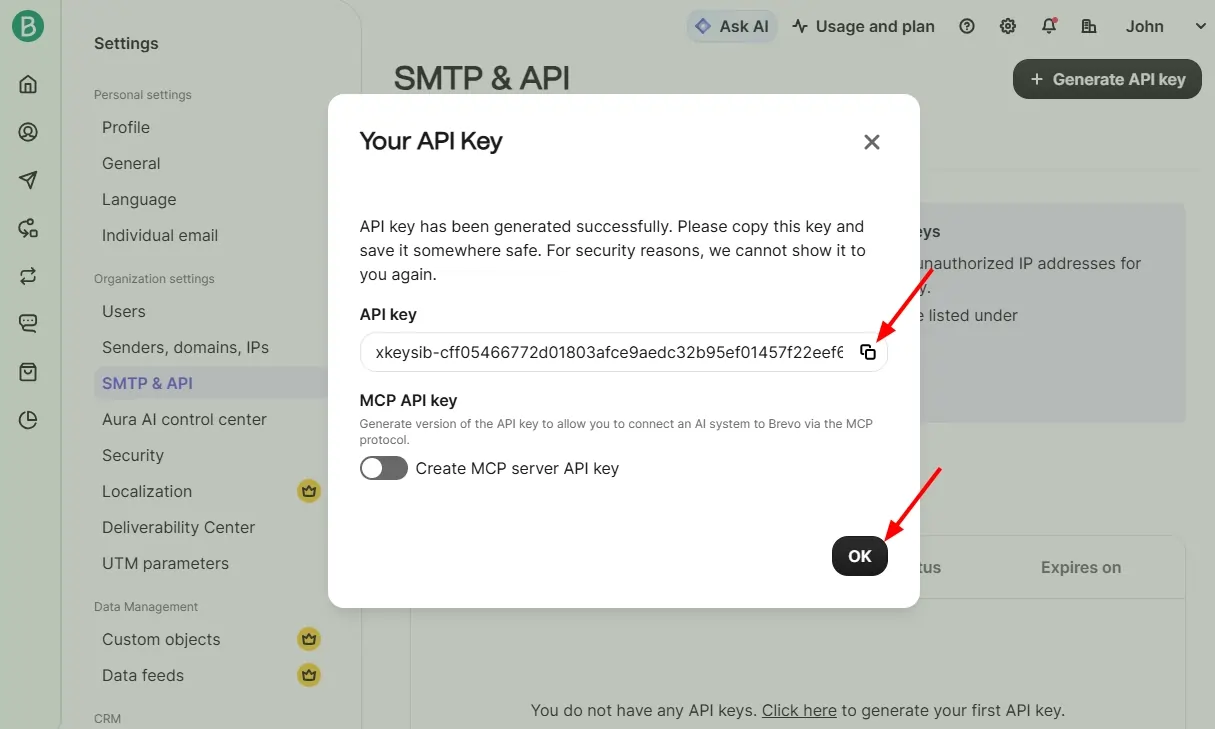
Keep it safe: treat your API key like a password. If it's lost or expires, you'll need to generate a new one and reconnect it in Sigsync.
Connect your Brevo account in Sigsync
With your API key ready, here's how to connect it in Sigsync.
- Log in to your Sigsync Dashboard.
- Go to Campaign Tools.
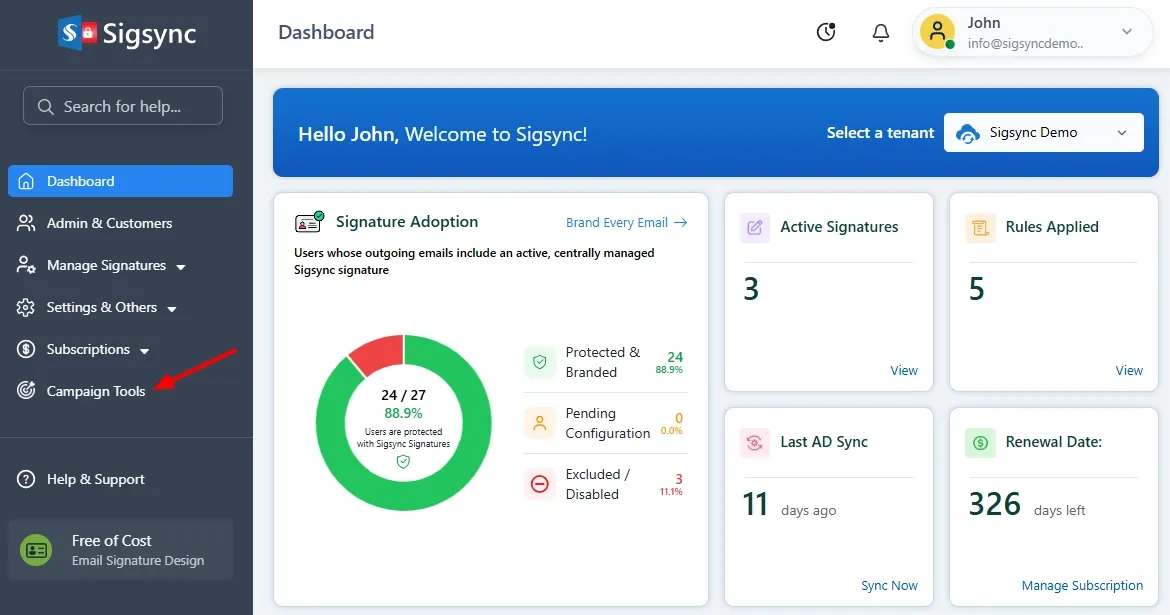
- Choose Brevo as the platform, paste your API key, and click Connect Account.
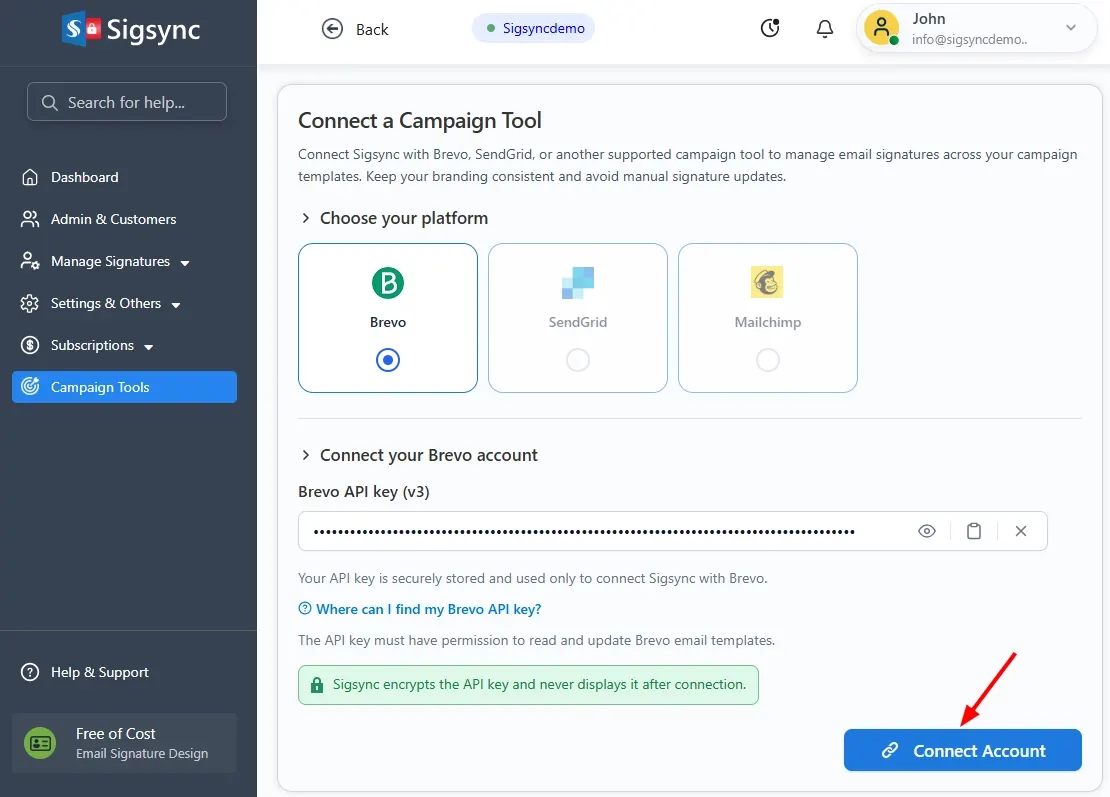
Your API key is encrypted once connected and isn't displayed again.
Select & sync templates
Once Brevo is connected, choose your signature and the templates to which it should apply.
- Select the Sigsync signature you want to use, then enter the sender email address.
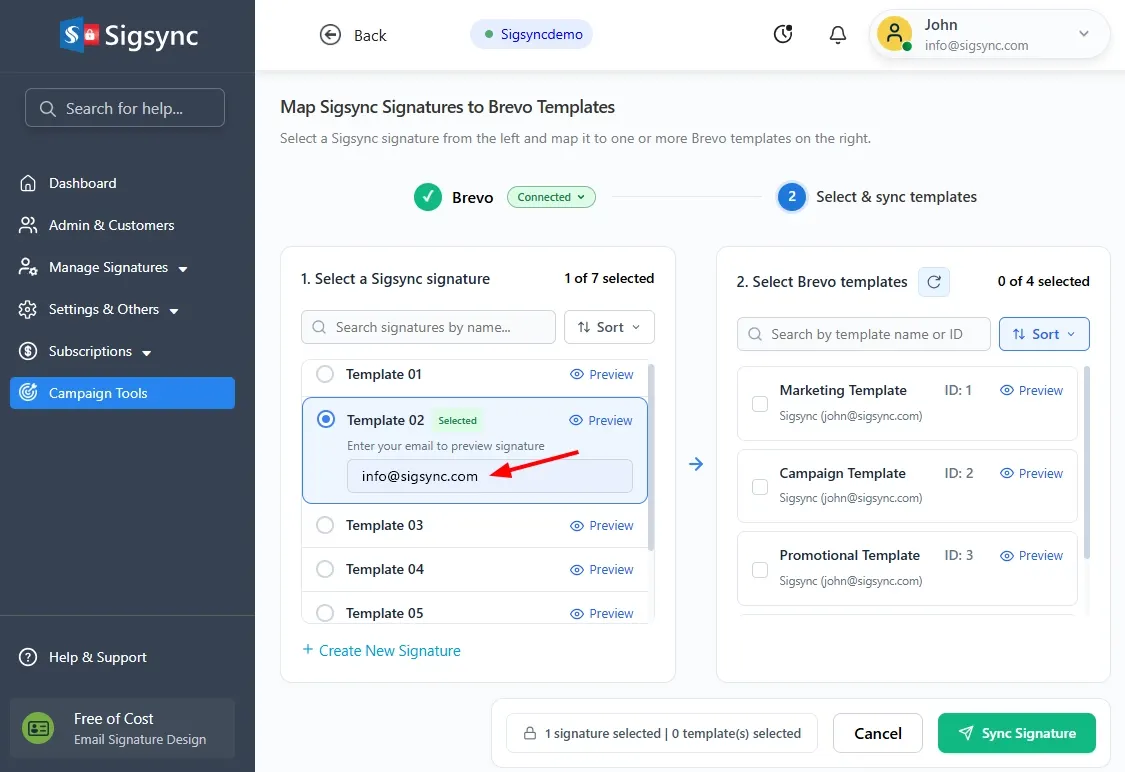
Note: Don't have one yet? Click + Create New Signature to set one up.
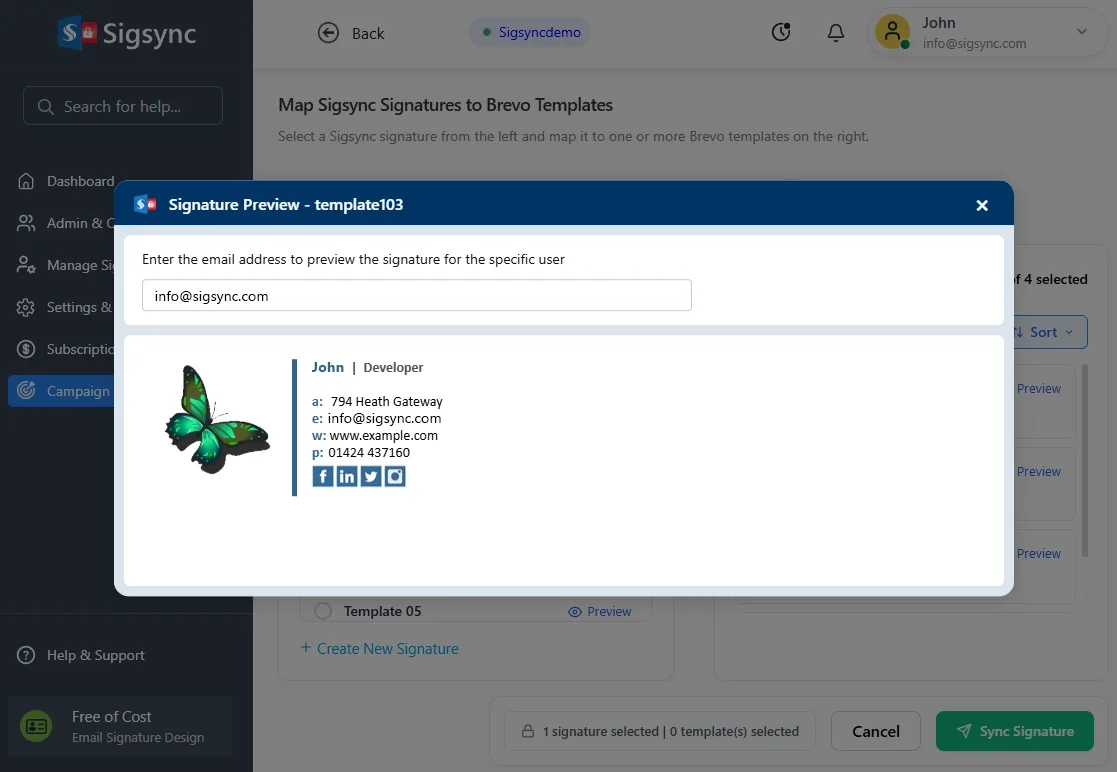
- You can preview the signature template by clicking the Preview button.
- Select the Brevo template(s) you want to sync to.
Note: You can select more than one. The signature you chose applies to every template you select.
Click here to know the steps to create email templates in Brevo
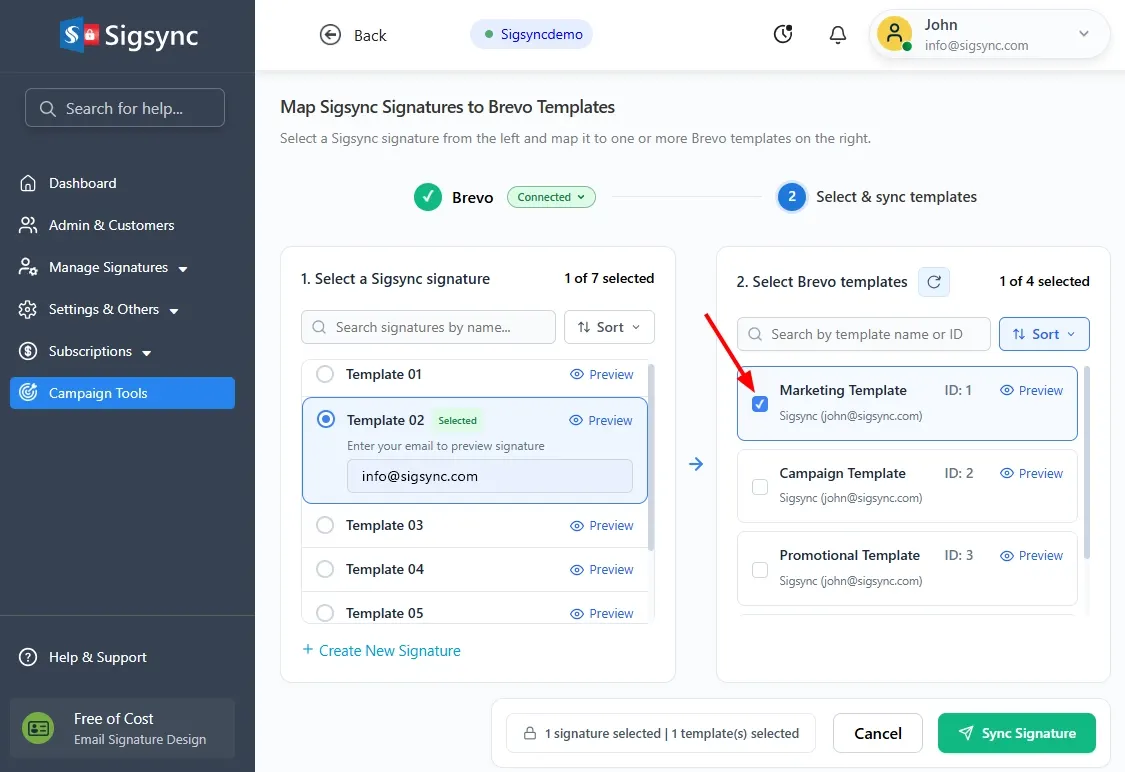
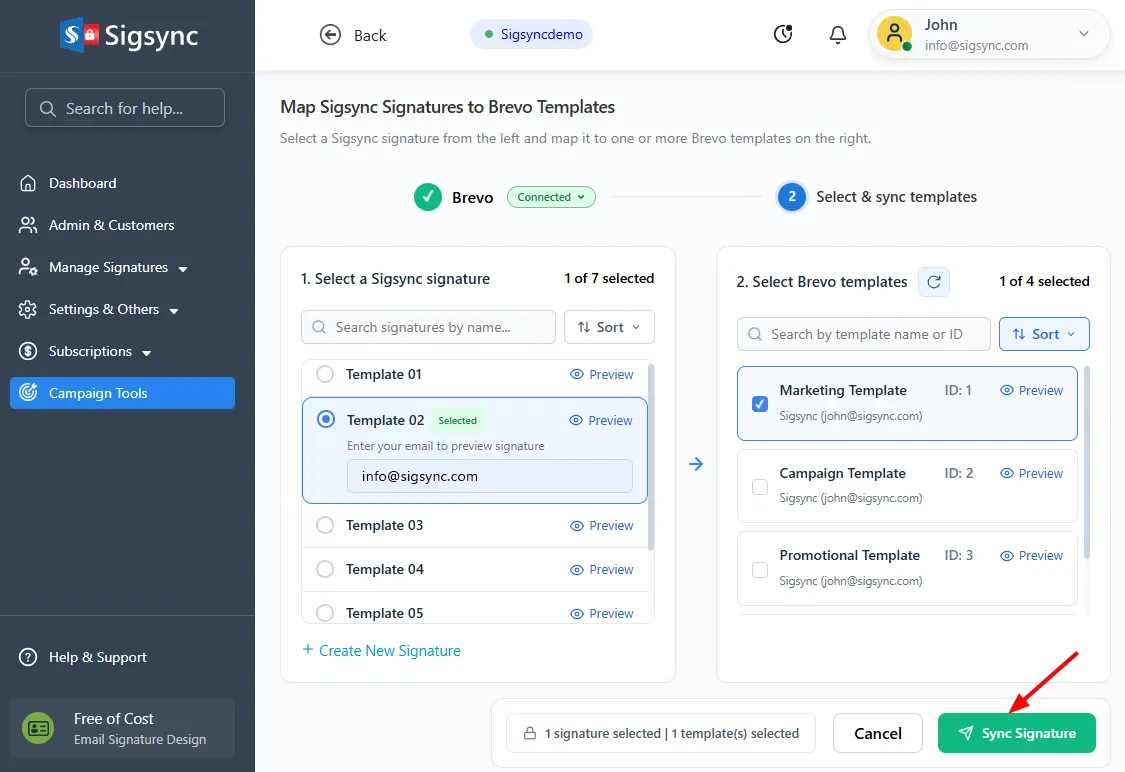
- Click Preview to check how the signature looks, then click Sync Signature.
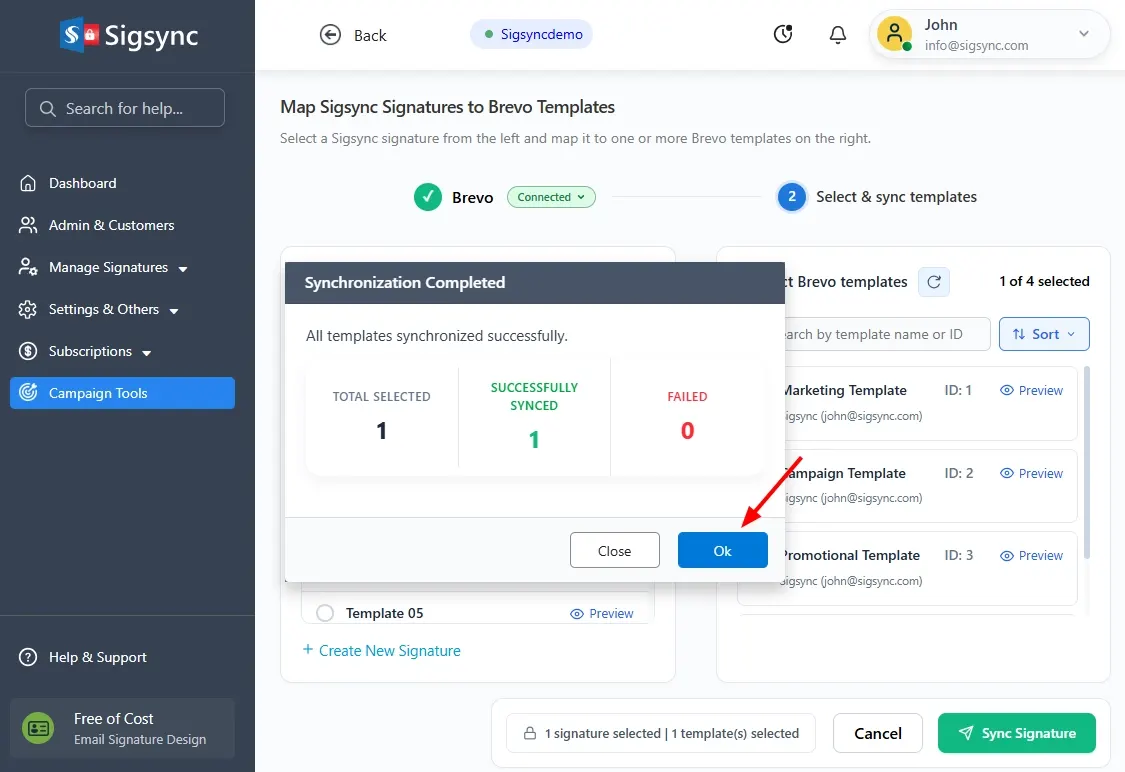
- Once syncing finishes, you'll see a confirmation that all templates were updated successfully.
Resolving Connection Failed Errors (Authorized IPs)
If your Brevo account has the Authorized IPs security setting turned on, Brevo will block the connection request from Sigsync, since it won't recognize Sigsync's IP address. In this case, you'll see a "Connection Failed" message when you try to connect your account in Sigsync, along with the unrecognized IP address.
You can resolve this using either of the following methods:
Method 1: Authorize the IP manually in Brevo
- When the ‘Connection Failed’ error appears in Sigsync, copy the IP address shown in the message.
- Log in to your Brevo account.
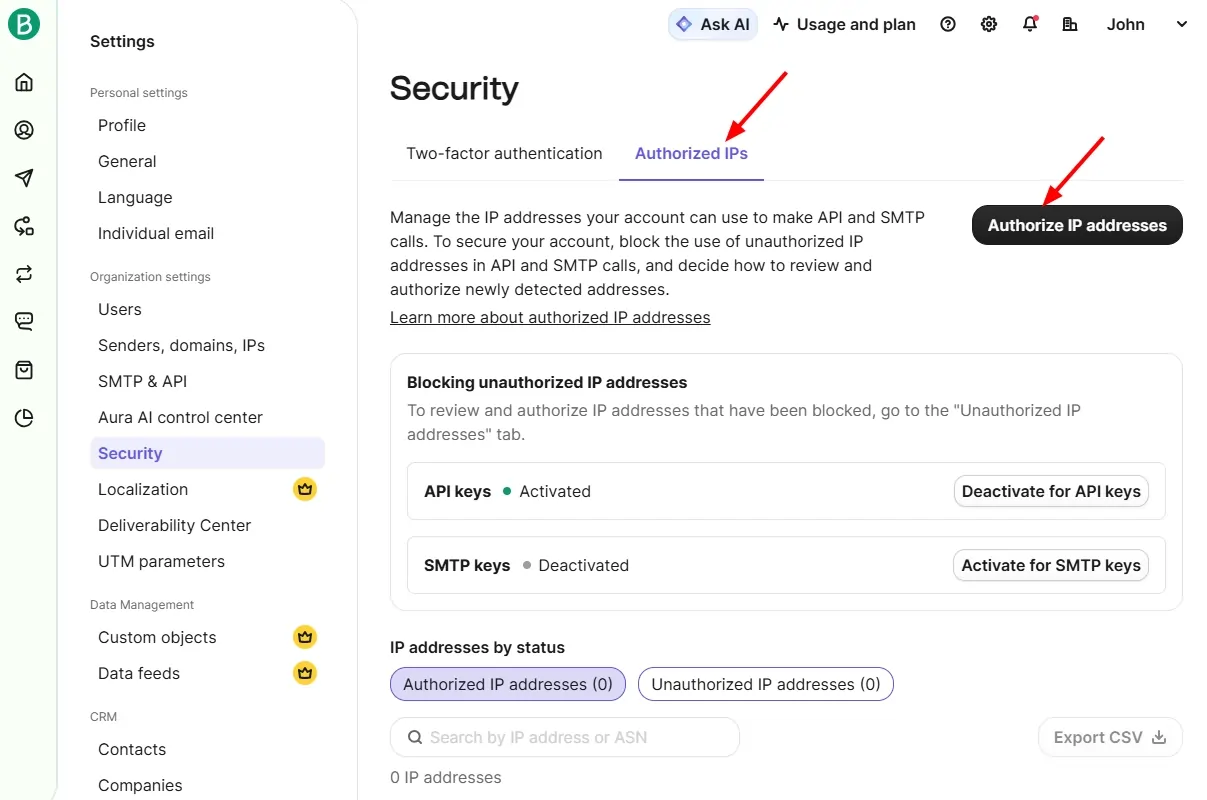
- Click the Settings (⚙️) in the top right corner, then select Security under Organization settings.
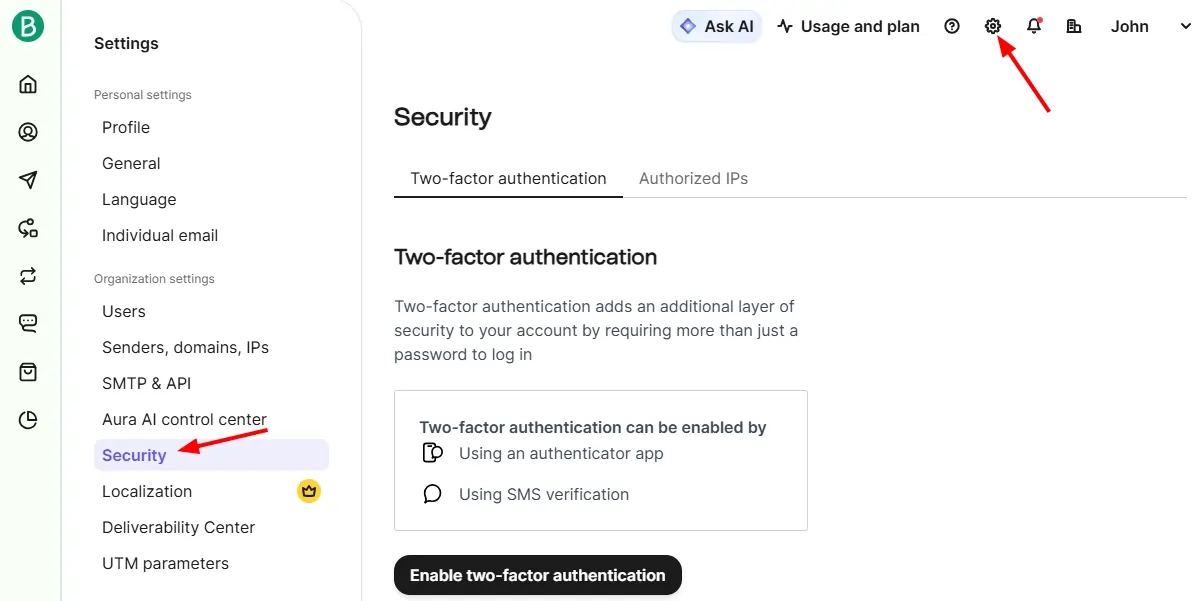
- Select Authorized IPs, then click Authorize IP addresses.
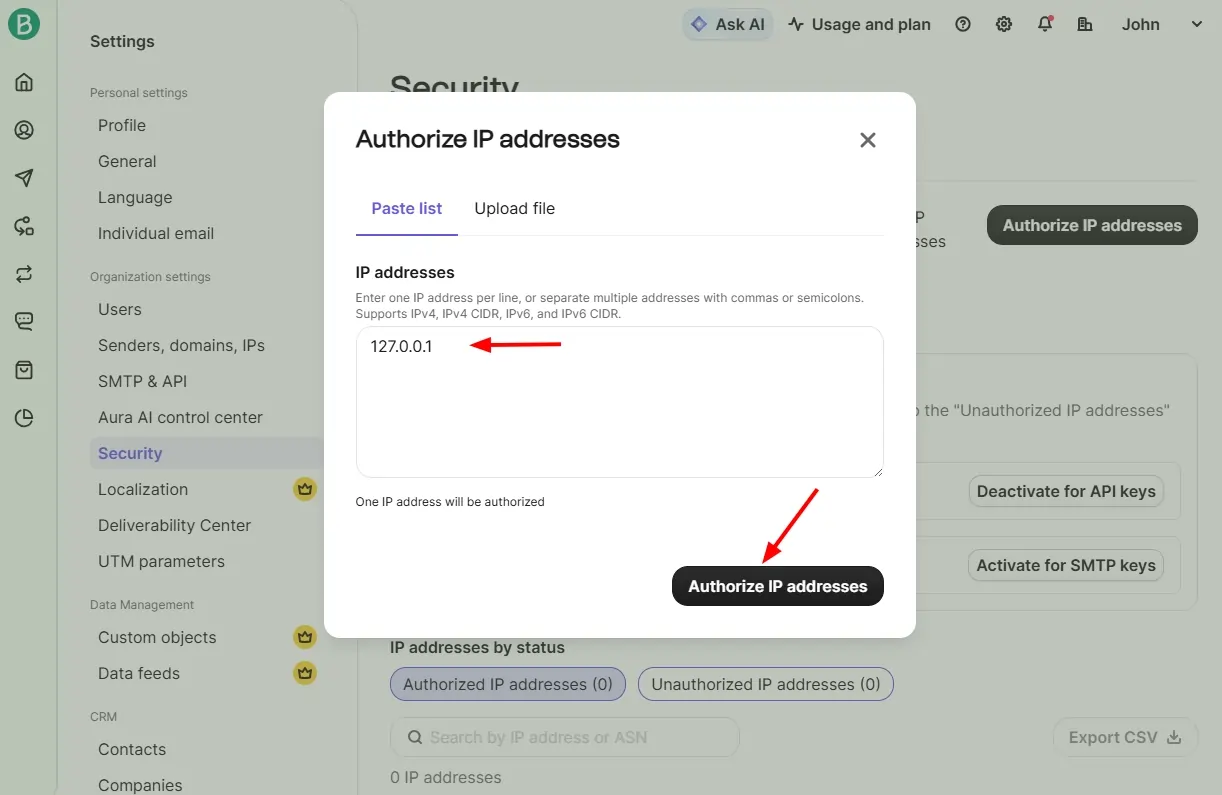
- Paste the copied IP address, then click Authorize IP addresses to confirm.
- Return to Sigsync and connect your Brevo account using your created API key.
Method 2: Authorize the IP through email verification
- When the connection attempt fails, Brevo also sends a Verify a new IP email to your registered email address.
- Open the email and click the option to authorize the new IP address.
- Once authorized, return to Sigsync and connect your Brevo account using your created API key.
Useful Links:
In this manual