-
- Reseller
-
Products
Tailored Product Demo for Your Exact Needs
Explore how our solution delivers efficiency, control, and scalability.
Request a Demo
-
Solutions
Tailored Product Demo for Your Exact Needs
Explore how our solution delivers efficiency, control, and scalability.
Request a Demo
- Dashboard
- Features
- Pricing
HubSpot Integration with Sigsync
Sigsync Office 365 Email Signature Software integrates with HubSpot CRM to help you display different email signatures and banners based on recipient lists. By connecting HubSpot with Sigsync, you can use your existing customer and prospect lists to manage recipient-based signatures without creating separate contact lists.
HubSpot is a CRM platform that helps businesses organize contacts, manage customer relationships, and group people into lists. With HubSpot integration, Sigsync uses these lists to apply relevant email signatures for different recipients.
For example, you can show a product announcement to prospects and a different banner to existing customers. Sigsync checks the recipient conditions in your signature rules and applies the assigned signature when the recipient matches the selected HubSpot list.
How HubSpot Integration Helps Personalize Email Signatures
Connecting HubSpot with Sigsync makes it easier to show relevant email signatures to different customers using your existing CRM lists.
- Use HubSpot contact lists directly in Sigsync without creating separate recipient groups.
- Display different email signatures based on the recipient's HubSpot list.
- Show promotional banners, product offers, or event announcements to specific customer groups.
- Synchronize HubSpot lists to keep recipient information up to date in Sigsync.
- Manage email signatures and banners centrally while using HubSpot lists for recipient targeting.
How to Integrate HubSpot with Sigsync
Setting up HubSpot integration involves two main steps:
Step 1: Connect Your HubSpot Account
Start by connecting your HubSpot account to Sigsync. This allows Sigsync to access the HubSpot list information required for recipient-based email signature rules.
- Login to your Sigsync Dashboard.
- Navigate to the ‘Integrations’ tab and select ‘HubSpot Integration with Sigsync’.
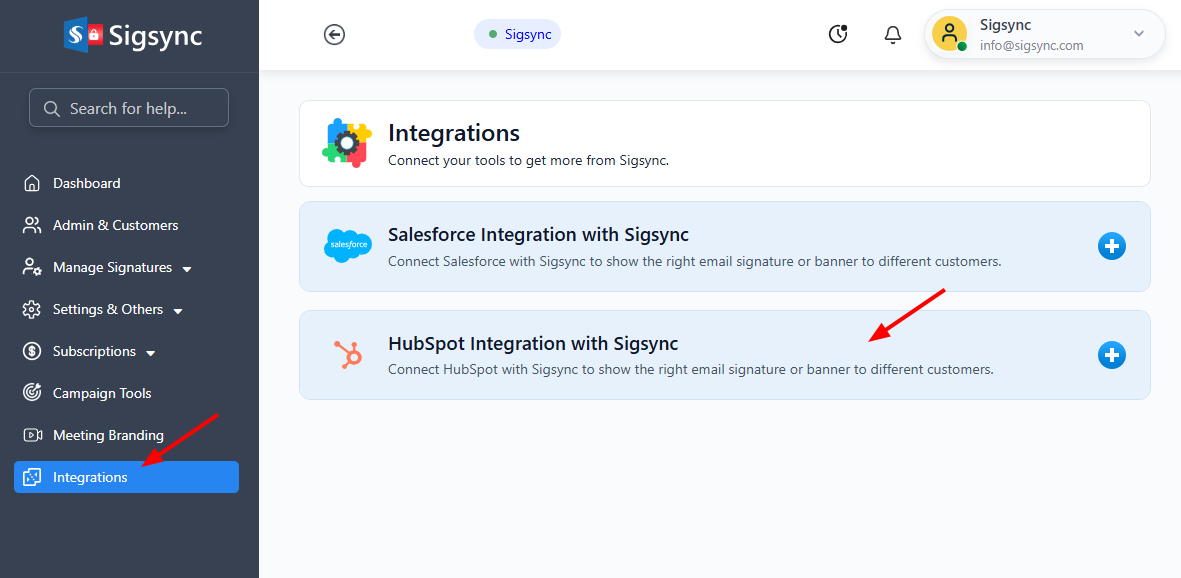
- Click ‘Connect to HubSpot’.
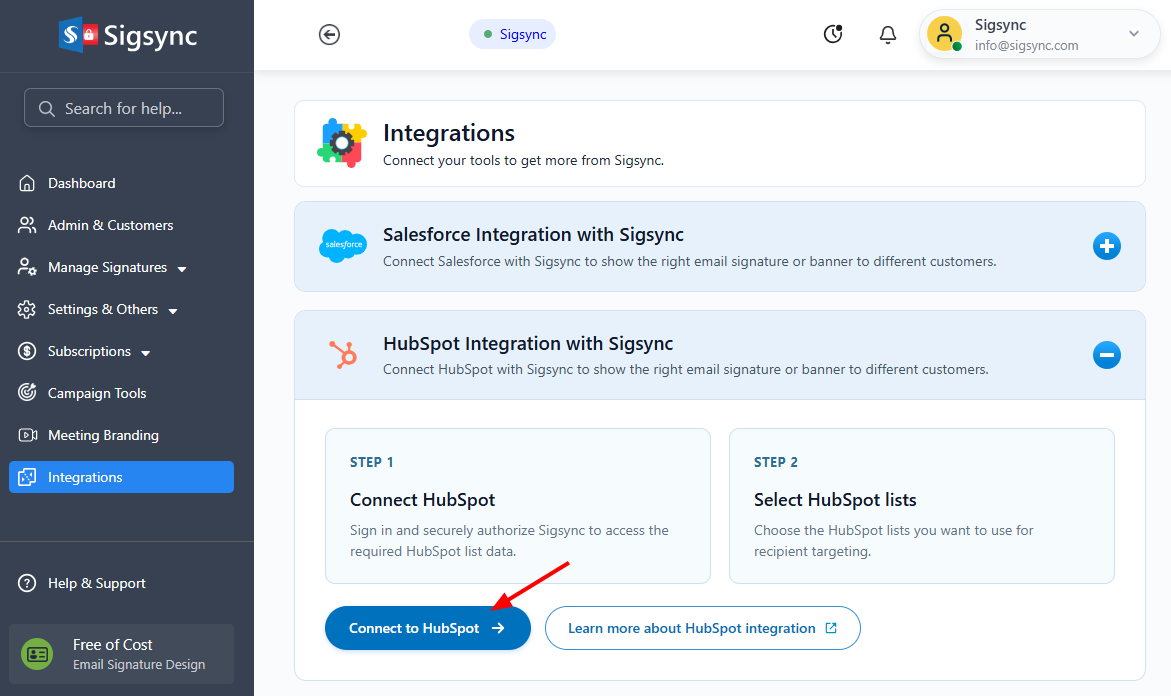
- Sign in to your HubSpot account.
- Select the HubSpot account you want to connect, if you have access to multiple accounts.
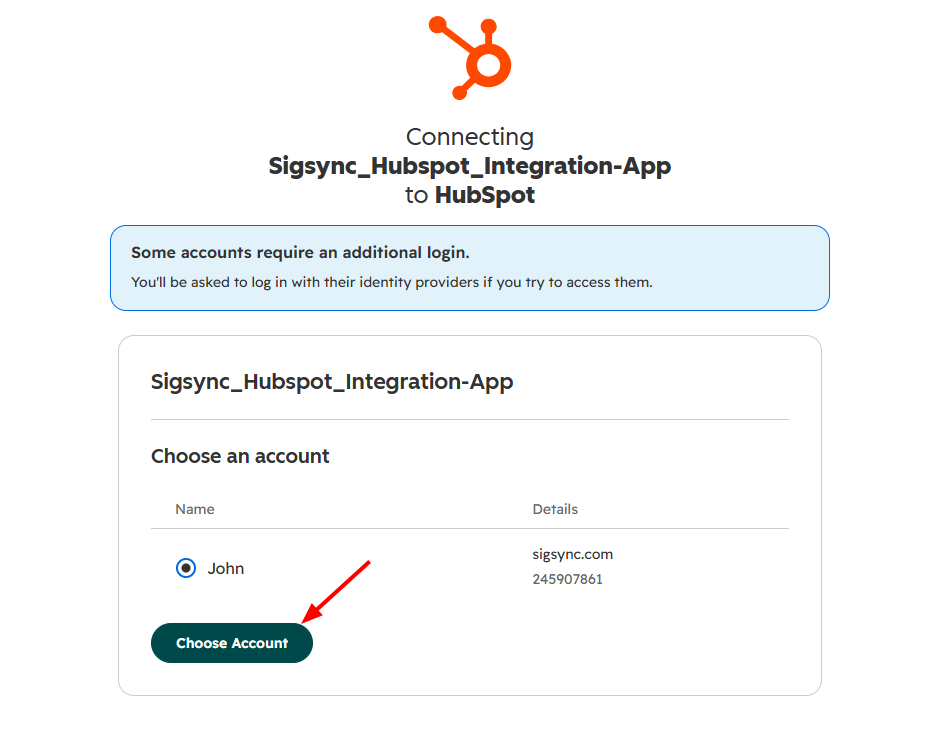
- Review the requested permissions and authorize Sigsync.
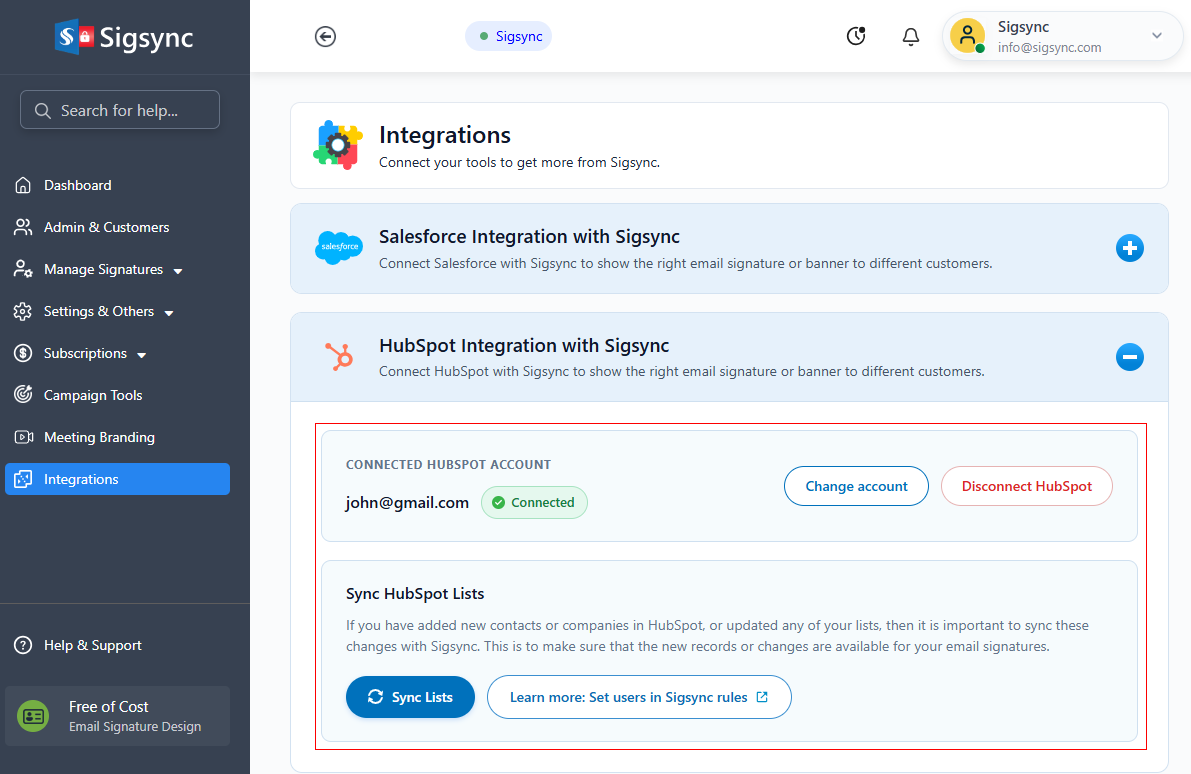
- Complete the connection process and verify that your HubSpot account shows the ‘Connected’ status in Sigsync.
Step 2: Configure Signature Rules Using HubSpot Lists
After connecting HubSpot, you can use its lists to control which signature appears when sending emails to different recipients.
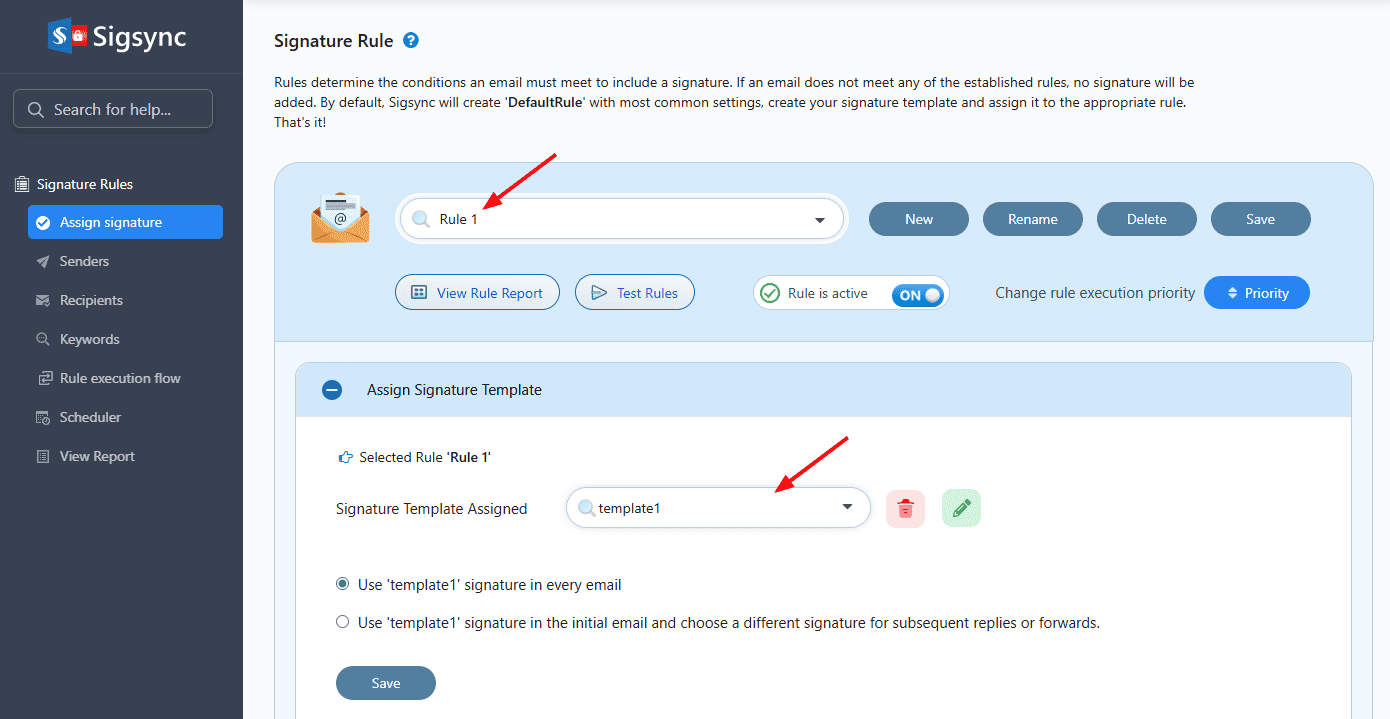
- Navigate to the ‘Signature Rules’ tab from the Sigsync dashboard.
- Select an existing signature rule or create a new one, then choose the signature template you want to apply.
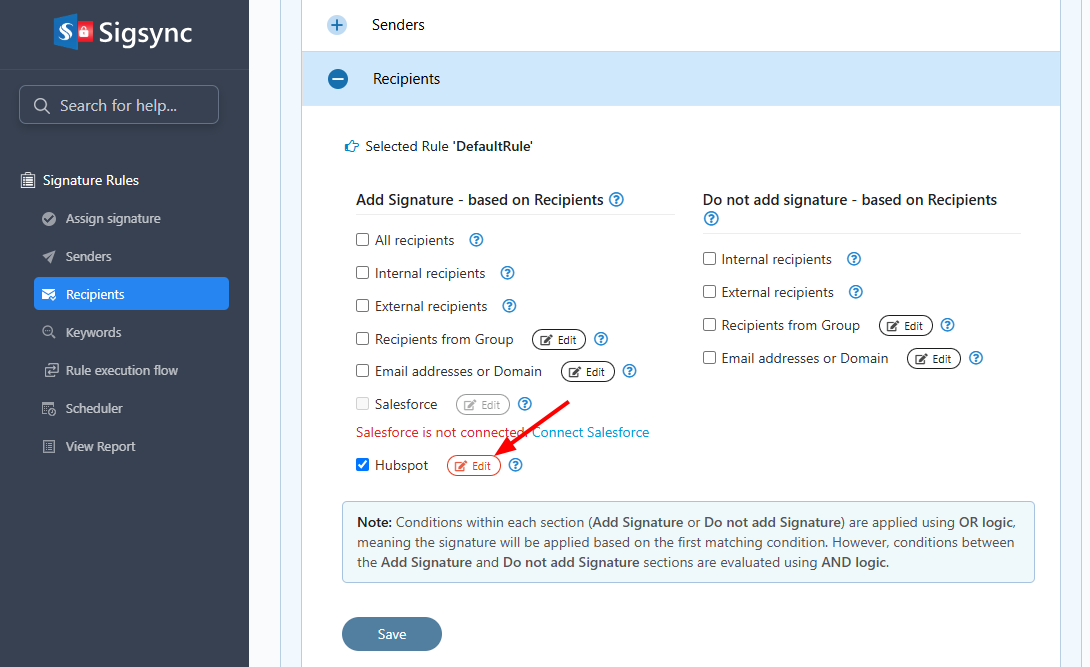
- Under the ‘Recipients’ tab, select the ‘HubSpot’ checkbox and click ‘Edit’.
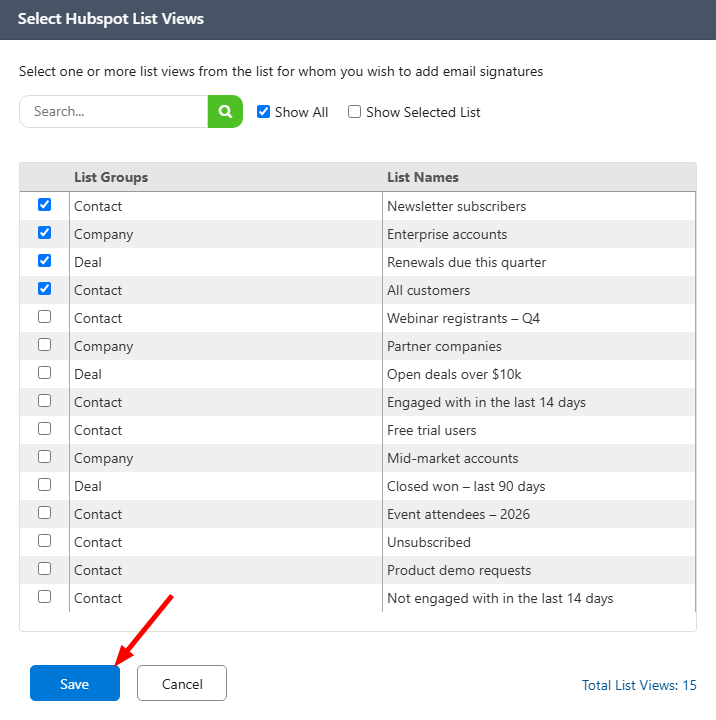
- Select the HubSpot list for the recipient condition and save the signature rule.
When you send an email to a recipient in the selected HubSpot list, Sigsync applies the signature assigned to that rule.
Verify Your HubSpot-Based Email Signatures
After configuring the signature rule, send a test email to confirm that it works as expected.
- Choose a recipient from the selected HubSpot list.
- Send a test email to that recipient.
- Check whether the correct email signature appears.
- Verify that the banner, images, and links are displayed correctly.
- Send another email to a recipient outside the selected list to verify that the appropriate signature is applied.
Note: If you recently updated a HubSpot list, make sure the latest changes are synced with Sigsync before testing.
Personalize Email Signatures for Different HubSpot Lists
With Sigsync, you can use different HubSpot lists to show relevant email signatures and banners to specific recipients.
For example:
- Potential customers: Show a product demo or promotional banner.
- Existing customers: Display support information or product updates.
- Event attendees: Share upcoming events or special offers.
Simply assign each HubSpot list to a different signature rule in Sigsync.
Note: If a recipient belongs to multiple HubSpot lists, check the signature rule priority to ensure the correct signature is applied.
Keep Your HubSpot Contact Lists Up to Date
When you add new contacts, companies, and deals in HubSpot, or update existing lists, you can synchronize those changes with Sigsync. This helps keep the recipient information used in your signature rules current.
To synchronize your HubSpot lists:
- Make the required contact or list changes in HubSpot.
- Log in to Sigsync and go to ‘Integrations’ → ‘HubSpot Integration with Sigsync’.
- Click ‘Sync Lists’.
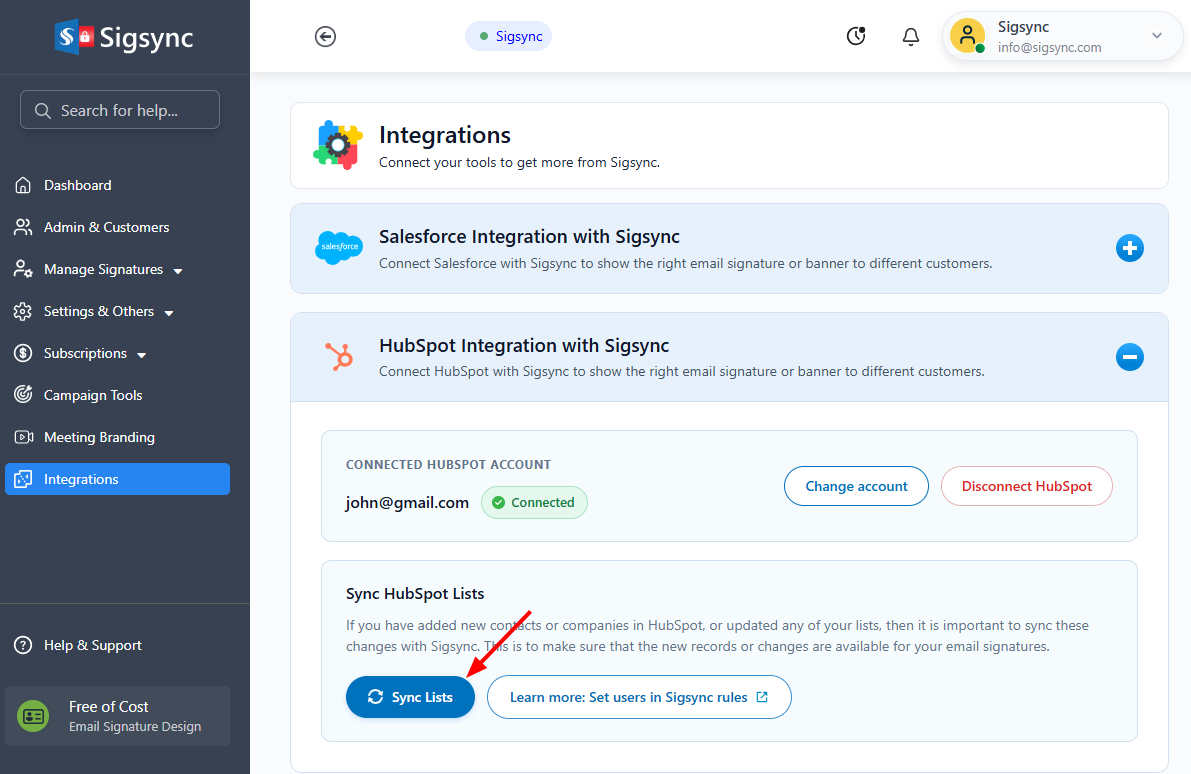
- Once synchronization is complete, check that the updated list information is available in Sigsync.
Note: A minimum gap of 30 minutes is required between HubSpot list sync requests.
Manage Your Connected HubSpot Account
Sigsync also allows you to manage your HubSpot connection directly from the Integrations section.
Change your HubSpot account
If you need to use a different HubSpot account, open Integrations → HubSpot Integration with Sigsync and click Change account. Follow the connection steps to authorize the account you want to use.
After switching accounts, review your existing signature rules to ensure the required HubSpot lists are available.
Disconnect HubSpot
To remove the connection, open the HubSpot integration section and click Disconnect HubSpot. Follow any confirmation prompts displayed.
Once the account is disconnected, Sigsync will no longer be able to synchronize lists from that HubSpot account. Review any signature rules that depend on those lists before disconnecting.